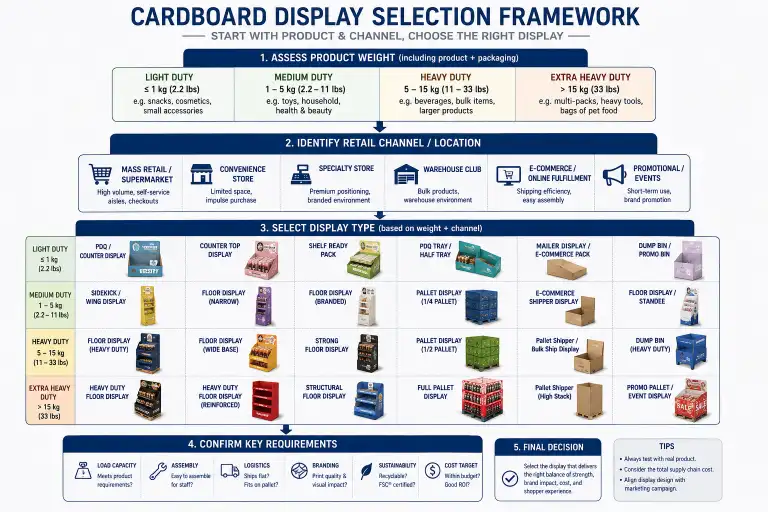
Core Principle
Do not start with the display. Start with the product.
Selection order:
Product → Weight → Retail Channel → Display Location → Display Type → Material → Structure
01 Product Assessment
01.1 Product Weight
| Weight Range | Display Type Options | Risk Level |
|---|---|---|
| < 1 kg | Counter Display, PDQ Display, Peg Display | Low |
| 1–3 kg | PDQ Display, Floor Display (1–2 shelves) | Low |
| 3–10 kg | Floor Display, Sidekick, PDQ (reinforced) | Medium |
| 10–50 kg | Floor Display (heavy-duty), Half Pallet Display | Medium |
| 50–200 kg | Full Pallet Display, Pallet Display (double-wall) | High |
| > 200 kg | Pallet Display (engineered, double-wall or triple-wall) | High |
Key rule:
Weight unknown → Display type cannot be confirmed.
01.2 Product Size
| Size Category | Example | Suitable Display Type |
|---|---|---|
| Fits in one hand | Lipstick, snack bar, phone case | Counter Display, Peg Display, PDQ |
| Box-sized | Cereal box, shoe box, toy box | Floor Display, PDQ, Sidekick |
| Bulky | Large bottle, tool set, bag | Floor Display, Dump Bin, Pallet Display |
| Irregular shape | Plush toy, sports equipment | Dump Bin, Custom Floor Display |
Key rule:
Product dimensions must include packaging. A product without packaging dimensions is an incomplete specification.
01.3 SKU Count
| SKU Count | Recommended Display Type | Compartment Requirement |
|---|---|---|
| 1 SKU | PDQ Display, Counter Display | Single compartment, no dividers needed |
| 2–5 SKUs | Floor Display, Sidekick, PDQ (multi-compartment) | Dividers or separate lanes |
| 6–15 SKUs | Floor Display, Pallet Display | Multiple shelves, labeled compartments |
| 15+ SKUs | Floor Display (large), Pallet Display (multi-tier) | Complex layout, planogram required |
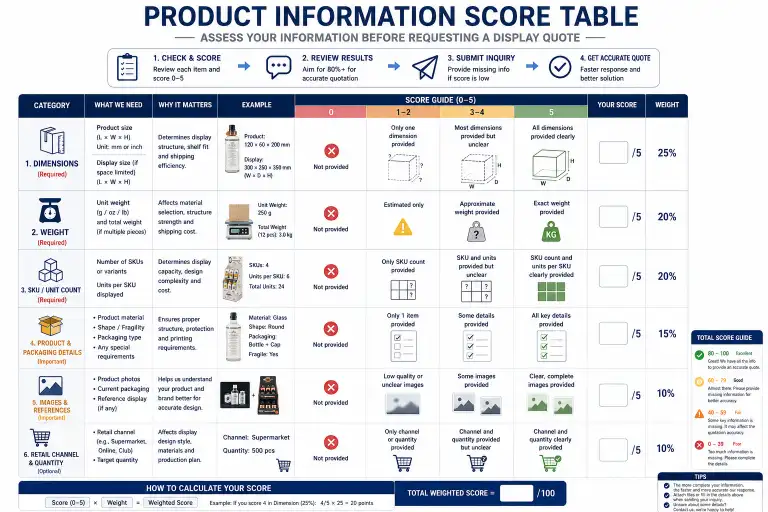
01.4 Product Information Score
Score your project before proceeding.
| Item | Points | Your Score |
|---|---|---|
| Product dimensions confirmed | 20 | /20 |
| Product weight confirmed | 20 | /20 |
| SKU count and quantity confirmed | 15 | /15 |
| Packaging type confirmed | 10 | /10 |
| Total | 65 | /65 |
Score < 50 → Stop. Do not proceed to design. Collect missing information first.
02 Retail Channel Assessment
Walmart
Keywords: High Volume, Low Cost, Fast Replenishment
Recommended display types:
- PDQ Display (shelf-ready)
- SRP (shelf-ready packaging)
- Half Pallet Display (action alley)
- Full Pallet Display (pallet program)
Risk level: ★★★★☆
Must confirm before design:
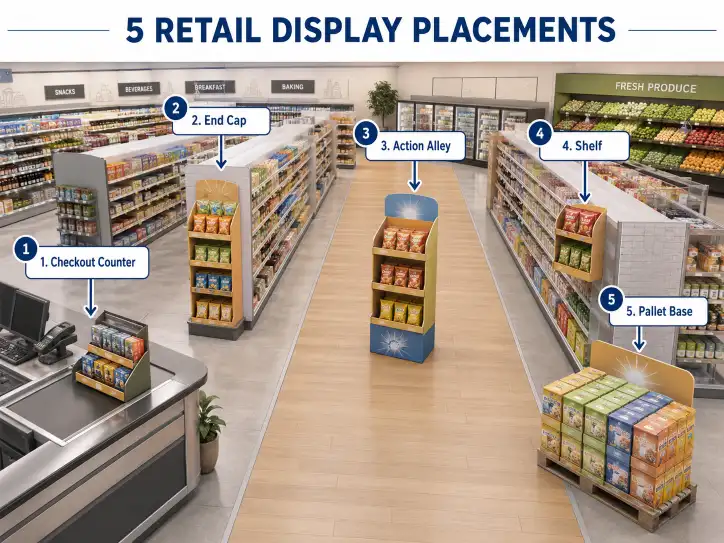
- Display location: Shelf / End Cap / Action Alley
- Product weight per unit
- Store assembly or pre-assembled
- Pallet size (48" x 40" GMA standard)
Avoid: Complex structures with high unit cost.
For Walmart-specific requirements, see [[Walmart Pallet Display Requirements Guide|Walmart Display Requirements]] and [[Walmart PDQ Display & Shelf-Ready Packaging Guide|Walmart PDQ & SRP Guide]].
Costco
Keywords: Warehouse, Bulk Selling, Pallet Ready
Recommended display types:
- Full Pallet Display
- Half Pallet Display
- PDQ Pallet Display (for food products)
Risk level: ★★★★★
Must confirm before design:
- Pallet size: 48" x 40" GMA pallet
- Total pallet weight (including product)
- Forklift access required
- Floor-ready presentation
- Display height restriction (usually 72" including pallet)
Avoid: Displays that cannot be moved by forklift.
See [[Costco Display Approval Process|Costco Display Approval Guide]] for detailed compliance requirements.
Target
Keywords: Brand Experience, Clean Design, Premium Presentation
Recommended display types:
- Floor Display (branded FSDU)
- Sidekick Display (end-cap)
- PDQ Display (shelf)
Risk level: ★★★☆☆
Must confirm before design:
- Display height limit (typically 54"–66")
- Brand graphic requirements
- Store assembly capability
- plano gram compliance
Aldi / Lidl
Keywords: Discount Retail, Efficiency, Low Cost
Recommended display types:
- SRP (shelf-ready packaging)
- Simple Floor Display (FSDU)
- Pallet Display (bulk promotion)
Risk level: ★★★☆☆
Avoid: Complex structures, multiple components, slow assembly.
Warehouse Clubs (Sam's Club, BJ's)
Keywords: Bulk, Pallet, High Volume
Recommended display types:
- Full Pallet Display
- Half Pallet Display
- Pre-filled Pallet Display
Risk level: ★★★★☆
Must confirm before design:
- Pallet footprint
- Total weight
- Whether display is pre-filled at factory
- Labeling requirements (GS1-128, SSCC-18)
Pharmacy / Drugstore (CVS, Walgreens)
Keywords: Small Footprint, Impulse, Easy Restock
Recommended display types:
- Counter Display
- Sidekick Display
- PDQ Display
- Floor Display (narrow footprint)
Risk level: ★★☆☆☆
Must confirm before design:
- Display width restriction (typically 12"–24")
- Planogram compliance
- Store assembly method
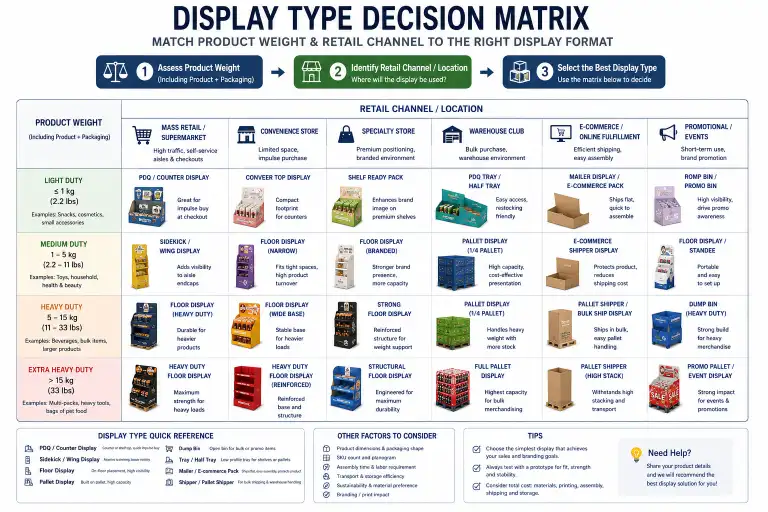
03 Display Type Decision Matrix
| Product Weight | Retail Channel | Display Location | Recommended Display | Risk |
|---|---|---|---|---|
| < 1 kg | Any | Checkout Counter | Counter Display | Low |
| < 1 kg | Pharmacy | Shelf | PDQ Display | Low |
| 1–3 kg | Grocery | Shelf | PDQ Display | Low |
| 1–3 kg | Mass Retail | End Cap | Floor Display (1–2 shelves) | Medium |
| 3–10 kg | Mass Retail | End Cap / Aisle | Floor Display | Medium |
| 3–10 kg | Club Store | Pallet Base | Half Pallet Display | Medium |
| 10–50 kg | Club Store | Main Aisle | Full Pallet Display | High |
| 10–50 kg | Mass Retail | End Cap | Floor Display (heavy-duty) | Medium |
| 50–200 kg | Club Store | Main Aisle | Full Pallet Display (double-wall) | High |
| Any | Any | Side of Shelf | Sidekick Display | Low |
| Any | Any | Aisle / Seasonal | Dump Bin Display | Low |
04 Material Selection Guide
Board Grade by Weight
| Board Grade | Flute Type | Thickness | Max Recommended Load per Shelf |
|---|---|---|---|
| Single-wall | E-flute | 1.5 mm | < 3 kg |
| Single-wall | B-flute | 2.8 mm | 3–8 kg |
| Single-wall | C-flute | 3.8 mm | 5–12 kg |
| Double-wall | BC-flute | 5.5 mm | 10–25 kg |
| Double-wall | EB-flute | 4.5 mm | 8–20 kg |
| Triple-wall | A-flute combo | 8+ mm | 25–50 kg |
Key rule:
Board grade must be selected based on the heaviest shelf load, not the average load.
For a full breakdown of flute types and board grades, see [[Corrugated Grades Explained- How to Choose the Right Material for Displays|Corrugated Grades Explained: How to Choose the Right Material for Displays]].
Printing Method by Quantity
| Order Quantity | Recommended Printing | Quality | Cost per Unit |
|---|---|---|---|
| 1–200 units | Digital printing | High | Higher |
| 200–2,000 units | Litho-laminate | Very high | Medium |
| 2,000+ units | Flexo printing | Good | Lower |
05 Red Flags
Any of these conditions requires a stop before proceeding.
🔴 Stop Conditions
| Condition | Risk | Action Required |
|---|---|---|
| Product weight unknown | Cannot choose board grade | Request weight data |
| No retailer specified | Cannot confirm size or compliance | Ask for target retailer |
| Only product photo provided | Dimensions may be wrong | Request actual dimensions |
| Display location not confirmed | Wrong display type likely | Confirm shelf / end cap / pallet base |
| Launch date is 2 weeks away | Cannot meet timeline | Discuss expedited options or air freight |
| No artwork files ready | Printing cost unknown | Start artwork preparation |
| Quantity below MOQ | May not be feasible | Check MOQ with factory |
See [[Cardboard Display MOQ Guide|Cardboard Display MOQ Guide]] and [[Cardboard Display Lead Time- Production Timeline Explained|Cardboard Display Lead Time Guide]] for details on minimum orders and production timelines.
06 Decision Flow
Follow this sequence for every new display project.
Step 1: Product Assessment
Confirm product weight, dimensions, SKU count, and packaging type.
Score ≥ 50 → Proceed
Score < 50 → Stop and collect information
Step 2: Channel Assessment
Identify the target retailer and display location.
Check retailer-specific requirements for height, footprint, and labeling.
Step 3: Display Type Selection
Use the decision matrix to select the recommended display type.
Consider:
- Product weight and size
- Retail channel requirements
- Display location
- Budget and timeline
Step 4: Material Selection
Select board grade based on maximum shelf load.
Select printing method based on order quantity.
Step 5: Risk Assessment
Check red flags. If any red flag is present, resolve before proceeding.
Step 6: Sample and Approve
Make a blank sample for structure and fit check.
Make a printed sample for color and artwork confirmation.
Approve sample before mass production.
See [[Cardboard Display Sample Approval Checklist- What to Check Before Mass Production|Sample Approval Checklist]] for a full walkthrough of what to check before approving production.
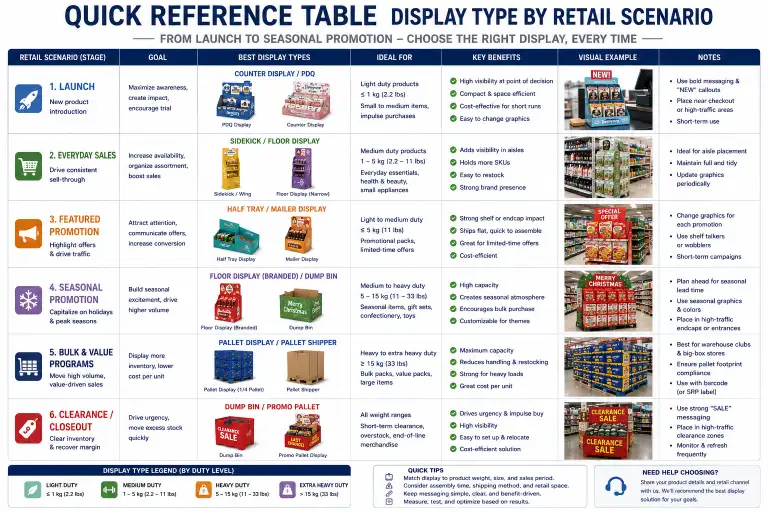
07 Quick Reference: Display Type by Scenario
| Scenario | Recommended Display |
|---|---|
| New product launch, single SKU, shelf placement | PDQ Display |
| Impulse buy at checkout | Counter Display |
| Seasonal promotion, bulk quantity | Pallet Display |
| Brand campaign, end-cap placement | Floor Display |
| Small add-on product, side of shelf | Sidekick Display |
| Loose product, promotional bin | Dump Bin Display |
| Hanging packaged product | Peg Display |
| Club store, bulk sales, pallet program | Pallet Display |
For a visual overview of the full manufacturing process, see [[Cardboard Display Manufacturing Process- From Design to Export Packing|Cardboard Display Manufacturing Process: From Design to Export Packing]].