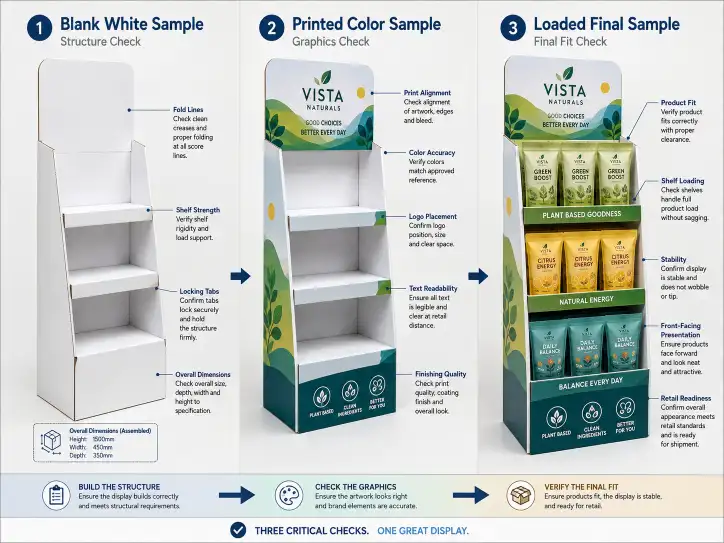
The sample stage is the most important risk control point in any custom cardboard display project. A properly checked sample catches structural problems, print issues, and fit errors before they become costly production mistakes. A skipped or rushed sample approval is the most common cause of displays that arrive at the warehouse with the wrong dimensions, weak joints, off-register prints, or products that do not fit.
This guide covers what to check at each stage of the cardboard display sample process — from the blank structural sample through the printed sample to the pre-production sample — with a checklist buyers can use to compare samples from different factories and confirm the display is ready for bulk production.
Why the Sample Stage Matters
A custom cardboard display is a structural product — it holds real products, sits in a real retail environment, and must survive real shipping. Unlike a printed flyer or a digital design, a display that looks correct on screen can fail in three ways that only a physical sample reveals:
- Structural failure — the product does not fit, the shelf does not hold the weight, the lock tabs do not engage, or the display collapses during assembly.
- Print misalignment — the print looks correct on a flat sheet but is misaligned after folding, or the color shifts between the screen proof and the production run.
- Assembly or packing issue — the display takes too long to assemble, the packing method damages the display in transit, or the store staff cannot set it up correctly.
Every one of these problems can be caught at the sample stage. None of them can be fixed after bulk production without significant cost and delay. The sample is not a formality — it is the factory's last chance to prove the design works and the buyer's last chance to make corrections before committing to full production.
Note: Leader Display has been manufacturing cardboard displays and paper packaging since 2008. The sample process described below reflects the standard workflow used for export projects serving the US, Australia, the UK, and European markets.
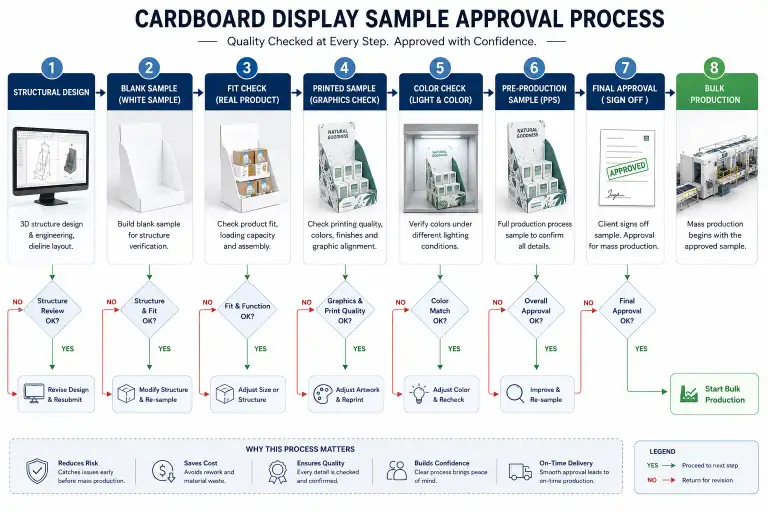
Types of Samples in a Cardboard Display Project
Most custom display projects involve three types of samples, each serving a different purpose:
| Sample type | What it proves | When to request | Cost |
|---|---|---|---|
| Blank sample (white sample) | Product fit, structure, assembly logic, dimensions | After dieline approval, before printing | Low — no printing setup cost |
| Printed sample | Color accuracy, print registration, finish appearance | After blank sample approval | Medium — includes printing setup |
| Pre-production sample | Final confirmation with production materials and method | After printed sample approval, before bulk run | Medium — same as printed sample |
Some factories also offer a digital mockup (3D rendering) before the blank sample. A digital mockup is useful for visualizing the structure and graphics, but it cannot replace a physical blank sample for confirming product fit and structural integrity.
Blank Sample Checklist: What to Check First
The blank sample is made from the same board grade as the production run but without printing. It is the cheapest and fastest sample, and it is where most structural issues should be caught.
1. Product Fit
| Check point | What to look for | Pass/fail criteria |
|---|---|---|
| Product fits in the designated space | Insert the product into each shelf, tray, or slot | Product slides in and out without forcing. No gap larger than 5 mm around the product |
| Product loading direction is correct | Check which side of the product faces the customer | The branded side of the product is visible when the display is stocked |
| Product height clears the shelf above | Close the display or check clearance above each row | At least 10 mm clearance between product top and the shelf above |
| Multiple SKUs have correct placement | Load each SKU into its assigned position | Each SKU fits its assigned space. No SKU overlaps into another position |
2. Structure and Assembly
| Check point | What to look for | Pass/fail criteria |
|---|---|---|
| Display assembles correctly | Assemble the display following the intended method | All lock tabs engage securely. No pieces are missing or misaligned |
| Joints and lock tabs hold | Apply light pressure to each joint | Joints do not separate under normal handling pressure |
| Display stands level on a flat surface | Place the assembled display on a flat floor or table | No rocking. All four corners (or the full base) contact the surface |
| Shelf strength | Place the product on each shelf | Shelf does not sag or bend under the product weight |
| Overall stability | Load the display with full product and apply light side pressure | Display does not tip over. Structure does not twist or rack |
3. Dimensions
| Check point | What to look for | Pass/fail criteria |
|---|---|---|
| Overall height | Measure from the floor to the highest point | Matches the specified height within ±3 mm |
| Width and depth | Measure at the widest and deepest points | Matches the specified footprint within ±3 mm |
| Shelf height and spacing | Measure from shelf surface to shelf surface | Each shelf is at the specified height. Products fit between shelves |
| Pallet footprint (if applicable) | Measure the base dimensions | Matches the pallet size (typically 48 × 40 in for GMA pallets) |
4. Board Grade
| Check point | What to look for | Pass/fail criteria |
|---|---|---|
| Board thickness | Measure with a caliper | Matches the specified board grade (E-flute ~1.5 mm, B-flute ~2.8 mm, C-flute ~3.8 mm) |
| Board quality | Inspect the fluting and liner | No visible crush damage, no delamination, no moisture spots |
Related: See our [[Display Materials Guide|Display Materials Guide]] for board grade specifications.
Printed Sample Checklist: Color, Finish, and Registration
Once the blank sample is approved, the factory produces a printed sample. This sample includes the full printing and finishing process that will be used in production.
1. Color Accuracy
| Check point | What to look for | Pass/fail criteria |
|---|---|---|
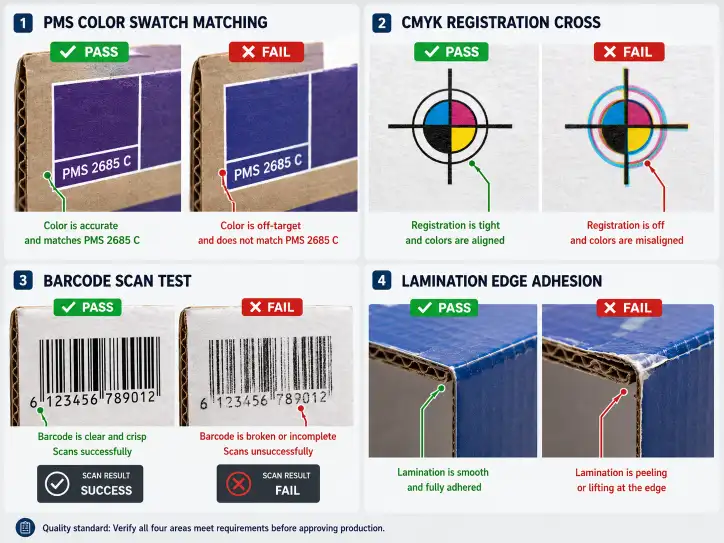
| PMS (Pantone) color match | Compare printed colors to the PMS swatch under daylight-equivalent lighting | Colors match within visual tolerance. No significant hue shift |
| CMYK color balance | Compare to the approved digital proof | Overall color balance matches the proof. Skin tones and brand colors are accurate |
| Color consistency across panels | Compare the same color on different panels of the sample | No visible variation between panels |
| White ink / unprinted areas | Check areas that should remain unprinted | No ink fogging or overspray in unprinted areas |
2. Print Registration
| Check point | What to look for | Pass/fail criteria |
|---|---|---|
| Multi-color registration | Check where two colors meet | No visible misregistration. Color boundaries are sharp |
| Print-to-dieline alignment | Check that printed elements align with the die cut and crease lines | No critical printed element (logo, text, product image) is cut off or folded over by a crease |
| Text legibility | Read all text on the assembled sample | All text is readable. No text is obscured by folds or cut lines |
3. Finishing and Surface Quality
| Check point | What to look for | Pass/fail criteria |
|---|---|---|
| Lamination or coating quality | Inspect the surface under good lighting | No bubbles, no delamination, no scratches, no uneven coating |
| Gloss or matte finish matches specification | Compare to the standard | The finish level matches what was specified (gloss, matte, soft touch, or UV) |
| Ink rub resistance | Rub a dry white cloth across a printed area | No ink transfer to the cloth. This is critical for displays that will be handled during store setup |
4. Barcodes and Retail Labels
| Check point | What to look for | Pass/fail criteria |
|---|---|---|
| Barcode readability | Scan the barcode with a retail scanner | Barcode scans correctly on the first attempt |
| Barcode placement | Confirm the barcode is on the correct panel and orientation | Barcode is positioned as specified in the retailer's guidelines |
| Retail labels | Check that all required labels (UPC, SKU, price) are present and correctly placed | No missing labels. No label positioned where it will be covered by the display structure |
Pre-Production Sample Checklist: Final Confirmation
The pre-production sample is made using the same board, printing, finishing, and assembly method as the bulk production run. It is the final confirmation before the factory starts full production.
| Check point | What to verify | Why it matters |
|---|---|---|
| Same board grade as production | Confirm the sample uses the production board, not a thicker or thinner grade for the sample only | Some factories use thicker board for samples to hide structural weakness |
| Same printing method | Confirm the sample uses the production printing method (flexo, offset, or digital) | Offset sample quality is not representative of flexo production quality |
| Same finishing | Confirm the sample uses the production lamination or coating | Sample with a different finish will look and feel different in production |
| Same packing method | Confirm the sample is packed in the production packing configuration | Packing method affects shipping protection and in-store setup |
| Assembly instruction | Check that assembly instructions are clear and accurate | Store staff will follow these instructions. Unclear instructions cause setup errors |
| Sample retention | Keep one approved pre-production sample as the production quality reference | The factory should match the production run to the approved sample |
How to Compare Samples from Different Factories
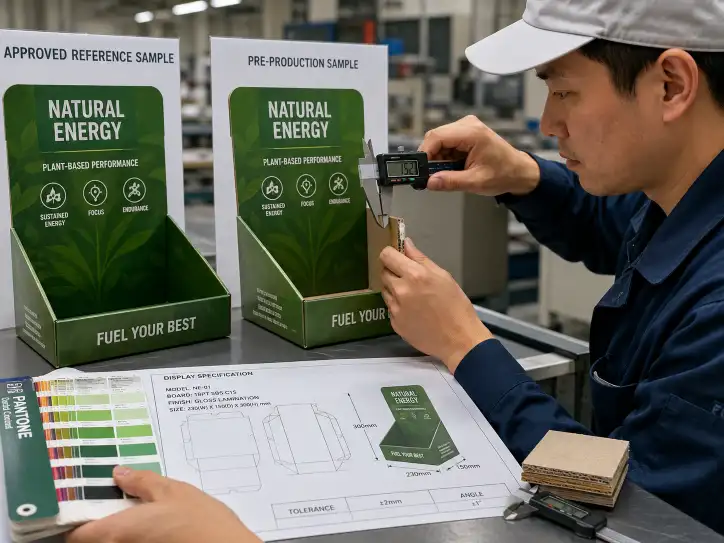
When evaluating multiple factories, comparing samples side by side reveals differences that are not obvious when looking at one sample alone.
| Comparison criteria | What to check | Why it matters |
|---|---|---|
| Board grade consistency | Measure the board thickness of each sample | A factory using thicker board may be compensating for weaker structure |
| Print quality at 1 meter distance | Place samples side by side and view from 1 meter away | The sample that holds color and sharpness at retail distance will perform better in stores |
| Assembly time | Time how long it takes to assemble each sample | A display that takes 30 seconds to assemble costs less in-store labor than one that takes 3 minutes |
| Product fit precision | Check how snugly the product fits in each sample | Overly loose fit means the product can shift during shipping. Overly tight fit means store staff will struggle to stock it |
| Joint quality | Compare lock tab engagement and glue joint strength | Weak joints in the sample will be weaker in production at higher volumes |
| Packing quality | Compare how each sample is packed for shipping | Better packing reduces transit damage and receiving problems |
For more on comparing factories beyond the sample, see our [[Find a Reliable Cardboard Display Manufacturer in China|Guide to Finding a Reliable Cardboard Display Manufacturer]].
Common Sample Issues and How to Fix Them
Issue 1: Product does not fit the shelf or tray
Cause: The product dimensions provided to the factory did not include the outer packaging, or the clearance allowance was too small.
Fix: Measure the product in its final retail packaging (including any poly bag, box, or wrapping) and provide updated dimensions. Request a revised blank sample before moving to the printed sample.
Issue 2: Print is misaligned after folding
Cause: The dieline was changed after the artwork was designed, or the artwork was not adjusted for print-to-dieline alignment.
Fix: Confirm the dieline is final before the artwork is created. The art file should be built on the exact dieline template provided by the factory. Fix the art file and request a new printed sample.
Issue 3: Display is unstable when loaded
Cause: The board grade is too thin for the product weight, or the structural design does not account for the load distribution.
Fix: Move to a thicker board grade (e.g., B-flute instead of E-flute) or add structural reinforcements (gussets, lock tabs, or additional support panels). Confirm the fix with a new blank sample.
Issue 4: Color does not match the brand standard
Cause: The factory used CMYK build instead of PMS colors, or the printing press was not calibrated for the specific board grade.
Fix: Specify PMS colors in the artwork. Request a printed sample proof before the full production run. If the factory cannot match PMS colors, consider offset printing or a different factory.
Issue 5: Assembly is too difficult or time-consuming
Cause: The structural design requires too many steps, or the assembly instructions are unclear.
Fix: Simplify the structure — reduce the number of lock tabs, combine panels where possible, or switch to a semi-assembled configuration where the factory does the complex assembly. Revise the assembly instructions with step-by-step photos.
Sample Timeline and What Affects It
| Sample stage | Typical time | Notes |
|---|---|---|
| Digital mockup / rendering | 1–2 days | Optional — useful for early visual approval |
| Dieline creation and confirmation | 1–3 days | Based on product dimensions and display type |
| Blank sample making | 1–2 days | Faster for standard structures with existing dies |
| Blank sample shipping to buyer | 3–7 days | Courier-dependent |
| Buyer blank sample review | 1–5 days | Depends on internal approval process |
| Printed sample making | 2–4 days | Requires plate making and printing setup |
| Printed sample shipping to buyer | 3–7 days | Courier-dependent |
| Buyer printed sample review | 1–5 days | Color approval may require multiple rounds |
| Pre-production sample | 2–4 days | Optional — recommended for large orders |
Total typical sample cycle: 2–4 weeks from dieline confirmation to final sample approval. Complex displays with multiple SKUs or special finishes may take 4–6 weeks.
Conclusion
The cardboard display sample approval process has three stages — blank sample, printed sample, and pre-production sample — each catching a different type of risk. The blank sample confirms product fit and structural integrity. The printed sample confirms color accuracy and print registration. The pre-production sample confirms that the production materials and method match the approved sample. Skipping any stage increases production risk.
The most efficient path to a successful display program is to check the blank sample carefully before approving printing, confirm color on the printed sample before approving bulk production, and keep the approved pre-production sample as the quality reference for the factory. These three checkpoints eliminate most of the common problems that cause display projects to fail at the receiving dock or in the retail store.
If you have a cardboard display project in development and need a sample to verify, send us the product dimensions, target quantity, and retail channel. We will produce a blank sample and a printed sample for your approval before moving to bulk production.
FAQ
Why do I need a blank sample before a printed sample?
A blank sample confirms product fit, structure, and assembly without the cost of printing setup. Changes to the structure after printing require reprinting, which adds cost and time.
How long does the sample process take?
The full sample cycle — from dieline confirmation to approved pre-production sample — typically takes 2–4 weeks. Complex displays with multiple SKUs may take 4–6 weeks.
What is the difference between a blank sample and a pre-production sample?
A blank sample is made without printing to check structure and fit. A pre-production sample uses the same board, printing, finishing, and packing method as the bulk production run.
Can I approve a display based on a digital mockup only?
No. A digital mockup shows the appearance but cannot confirm product fit, structural stability, or assembly quality. A physical sample is required before bulk production.
What should I do if the printed sample color does not match my brand?
Specify PMS colors in the artwork and request a printed sample before the full production run. If the factory cannot match PMS colors, consider offset printing or switching to a factory with better color control.
How many samples should I request?
One blank sample and one printed sample is standard for most projects. For large orders (5,000+ units), request a pre-production sample as well. For multi-SKU displays, request a sample with all SKUs loaded.
What is the cost of a cardboard display sample?
Blank samples are typically low cost (material + labor only). Printed samples cost more because they include printing setup. Many factories deduct the sample cost from the bulk order if the order proceeds.
Should I keep the approved sample?
Yes. Keep the approved pre-production sample as a quality reference. The factory should match the production run to the approved sample. If the production run does not match, the sample is your evidence.