Many B2B buyers focus only on how a display looks in the design stage. They pay less attention to how it will be produced, packed, and shipped. That gap between design approval and factory execution is where most problems begin — wrong print finish, weak die-cut tolerances, packing damage during transit, or assembly instructions that make no sense to store staff.
Understanding retail display production and packing helps buyers ask better questions during the quoting stage and catch problems before they become expensive revisions.
This guide walks through the production and packing stages from a factory perspective, so you know what to check at each step.
The Production Flow: From Design to Packing
A typical retail display production run follows this sequence:
Design & Dieline → Die-Making → Material Sourcing → Printing →
Surface Finishing → Die-Cutting → Stripping → Folding/Gluing →
Assembly → Packing → Palletizing → Container Loading
Each stage affects the next. A poorly made die creates bad cuts. Bad cuts cause assembly problems. Assembly problems slow down packing. Packing delays affect shipping.
For B2B buyers, understanding this flow helps you identify where delays or defects are most likely to occur.
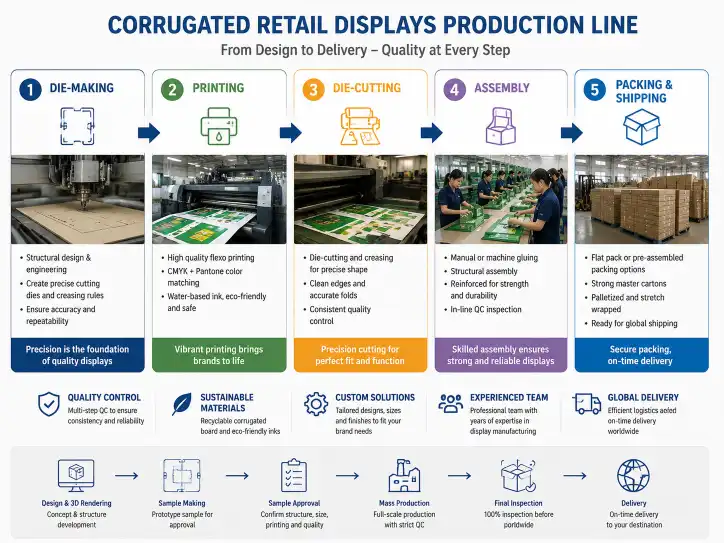
Our PRODUCTION page shows the factory process with detailed images of each stage.
Step 1: Die-Making and Material Preparation
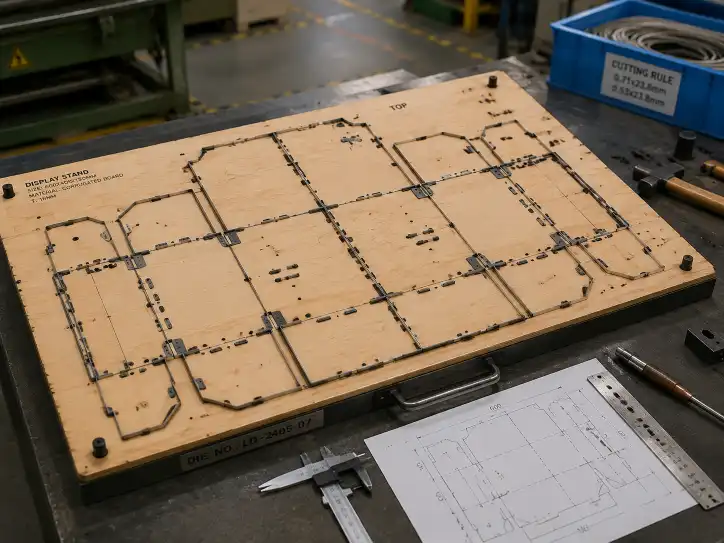
Die-Making
The die is a cutting template used to punch the flat corrugated sheet into the display shape. It is made from laser-cut plywood with embedded steel cutting rules and creasing rules.
What to check:
- Die tolerance: ±0.5 mm is standard. Tighter tolerance costs more but ensures better fit for interlocking parts.
- Crease alignment: Creases must align with the flutes of the corrugated board. Misaligned creases cause cracking at the fold line.
- Sample match: The production die must match the approved sample die. Any changes should be documented.
Material Preparation
Corrugated board is ordered by flute type, board grade, and ECT (Edge Crush Test) rating.
| Board Type | Common Use | ECT Rating |
|---|---|---|
| E-flute | Counter displays, small POS units | 23–28 lbs/inch |
| B-flute | Floor displays, sidekicks, SRP trays | 28–32 lbs/inch |
| BC-flute (double-wall) | Pallet displays, heavy-duty units | 44–55 lbs/inch |
What to check:
- Board grade matches the approved sample specification
- ECT rating meets the retailer's structural requirements
- Material is sourced from the same mill as the sample (board color and surface quality can vary between mills)
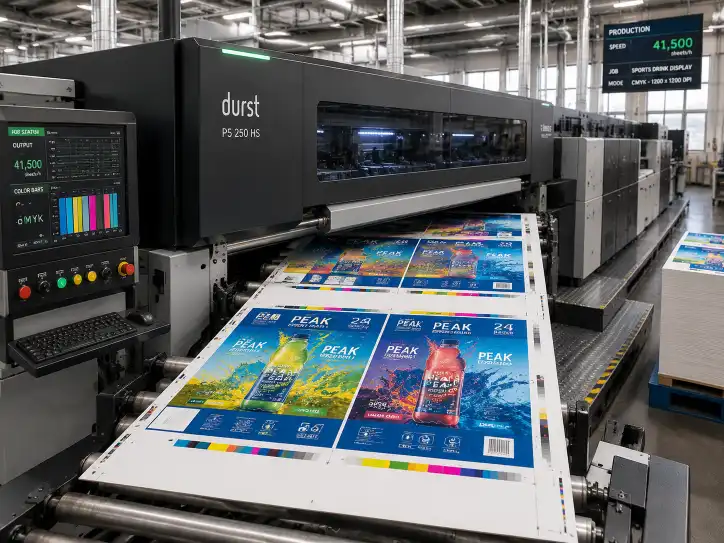
Step 2: Printing
Printing Methods Compared
| Method | Quality | MOQ | Setup Cost | Best For |
|---|---|---|---|---|
| Flexography | 1–3 colors, basic | 1,000+ units | Low-Medium | SRP trays, shipping cases, simple displays |
| Digital (high-speed) | Full CMYK, photo quality | 100+ units | Low | Custom designs, multiple versions, short runs |
| Litho-lamination | Premium, full color | 500+ units | High | High-end retail displays, cosmetics, luxury |
Print Quality Checks
- Color matching: Compare production run against the approved digital proof using a spectrophotometer. Acceptable delta E (color difference) is under 3.0 for standard jobs, under 2.0 for premium jobs.
- Registration: Printed elements must align within 0.5 mm. Misregistration shows as blurry text or overlapping colors.
- Ink coverage: Large solid areas need even coverage without streaks or mottling.
For detailed printing options, see our CONCEPT TO DESIGN page.
Step 3: Surface Finishing
Surface finishing protects the print and improves the display's durability in the retail environment.
| Finish | Purpose | Best For |
|---|---|---|
| Aqueous coating (gloss) | Shiny finish, scuff resistance | Most retail displays |
| Aqueous coating (matte) | Non-reflective, premium feel | High-end cosmetic displays |
| UV coating | High durability, scratch resistance | Counter displays, high-touch areas |
| Lamination (gloss/matte) | Maximum protection | Luxury displays, long-term campaigns |
| Spot UV | Selective highlight areas | Premium branding elements |
What to check:
- Finish type matches the product environment (wet or dry goods, high-touch vs. low-touch)
- Coating does not interfere with glue areas (some coatings reduce glue adhesion)
- UV coating cures fully before die-cutting to prevent cracking
Step 4: Die-Cutting and Creasing
The printed corrugated sheets go through the die-cutting press, which cuts the outline and creases the fold lines in a single operation.
Common Issues in Die-Cutting
| Issue | Cause | Impact |
|---|---|---|
| Incomplete cut | Worn cutting rule | Parts do not separate cleanly |
| Over-compressed board | Too much pressure | Crushed flutes, weakened structure |
| Misaligned crease | Poor die setup | Cracking at fold line |
| Rough edge | Dull cutting rule | Poor visual finish, assembly difficulty |
What to check:
- Request in-process inspection at the die-cutting stage
- Check that stripped waste (scrap board) is completely removed
- Compare the cut sample against the approved die blueprint

Step 5: Folding, Gluing, and Assembly
Assembly Levels
| Level | Description | When to Use |
|---|---|---|
| Flat (KDF) | Display ships flat, assembled in store | Lowest shipping cost, store labor available |
| Semi-assembled | Main structure pre-assembled, trays/inserts separate | Balance of shipping and labor |
| Fully assembled | Display assembled at factory, ships in protection | Limited store labor, premium presentation |
| Pre-filled | Products loaded into display at factory | Club stores, retail rollouts |
Gluing Quality
- Glue type: Water-based PVA adhesive is standard. Hot melt used for high-speed lines.
- Glue placement: Check that glue is applied within the glue tab area, not spreading onto visible surfaces.
- Open time: The glue must set within the window required for folding. Too fast = weak bond. Too slow = loose joints.
For more on assembly options, our SHIPPING page covers flat-pack, semi-assembled, and pre-filled methods in detail.
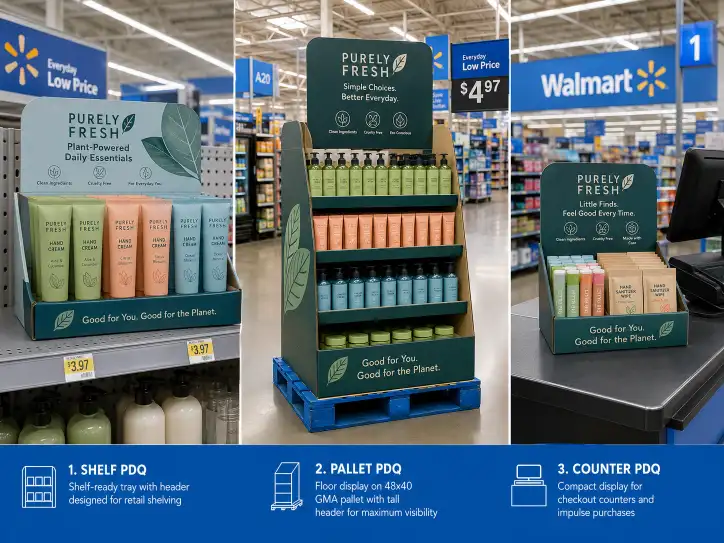
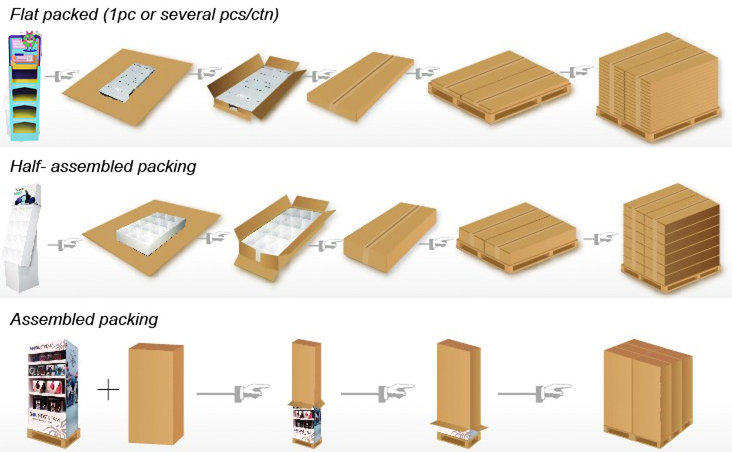
Packing Methods for Retail Displays
Flat-Pack Bundling
Displays are packed flat in bundles of 10–25 units, wrapped with kraft paper or shrink wrap. Bundles are then packed into master cartons or loaded directly on pallets.
- Best for: Floor displays, counter displays, sidekicks
- Advantage: Lowest shipping volume, lowest freight cost
- Risk: Parts can shift in transit if not properly secured
Individual Carton Packing
Each display is packed into an individual carton with protective inserts.
- Best for: Pre-assembled displays, fragile structures
- Advantage: Maximum protection
- Risk: Higher carton cost, more waste in store
Pallet Skirt and Shrink Wrap
The display sits on a pallet with a printed skirt, covered by stretch wrap.
- Best for: Pallet displays, club store units
- Advantage: Display arrives ready to sell
- Risk: Wrap must be removed carefully to avoid damaging print
Co-Packing (Pre-Filled)
Products are loaded into the display at the factory. The filled unit is packed for transit.
- Best for: Club stores, retail rollouts, promotional programs
- Advantage: Zero store labor for display setup
- Risk: Higher shipping volume, product damage if not properly secured
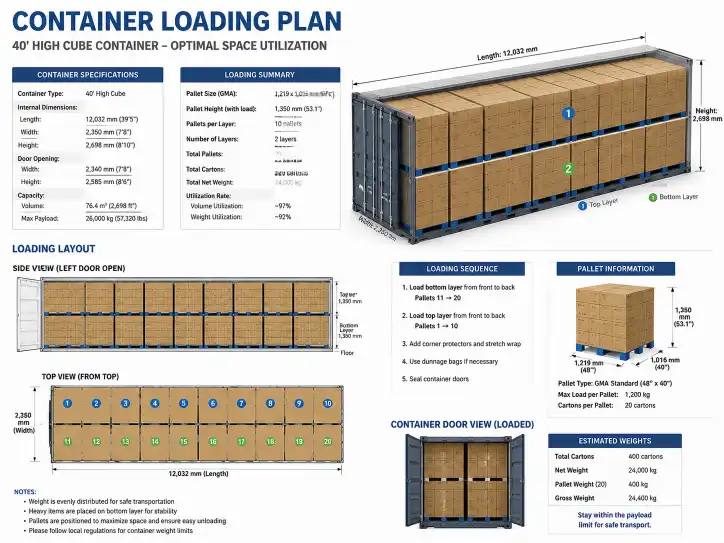
Export Packing and Container Loading
For overseas buyers, export packing is as important as the display itself.
Container Loading Plan
The factory should provide a container loading plan showing:
- Number of cartons per container
- Layer pattern on each pallet
- Total volume utilization (target: 80–85% for standard displays)
- Pallet count per container
Protection Layers
| Layer | Purpose |
|---|---|
| Inner void fill | Prevents display movement inside carton |
| Carton | Primary protection during handling |
| Pallet | Base for forklift movement |
| Corner boards | Protect carton edges on pallet |
| Stretch wrap | Secures pallet load |
| Pallet label | Identification for receiving dock |
Moisture Protection
For sea freight, corrugated board absorbs moisture. The factory should:
- Use moisture-resistant adhesive
- Apply stretch wrap with moisture barrier if needed
- Include desiccant packs in sealed containers for high-humidity routes
Quality Control in Production
In-Process QC Checks
| Stage | Check | Frequency |
|---|---|---|
| Material receiving | Board grade, ECT, flute type | Every shipment |
| Printing | Color match, registration, ink coverage | Every 100–200 sheets |
| Die-cutting | Cut quality, crease alignment | Every 200–500 sheets |
| Assembly | Glue strength, joint fit | Random sampling per batch |
| Packing | Carton quality, barcode readability | Every carton |
Final QC Before Shipment
- Visual inspection: 100% of units checked for print defects
- Assembly test: 5% of units assembled to verify fit
- Drop test: 1–2 units per pallet layer drop-tested to simulate handling
- Barcode scan: All individual barcodes verified for readability
Production Timeline: What to Expect
| Stage | Typical Duration | Notes |
|---|---|---|
| Die-making | 3–7 days | Rush option available (1–2 days) |
| Material sourcing | 3–5 days | Standard board held in stock |
| Printing + finishing | 5–10 days | Depends on print method and complexity |
| Die-cutting | 3–5 days | For standard quantities |
| Assembly + packing | 5–10 days | Semi-assembled longer than flat-pack |
| Transit to port | 1–3 days | Domestic trucking |
| Sea freight | 15–30 days | Depends on destination |
Total lead time: 30–60 days from die-making to delivery, depending on complexity, quantity, and shipping method.
For sample and approval timelines, see our SAMPLING page.
Buyer Checklist for Production Review
| Check Item | What to Confirm |
|---|---|
| Die tolerance | ±0.5 mm or tighter? |
| Board grade | Matches sample spec? ECT rating confirmed? |
| Print method | Flexo, digital, or litho? |
| Color proof | Delta E under 3.0? |
| Finish type | Aqueous, UV, or laminate? |
| Assembly level | Flat, semi, pre-assembled, or pre-filled? |
| Packing method | Bundle, carton, pallet skirt, or co-pack? |
| Container plan | Loading diagram provided? |
| Moisture protection | Needed for sea freight route? |
| QC checkpoints | In-process inspection schedule confirmed? |
| Lead time | Production + transit timeline agreed? |
Conclusion
Retail display production and packing is a multi-stage process where each step affects the next. For B2B buyers, the most important habit is to check production details before the factory starts the run — not after problems appear.
A clear production brief that includes board grade, print method, finish, assembly level, and packing method saves time, reduces revision costs, and ensures the display arrives looking the way it was approved.
If you are planning a new display project, start with the production requirements, not just the design. The factory can give a more accurate quote and a faster timeline when the production and packing specifications are clear from the beginning.
Ready to start? Review our CONCEPT TO DESIGN process or contact us with your project requirements.
FAQ
What is the typical lead time for retail display production?
Total lead time is 30–60 days including die-making, printing, assembly, packing, and sea freight. Air freight can reduce transit to 5–10 days.
What is the difference between flat-pack and pre-filled displays?
Flat-pack displays ship unassembled and are put together in store. Pre-filled displays are assembled and loaded with products at the factory, ready to sell after unwrapping.
How do I know if my display needs double-wall corrugated board?
If the total display weight exceeds 50 lbs (23 kg) or individual trays hold more than 15 lbs (7 kg), double-wall board is recommended. Ask your factory to confirm board grade based on product weight and stack height.
What print method is best for retail displays?
Digital printing is best for runs under 1,000 units or when you need multiple design versions. Flexography is cost-effective for simple 1–3 color runs over 1,000 units. Litho-lamination gives the best quality for premium displays.
Do I need a container loading plan?
Yes. A container loading plan helps you verify that the packed displays fit the container, optimize freight cost, and plan the receiving process at your warehouse or distribution center.
How can I check production quality before shipment?
Request in-process inspection photos or video from the factory at key stages (printing, die-cutting, assembly). Consider a third-party inspection service for larger orders.