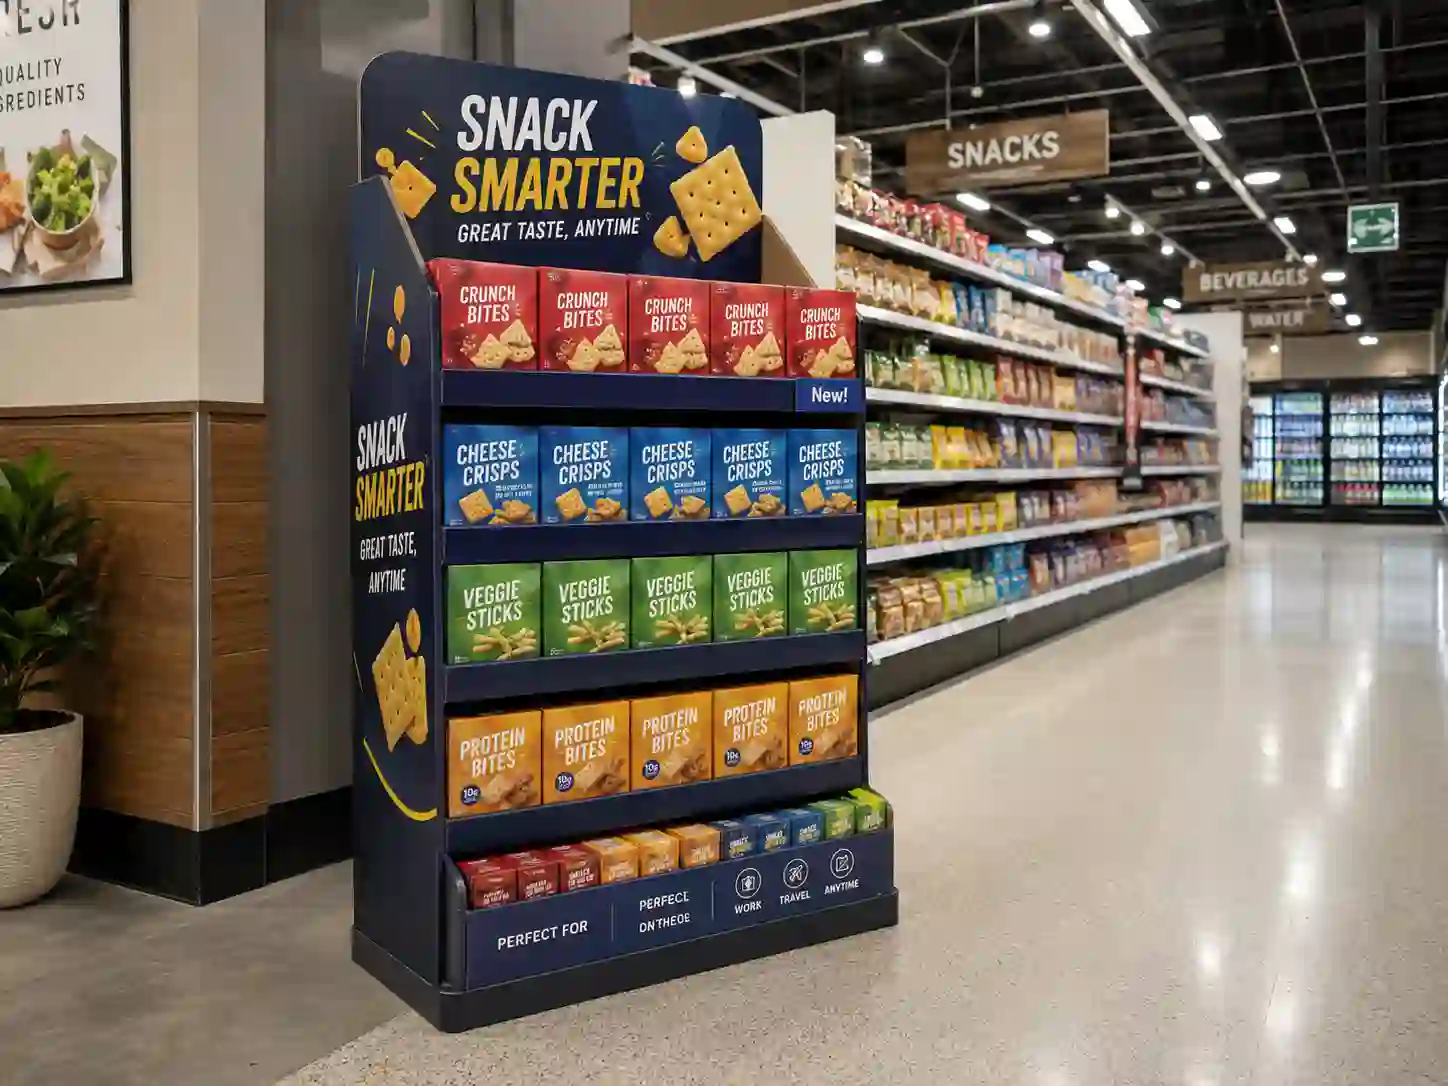
A standee display can look well-designed on a factory sample table, but its performance depends heavily on where it stands in the store. Placement affects shopper attention, product access, refill speed, safety, and how long the display can stay in good condition during a campaign.
For brand owners, wholesalers, retail buyers, and trade marketers, the question is not only “Can the display hold the products?” It is also “Will shoppers see it, understand it, and pick from it without blocking store traffic?”
As a practical cardboard display manufacturer, we look at placement before confirming structure, material thickness, shelf depth, header size, base footprint, and export packing method. A standee display for a supermarket aisle may need a different structure from one used near a checkout counter, end cap, trade show booth, or seasonal promotion zone.
Why Placement Matters Before Production
Many buyers begin with artwork and size. That is useful, but placement should come earlier.
A standee display placed in a high-traffic retail area must be stable, easy to refill, and clear from several viewing angles. If it stands beside an aisle, the side panels may carry important messages. If it stands at the end of an aisle, the header card and front-facing shelves become more important. If it stands near checkout, the product weight, reach height, and impulse-buy layout matter more.
This is why experienced buyers often share store photos, floor plans, product dimensions, product weight, and expected quantity per display before sampling. With those details, a manufacturer can design a display that fits the retail position instead of forcing a standard structure into the wrong space.
For custom projects, Leader Display can support structure planning, sample testing, printing, assembly review, and export packing through custom cardboard displays for different campaign needs.
Best Retail Locations for a Standee Display
The best location depends on the product category, campaign goal, store traffic, and display size. Below are common placement zones and how they work in practice.
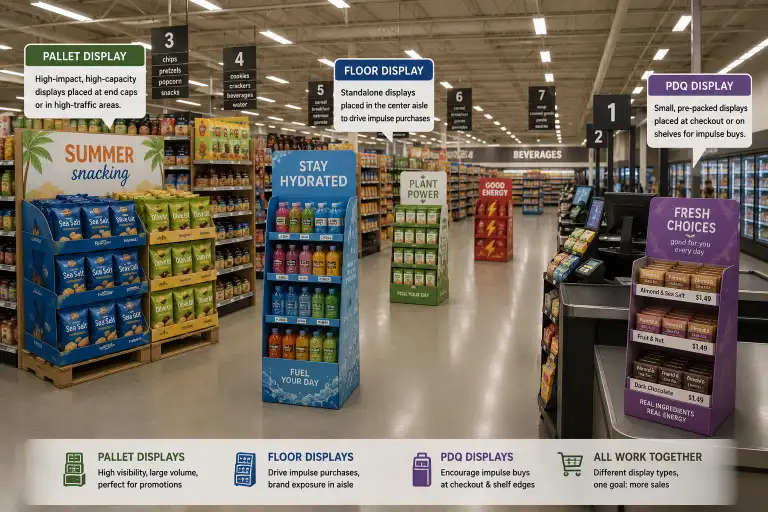
1. Aisle Entrances
Aisle entrances are strong locations because shoppers make direction decisions there. A standee display placed near the entrance can introduce a promotion before the shopper enters the product category.
This works well for snacks, drinks, pet products, personal care, seasonal gifts, and new product launches. The display should not block the aisle. A slim footprint, reinforced base, and clear front header help the display catch attention without creating a traffic problem.
For aisle entrances, we often recommend strong side panels because shoppers may approach from an angle. The header should be simple, with one main message and one clear product benefit.
Keep it direct.
2. End Caps and Aisle Ends
End caps are premium retail positions. A standee display placed near an aisle end can support seasonal campaigns, bundle offers, limited-time launches, or brand storytelling.
This location gives the display more front-facing visibility. It also allows a larger header card, stronger product blocking, and better promotional artwork. However, end-cap areas may already have retailer fixtures, so the cardboard display footprint must be confirmed before production.
If the product is heavy, such as large bottles, canned goods, or multi-pack items, the display needs stronger corrugated board, load-bearing shelf design, and possibly a wider base. Sampling is important here. Load testing should check shelf bending, locking tabs, front lips, and product movement during handling.
3. Checkout and Queue Areas
Checkout areas work well for small, light, high-margin, or impulse products. Examples include trial-size items, small cosmetics, gift cards, snacks, batteries, accessories, and promotional packs.
A standee display in this area should be compact, easy to shop from one side, and safe for crowded spaces. Shelf height matters because shoppers may be standing close to other people or holding shopping baskets. The top message should be readable fast.
Do not overload checkout displays. Too much product can make the display look messy and can slow down refill work. For this location, a PDQ tray, counter display, or narrow floor display may perform better than a large standee, depending on available space.
You can compare options through cardboard display solutions when deciding between floor, counter, PDQ, and sidekick formats.
4. Category Shelf Areas
Placing a standee display beside the main category shelf can help brands win attention where shoppers are already comparing products. This is useful for product launches, upgraded packaging, flavor extensions, bundle packs, and retail education.
For example, a supplement brand may place a display near wellness shelves. A pet product brand may place it beside pet food aisles. A beverage brand may place it close to chilled or dry drink sections.
The key is relevance. If the display is too far from the product category, shoppers may notice it but not connect it to their purchase mission. A strong display near the correct category can work as a silent salesperson.
5. Promotional Islands and Seasonal Zones
Seasonal zones are useful for holiday gifts, back-to-school products, beauty campaigns, beverage promotions, and event-based launches. In these areas, shoppers expect discovery.
A standee display can carry stronger graphics, larger seasonal artwork, and clearer campaign messaging. For gift boxes or promotional kits, one open sample or product hero area can help shoppers understand the offer faster.
The structure should support frequent handling. If shoppers touch products often, the display needs strong shelf lips, stable product compartments, and clear refill access from the front or back.
Placement Comparison Table
| Placement Area | Best For | Display Design Focus | Common Risk | Manufacturer Recommendation |
|---|---|---|---|---|
| Aisle entrance | New products, snacks, personal care | Slim footprint, visible side panels | Blocking traffic | Confirm store aisle width before sampling |
| End cap area | Seasonal campaigns, hero promotions | Strong header, front-facing shelves | Heavy product load | Test shelf strength and base stability |
| Checkout zone | Small impulse products | Compact size, fast message | Overcrowded layout | Use lighter products and simple refill design |
| Category shelf area | Product education, brand comparison | Clear product benefits | Weak category connection | Match display message to shopper intent |
| Promotional island | Gift sets, bundles, holiday campaigns | High-impact graphics | Messy refill | Use compartments and clear packing plan |
| Trade show booth | B2B presentation, samples | Easy assembly, brand story | Transport damage | Plan flat packing and instruction sheets |
How Store Traffic Changes Display Design
A standee display in a slow shopping area can include more product details. A display in a fast traffic area needs a shorter message.
In high-traffic areas, shoppers may only see the display for a few seconds. The header should communicate the product type, offer, or main benefit immediately. The shelves should face the main walking path. The product should be arranged with clean facing, not random stacking.
Traffic direction also affects structure. If shoppers approach from the left side, the left side panel should not be blank. If the display stands at the end of an aisle, the front panel needs more visual strength. If the display is placed near a wall, the back panel may not need premium printing, which can help control cost.
This is where factory experience matters. A manufacturer should not only ask for artwork files. It should ask how the display will be used.
Product Weight and Placement Safety
Product weight can change the best placement choice.
Light products such as cosmetics, snacks, small toys, tea packs, and accessories can use more flexible display structures. Heavy products such as bottles, cans, jars, tools, and bulk packs require stronger engineering.
For heavier products, placement near busy walkways needs extra attention. The display must stay balanced when shoppers remove products from one side or from the top shelf first. A wider base, reinforced shelves, cross supports, and stronger corrugated flute can help.
During sampling, check these points:
- Does the display lean when fully loaded?
- Do shelves bend after standing for several days?
- Can staff refill products without damaging the structure?
- Are locking tabs easy to assemble?
- Does the base stay flat on the floor?
- Can the display survive local transport inside the store?
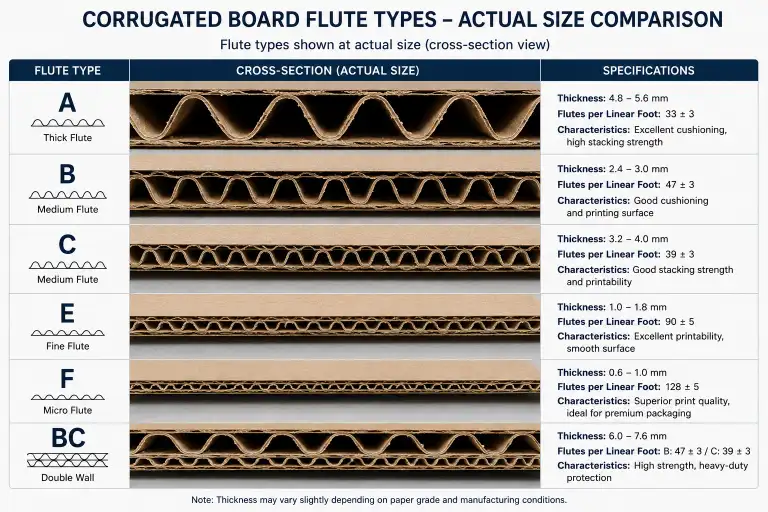
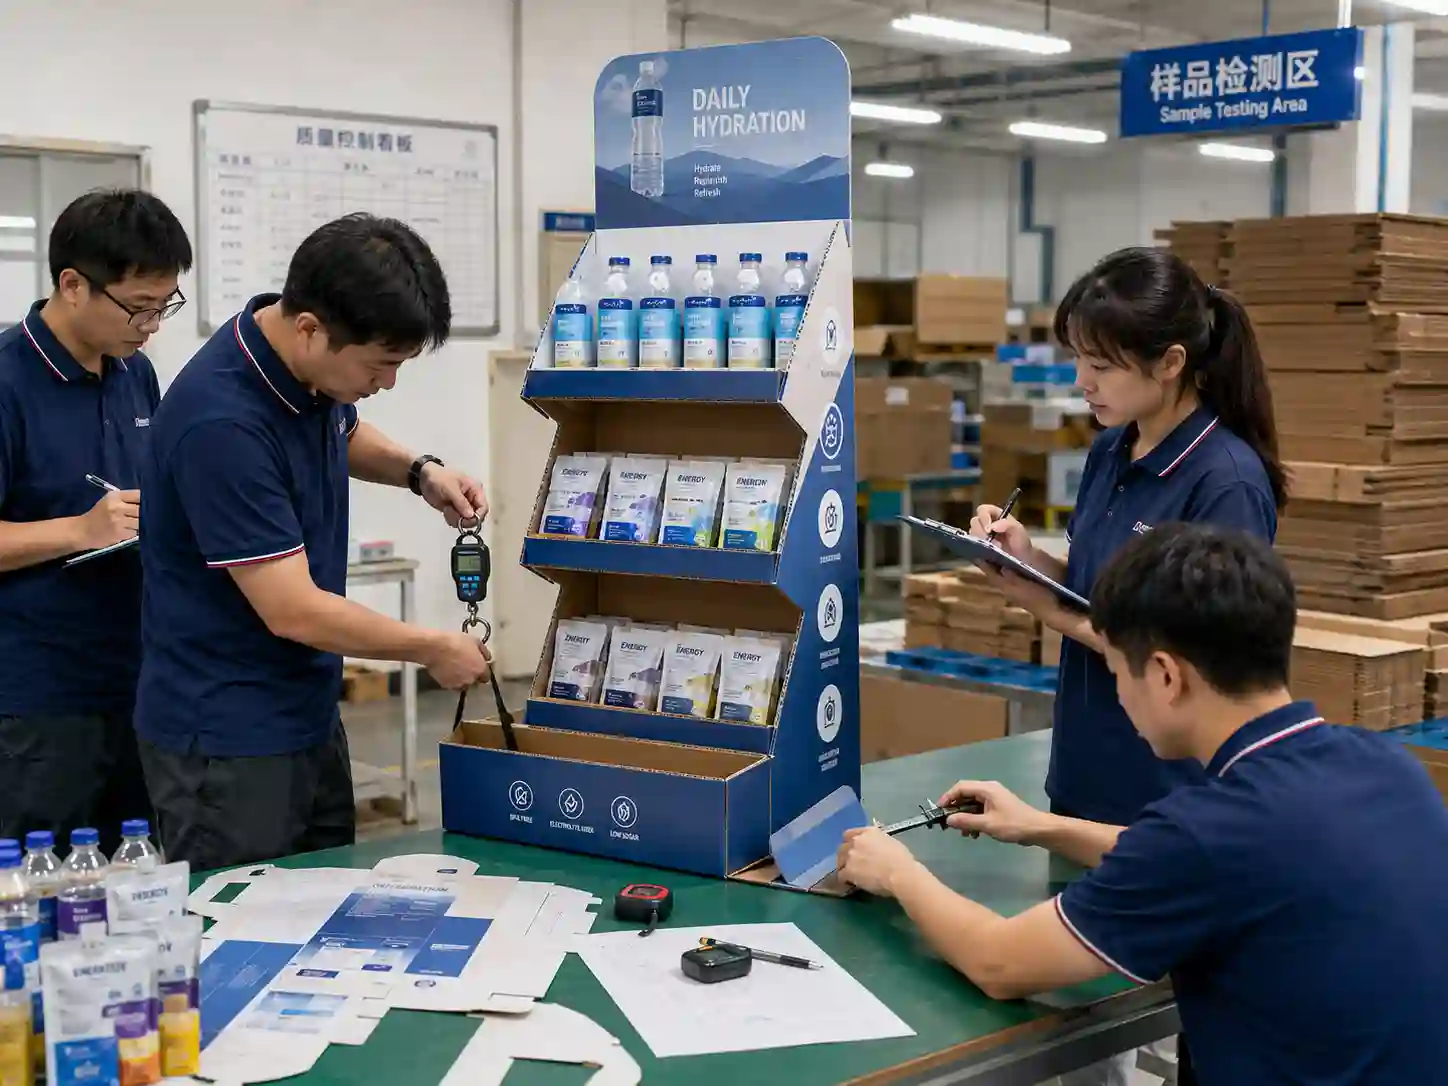
Standards and associations such as FEFCO can be useful reference points for corrugated packaging terminology and board structure discussions. FSC-certified paper options may also matter when buyers need responsible material sourcing. ISO-style quality management thinking can support more consistent sampling, inspection, and production control.
Visibility From Different Shopper Angles
A standee display is not a poster. It is a three-dimensional retail tool.
Good placement allows shoppers to see the header, products, and key message before they stand directly in front of the display. This means the side view matters. The base panel matters. The shelf spacing matters.
For floor displays, the header card should sit high enough to be seen over nearby products, but not so high that it becomes unstable or hard to pack. The product area should be at a comfortable picking height. Low shelves can carry heavier products, while upper shelves should carry lighter items or sample packs.
For narrow retail spaces, a tall and slim display may work better. For open promotional zones, a wider front-facing display may create stronger brand impact.
A good sample review should include photos from several angles, not only one front-facing studio shot.
Refill Access and Staff Handling
Retail staff will not treat every display gently. The design must make their work easier.
If the standee display is hard to refill, products may be placed incorrectly. If the shelves are too deep, the back products may become hidden. If the compartments are too tight, staff may damage the display during restocking. If instructions are unclear, assembly can take too long.
For better placement performance, buyers should think about refill flow:
Front Refill
Front refill is simple and works for most floor displays. Staff remove or add products from the shopper side. This is suitable for stores where displays are not moved often.
Back Refill
Back refill can work when the display stands in an open promotional area or trade show booth. It helps keep the front neat, but it requires enough space behind the display.
Tray-Based Refill
PDQ trays or removable shelf trays can speed up refill. This may be useful for high-turnover items, such as snacks, trial packs, or small promotional cartons.
The right refill method depends on placement. A checkout display needs fast refill. An end-cap display needs clean front-facing order. A trade show display may need easy product change between meetings.
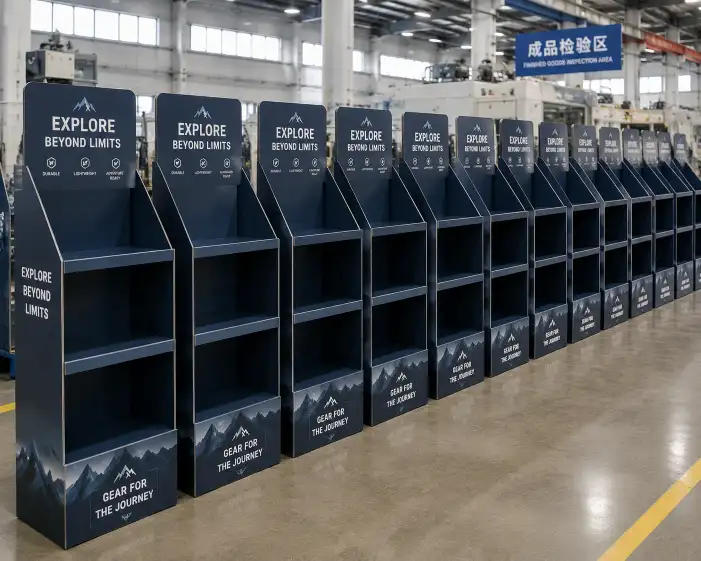
Floor Placement, Shelf Placement, and Hybrid Displays
Not every standee display needs to stand alone on the floor. Some projects use hybrid structures.
A brand may use a floor standee for the main campaign and PDQ trays on shelves for extra stock. A retailer may place a compact standee near the category shelf and use a pallet display in a larger promotional zone. A wholesaler may need one structure for supermarkets and another for convenience stores.
When buyers request retail display packaging from Leader Display, the most efficient approach is to match display format with retail space, product weight, and campaign duration.
A short campaign may not need the same board strength as a six-month placement. A lightweight product may not need a heavy-duty shelf structure. A premium product may need stronger printing, matte lamination, spot UV, or a clean product-only display area.
The placement decision helps control cost without weakening performance.
Sampling Before Retail Rollout
A sample is more than a visual approval tool. It is a placement test.
Before mass production, a physical sample can check structure, size, load capacity, assembly time, product fit, print effect, and packing method. If the standee display will be used in a specific retailer, the sample should be compared against the available floor space or fixture area.
A practical sample review should include:
- Full product loading test
- Shelf weight test
- Header stability check
- Assembly step review
- Product removal test
- Refill test
- Flat packing test
- Master carton packing check
- Photo review from shopper angles
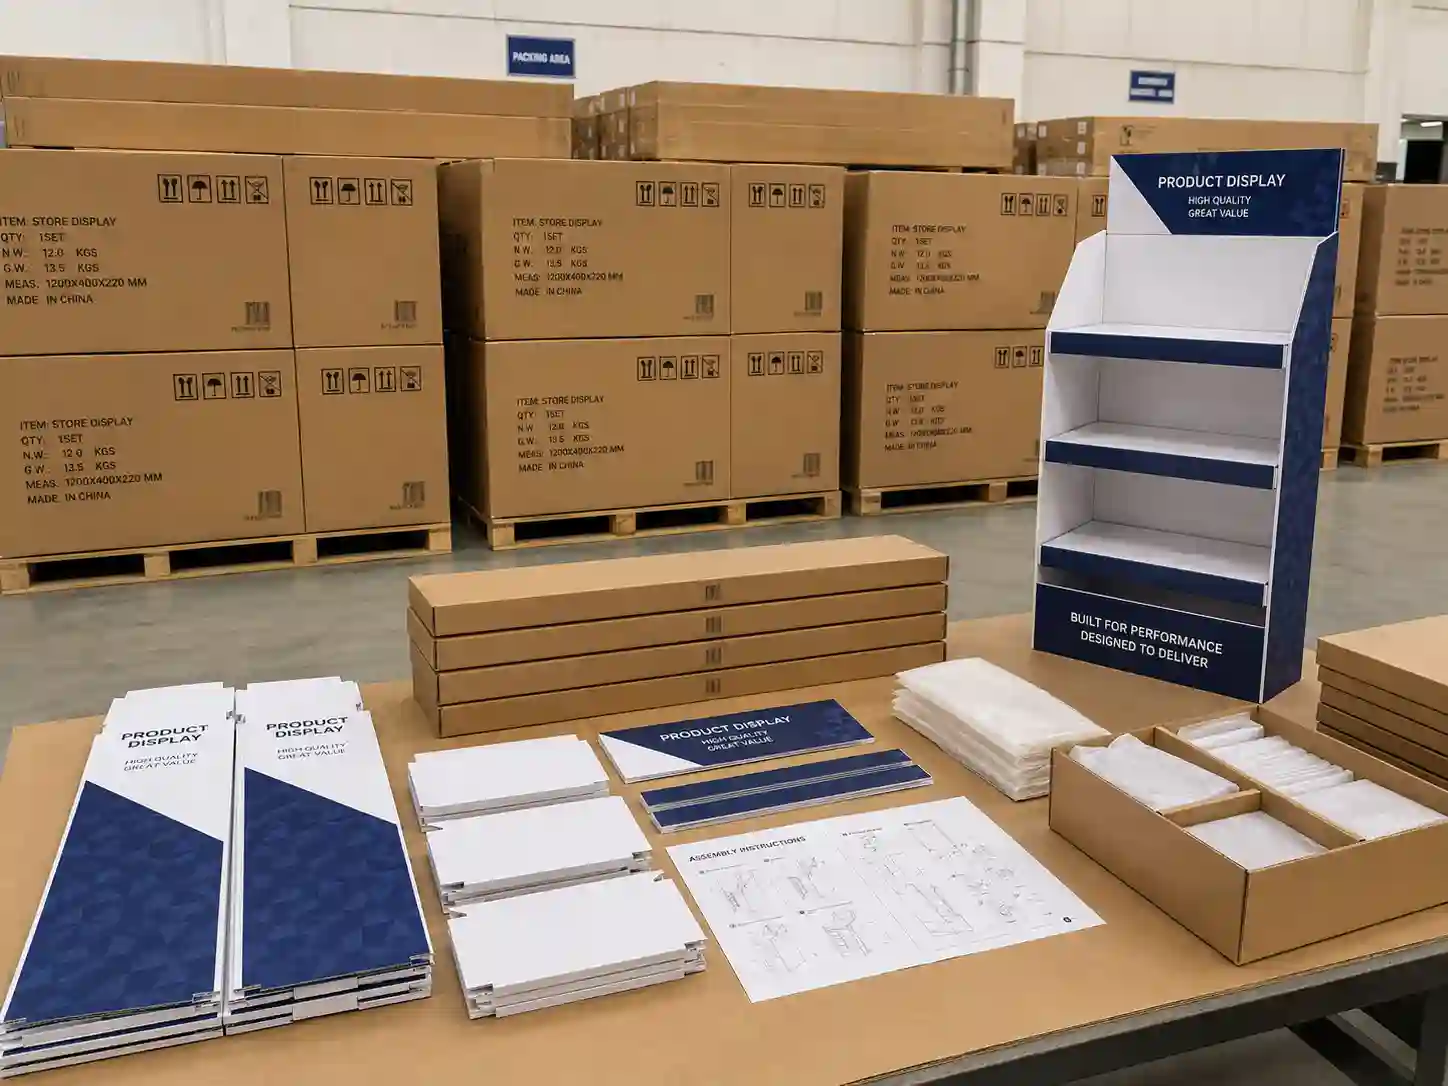
For export orders, flat packing matters. A display that looks good assembled may still create high freight cost if it cannot pack efficiently. The manufacturer should plan carton size, inner protection, assembly sheets, and carton marks before shipment.
This is especially important for buyers importing displays for multiple retail locations. Damaged displays can delay campaigns, increase replacement cost, and reduce store compliance.
Common Placement Mistakes to Avoid
Some placement issues appear after the display reaches the store. Many can be prevented during design.
Mistake 1: Choosing a Display That Is Too Wide
A wide display can look impressive in a showroom, but it may fail in a narrow aisle. If store staff must move it out of the way, visibility drops. The display should fit the real space.
Mistake 2: Placing Heavy Products Too High
Heavy products on upper shelves create safety and stability risks. Place heavier items lower and lighter products higher. This also makes shopping more comfortable.
Mistake 3: Using Small Text in Fast Traffic Areas
Shoppers will not stop to read long copy in busy zones. Use large, clear messaging. Keep detailed information for QR codes, packaging, or sales sheets.
Mistake 4: Ignoring Side Visibility
If the display sits beside a walking path, blank side panels waste exposure. Side graphics can carry product benefits, usage scenes, or simple campaign messages.
Mistake 5: Forgetting Store Staff
A display that is hard to assemble, move, or refill may not stay neat. Clear instruction sheets, labeled parts, and practical locking structures can improve retail execution.
What Buyers Should Tell the Manufacturer
To make placement planning more accurate, share detailed project information at the inquiry stage. This saves time and reduces sample revisions.
Useful details include product size, product weight, product quantity per display, target store type, placement zone, campaign duration, artwork direction, expected order quantity, shipping destination, and whether assembly will happen in the factory or at the store.
Photos help. Even simple phone photos of the intended placement area can guide structure decisions. A floor plan or retailer display guideline is better.
When the manufacturer understands the retail environment, it can recommend board grade, flute type, shelf support, base style, header size, print method, finish, and packing plan with fewer assumptions.
A Practical Placement Strategy for Better Visibility
For most B2B campaigns, the best placement strategy is to match the display to the shopper journey.
Use aisle entrances to create awareness. Use category shelf areas to support comparison. Use end caps to highlight promotions. Use checkout zones for impulse items. Use promotional islands for seasonal campaigns and gift sets. Use trade show spaces for product education and buyer meetings.
The standee display should support that job through structure, artwork, product layout, and packing. Strong visibility comes from the full system: placement, design, load capacity, assembly, refill, and store handling.
A well-planned cardboard display does not only stand in a store. It earns its space, keeps products organized, and gives the retail team fewer problems during the campaign. Share the placement details early, confirm the sample carefully, and the next custom display project can move from design approval to retail rollout with more confidence.