A cardboard display for snacks and candy has one clear job: make small, fast-moving products easy to see, easy to pick up, and easy to refill. For B2B buyers, the best display is not always the biggest or most decorative option. It is the structure that matches product weight, store traffic, shelf space, campaign timing, and packing requirements.
Snack and candy products often compete in crowded retail areas. Chocolate bars, gummies, cookies, chips, mints, protein snacks, and seasonal candy packs are impulse-driven, so the display must support both visibility and access. As a cardboard display manufacturer, we usually start by checking where the display will be used, how many SKUs it needs to hold, and whether the buyer needs a short promotional display or a repeat-use retail solution.
Why Snacks and Candy Need the Right Display Structure
Snacks and candy are usually lightweight, but they create special display challenges. A single candy bar is light. A full tray of chocolate, nut snacks, or boxed sweets can become heavy once products are stacked in multiple layers.
That is why the structure matters.
A weak display may bend, lean forward, or lose shape after refilling. A display with poor product access may look full but fail to encourage shoppers to pick up the product. A display with the wrong footprint may be rejected by retail stores before it reaches the sales floor.
A practical cardboard display for snacks and candy should solve these points:
- Hold product weight without shelf sagging
- Keep small packs visible from the front
- Support quick refill by store staff
- Fit checkout counters, aisles, side shelves, or floor areas
- Arrive flat packed or pre-packed according to the buyer’s needs
- Match seasonal artwork, brand colors, and retail promotion goals
For custom projects, buyers can review structure options through custom cardboard displays before confirming a sample.
The Main Display Options for Snacks and Candy
There is no single best display for every snack or candy project. The right choice depends on packaging size, unit weight, store placement, and the sales goal.
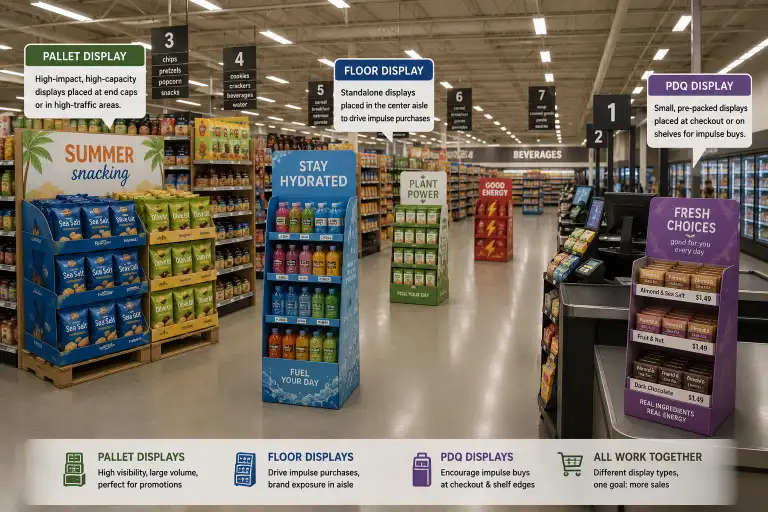
Counter Displays for Small Candy and Impulse Snacks
Counter displays are one of the most common choices for candy, mints, chocolate bars, small cookies, gum, and trial-size snacks. They are placed near checkout counters, reception desks, convenience store counters, or café payment areas.
This format works well when the product is small and easy to grab.
A counter display usually includes several trays or compartments. It can be designed with a header card, front lip, side panels, and printed dividers. For candy and snacks, we often suggest a stable base and clear front-facing product rows, because shoppers make quick decisions at checkout.
Counter displays are suitable for:
- Candy bars
- Gum and mints
- Small chocolate packs
- Protein bars
- Snack sample packs
- Promotional bundles
- Seasonal mini gift packs
The key is not to overload the tray. If the product is packed too deep, the front row may hide the back row. If the display is too tall, it may block the cashier area. A good counter display keeps the product within easy reach and makes the brand message visible within seconds.
PDQ Displays for Retail-Ready Snack Promotions
PDQ displays are excellent for snacks and candy because they are designed for quick retail setup. A PDQ can be shipped with products inside, then placed directly on a shelf, pallet, or counter after opening the outer carton.
For brands that sell through chain stores, wholesalers, or club stores, PDQ displays can reduce store labor. Retail staff do not need to build a complex structure. They open, place, and sell.
PDQ displays are often used for:
- Chocolate multipacks
- Candy bags
- Cookies
- Crackers
- Small chip packs
- Nuts and dried fruit
- Seasonal snack promotions
A PDQ needs strong side walls, a clean tear-away design, and enough front lip height to keep products in position. If the product is bagged, the display may need higher walls. If the product is boxed, lower front access may work better.
Many buyers choose PDQ displays when they want speed, consistency, and strong shelf presentation. You can compare broader options on our cardboard display page.
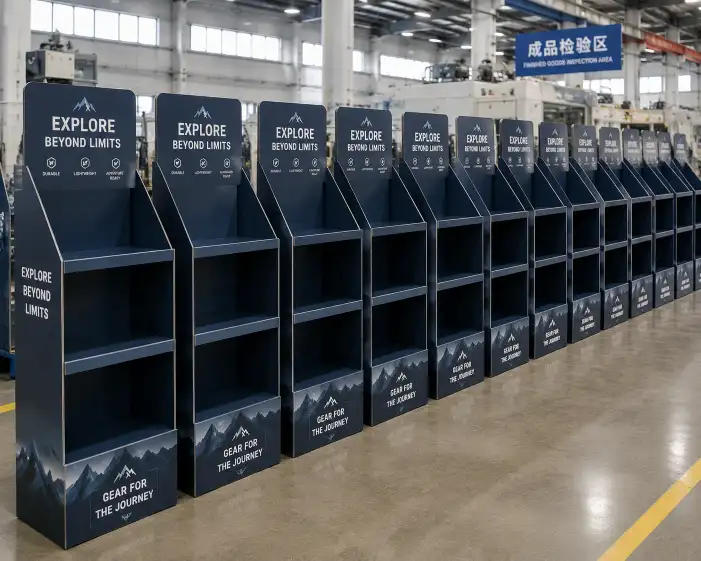
Floor Displays for Larger Snack Campaigns
Floor displays are suitable when the brand needs higher product capacity and stronger visual impact. They work well in supermarkets, convenience stores, wholesale stores, pharmacies, and promotional aisles.
A floor display for snacks and candy may use shelves, trays, hooks, bins, or a mixed structure. For lightweight candy bags, a multi-shelf display can work well. For heavier snack boxes, the display needs stronger board material, reinforced shelves, or inner support panels.
Floor displays are suitable for:
- Large candy launches
- Snack multipack promotions
- Holiday campaigns
- New flavor introductions
- Cross-selling campaigns
- Retail aisle promotions
For floor placement, the structure must be tested carefully. A full display can carry more weight than expected. Shelf load testing, assembly checking, and product fit testing should happen before bulk production.
A floor display also needs clear branding. The header, side panels, shelf strips, and base area should guide shoppers from attention to product selection.
Sidekick Displays for Retail Aisle Visibility
Sidekick displays are attached to shelf sides, aisle ends, or retail fixtures. They are useful when the buyer wants extra visibility without taking full floor space.
For snacks and candy, sidekick displays often work well for hanging pouches, small boxed snacks, novelty candy, and seasonal impulse products. They can use peg hooks, small pockets, or compact trays.
Sidekick displays are useful when:
- Store floor space is limited
- The product is lightweight
- The campaign needs aisle-side visibility
- The buyer wants impulse sales near related categories
- The display needs to ship flat and assemble quickly
The main concern is balance. A sidekick display should not twist, tilt, or overload one side. The hanging method, back panel strength, and product weight need to be confirmed during sampling.
Peg Displays for Hanging Candy and Snack Packs
Peg displays are a strong option for products with hang holes, such as candy bags, dried fruit packs, jerky packs, small chip bags, and snack accessories.
A peg display can be a counter unit, floor stand, sidekick, or pallet attachment. The peg spacing must match the product width and pack thickness. If the hooks are too close, products become hard to remove. If they are too far apart, the display wastes space.
Peg displays need special attention to:
- Hook strength
- Back panel thickness
- Product hanging hole position
- Total loaded weight
- Refill access
- Shipping protection
For heavier hanging products, plastic hooks, metal hooks, or reinforced cardboard hooks may be considered depending on the retail requirement.
Quick Comparison: Which Display Fits Your Snack or Candy Project?
| Display Type | Best For | Typical Placement | Key Structure Concern | B2B Buying Tip |
|---|---|---|---|---|
| Counter display | Candy bars, gum, mints, small snacks | Checkout counter | Tray depth and front visibility | Keep it compact and easy to refill |
| PDQ display | Retail-ready snack and candy packs | Shelf, counter, pallet | Tear-away design and product retention | Confirm carton size with logistics team |
| Floor display | Larger promotions and product launches | Aisle, entrance, promo zone | Shelf strength and stability | Ask for load testing before mass production |
| Sidekick display | Lightweight impulse products | Shelf side or aisle side | Hanging balance and back support | Check retailer fixture requirements early |
| Peg display | Hanging pouches and bagged candy | Counter, floor, sidekick | Hook spacing and panel strength | Test product removal and refill speed |
| Dump bin display | Loose bags, bulk candy, snack pouches | Promo area or aisle | Bin depth and product access | Avoid making the bin too deep for small packs |
| Pallet display | Club stores and high-volume retail | Warehouse club or large retail floor | Pallet footprint and stacking strength | Confirm pallet size and export packing method |
How Product Weight Changes the Display Decision
Product weight is one of the first things a manufacturer should check. Snacks and candy may look light, but the total load can be high when the display holds many units.
For example, a single 40 g candy bar is light. A counter display holding 80 bars may need a stronger base than expected. A floor display holding 200 boxed snacks may need reinforced shelves, double-wall corrugated board, or inner support pieces.
When planning a cardboard display for snacks and candy, buyers should prepare:
- Product dimensions
- Unit weight
- Number of units per display
- Number of SKUs
- Product packaging type
- Retail placement plan
- Required display life cycle
- Export carton size limit
With this information, the display factory can recommend a better board grade, flute type, structure, and packing method. Material choice should not be based only on appearance. It should match the load and retail use.
Shelf Placement vs Floor Placement
Shelf placement and floor placement require different thinking.
A shelf-ready snack display needs to fit retail shelves, shipping cartons, and store planograms. The display must be compact, stable, and quick to place. PDQ trays and small display boxes are common choices.
A floor display needs more structure. It must stand by itself, hold more products, and stay stable during shopping traffic. It may require a wide base, inner support, shelf reinforcements, or locking tabs.
For shelf placement, buyers should focus on:
- Shelf width and depth
- Product facing count
- Easy opening
- Clean front lip
- Retail-ready carton design
For floor placement, buyers should focus on:
- Total loaded weight
- Center of gravity
- Shelf distance
- Base footprint
- Assembly time
- Anti-tilt structure
- Export packing protection
Material Choice for Snack and Candy Displays
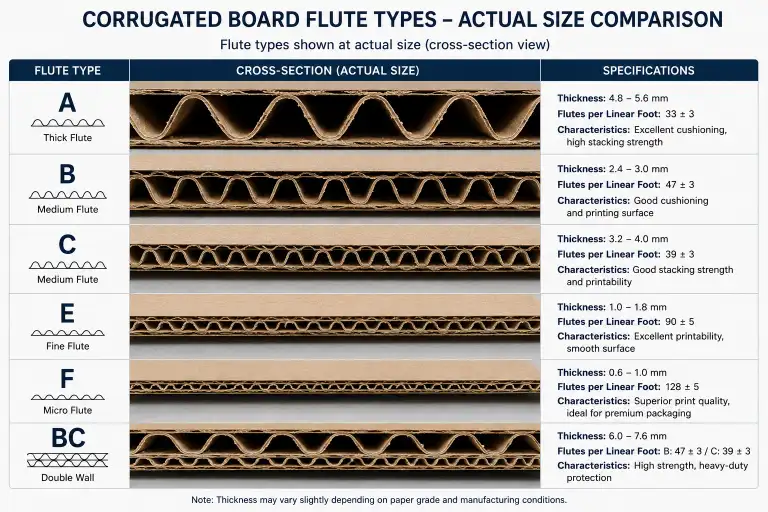
Cardboard display material depends on product weight, display size, print requirements, and retail environment. Common options include corrugated board, gray board, art paper lamination, and reinforced paperboard components.
For snack and candy displays, corrugated board is widely used because it is light, printable, and suitable for flat packing. Different flute types can be selected according to strength and printing needs.
A practical material plan may include:
Lightweight Counter Display Material
Small candy counter displays may use E-flute corrugated board with printed surface paper. This gives a clean print result and enough strength for small products.
Stronger Floor Display Material
Floor displays may use B-flute, double-wall corrugated board, or reinforced shelves. If the display holds many snack boxes or pouches, extra support panels may be added inside.
Printed Surface and Finishing
Snack and candy products often need strong shelf appeal. Common finishing options include matte lamination, gloss lamination, spot UV, embossing, or foil stamping. For B2B buyers, finishing should match the campaign budget and retail environment.
A premium chocolate display may need a refined print finish. A high-volume candy promotion may need durable, cost-controlled printing.
Responsible sourcing can also matter. Some buyers ask about FSC-certified paper materials, while factories may follow ISO-related quality management systems depending on their certification status. For shipping and carton standards, FEFCO references are also common in packaging discussions.
Custom Structure Details That Matter
A display may look simple from the outside, but small structure details decide whether it works in a store.
Front Lip Height
The front lip keeps products from falling out. For small candy packs, a low lip improves visibility. For snack bags, a higher lip may keep products upright.
Shelf Angle
A slight shelf angle can improve product visibility and access. But too much angle may cause products to slide forward. The right angle depends on product shape and friction.
Divider Design
Dividers help separate flavors, SKUs, and pack types. They are useful for mixed candy displays and snack variety packs.
Header Size
The header is important for brand recognition. It should be tall enough to attract attention but not too tall for the store area or shipping carton.
Locking Tabs
Locking tabs reduce the need for glue or tape during assembly. They also help the display stay firm after transport.
Inner Support Panels
Inner support panels are important for heavier floor displays. They help transfer shelf load to the base.
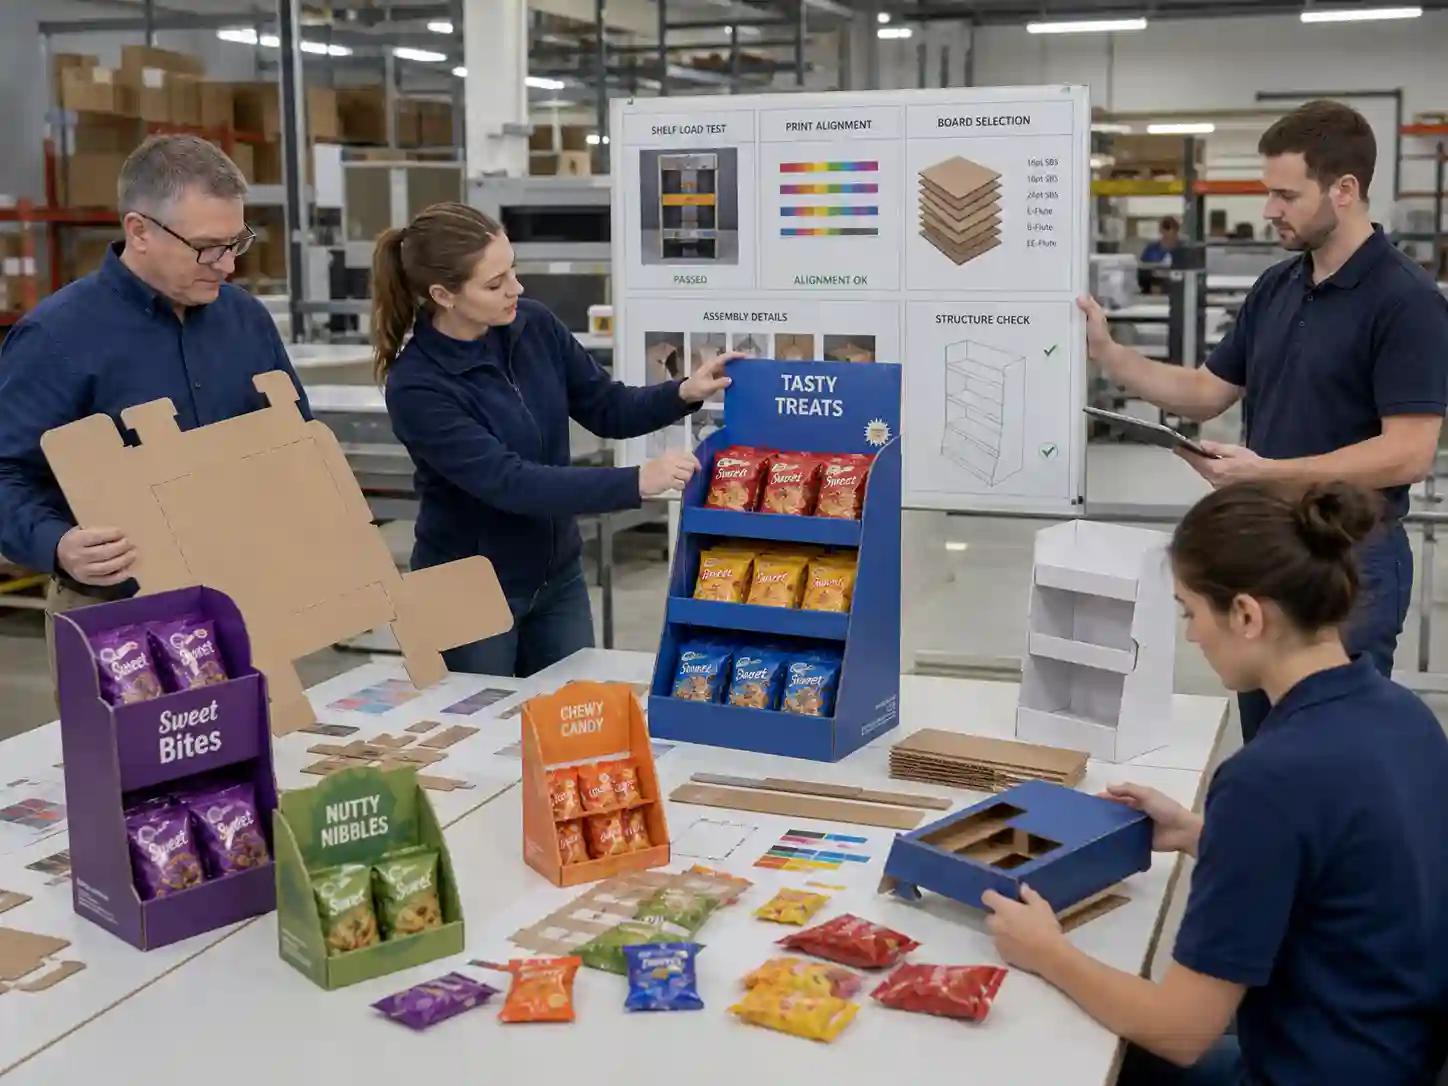
These details should be checked during sampling, not after mass production starts.
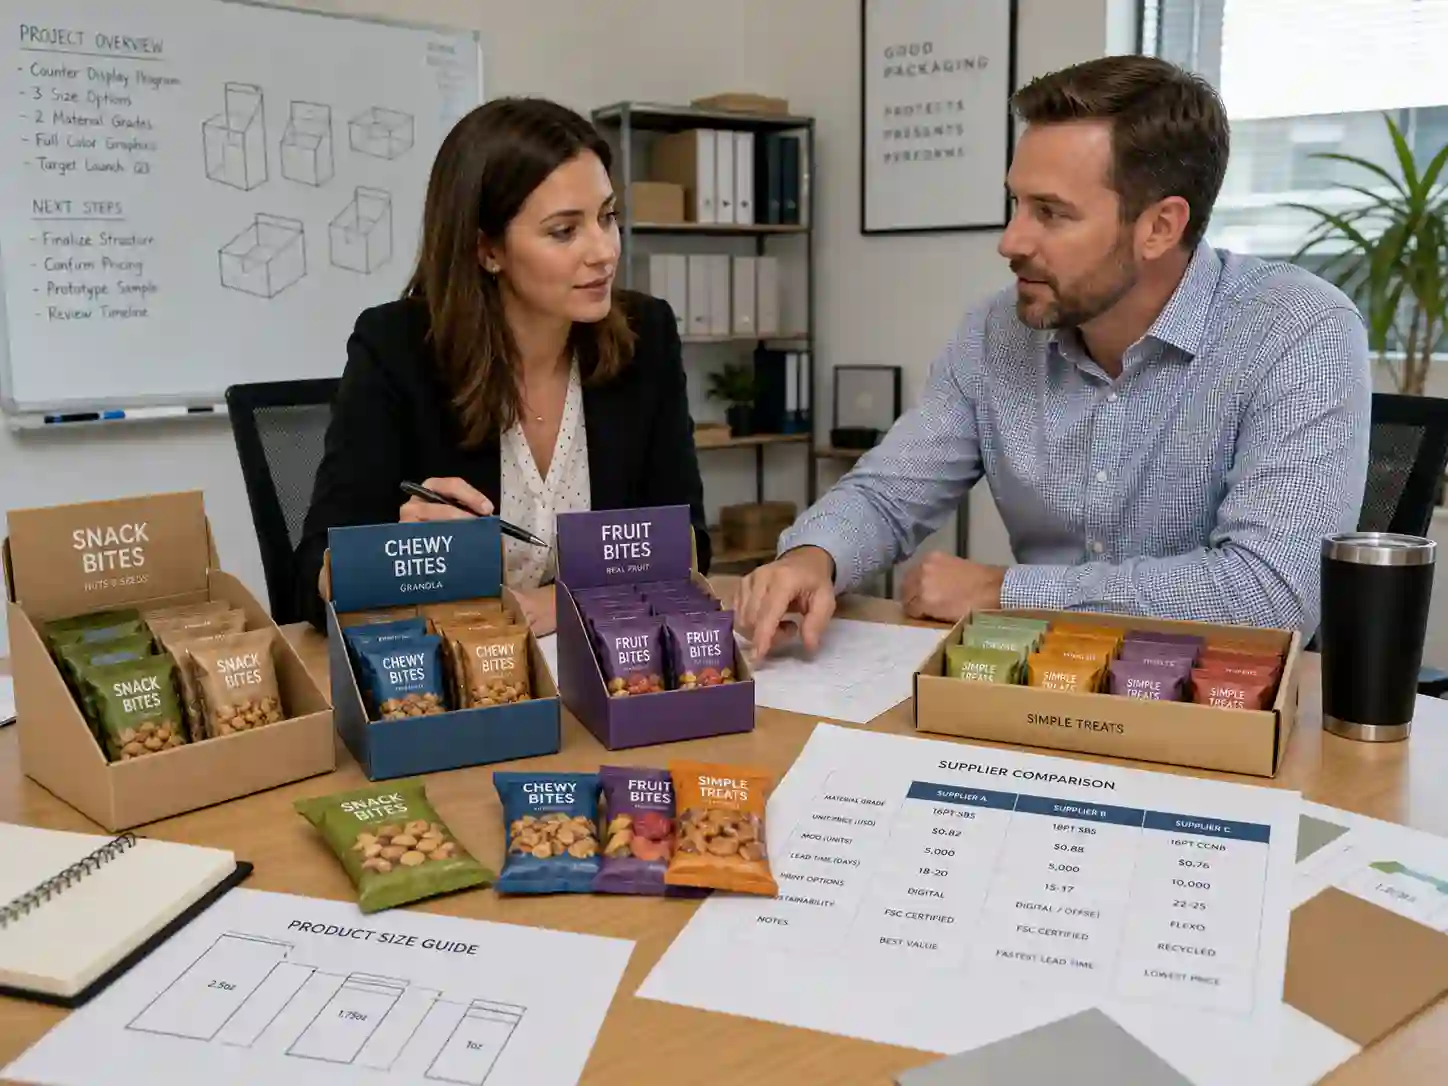
Sampling Before Bulk Production
Sampling is one of the most important steps in a custom cardboard display project. A sample allows the buyer and manufacturer to check size, structure, artwork, product fit, and assembly.
For snacks and candy, a useful sample review should include:
- Product fit test
- Shelf load test
- Assembly process check
- Print position review
- Barcode and legal text position check
- Refill access test
- Flat packing test
- Export carton protection check
A white sample can confirm structure before artwork. A printed sample can confirm color, branding, and finishing. For urgent promotions, buyers may approve structure first, then move quickly into printed sample confirmation.
Leader Display was established in 2004 and works as a B2B manufacturer for custom retail display projects. Buyers can contact Leader Display with product size, weight, quantity, and reference ideas to begin a practical structure discussion.
Flat Packing, Pre-Packing, and Export Cartons
Packing method affects cost, shipping space, retail setup, and product protection.
Flat Packing
Flat packing is common for cardboard displays. It saves space and reduces shipping volume. The retailer or distributor assembles the display before placing products.
Flat packing works well when:
- The display is large
- Products are packed separately
- Shipping cost needs control
- Retail staff can assemble the display
The design should include clear assembly steps. Complex structures may need instruction sheets or assembly videos.
Pre-Packing
Pre-packing means products are loaded into the display before shipment or retail delivery. This can save store labor and improve retail consistency.
Pre-packing works well for:
- PDQ displays
- Shelf-ready trays
- Club store promotions
- Fast seasonal campaigns
The outer carton must protect both the product and display. The tear-away area should open cleanly without damaging the printed display.
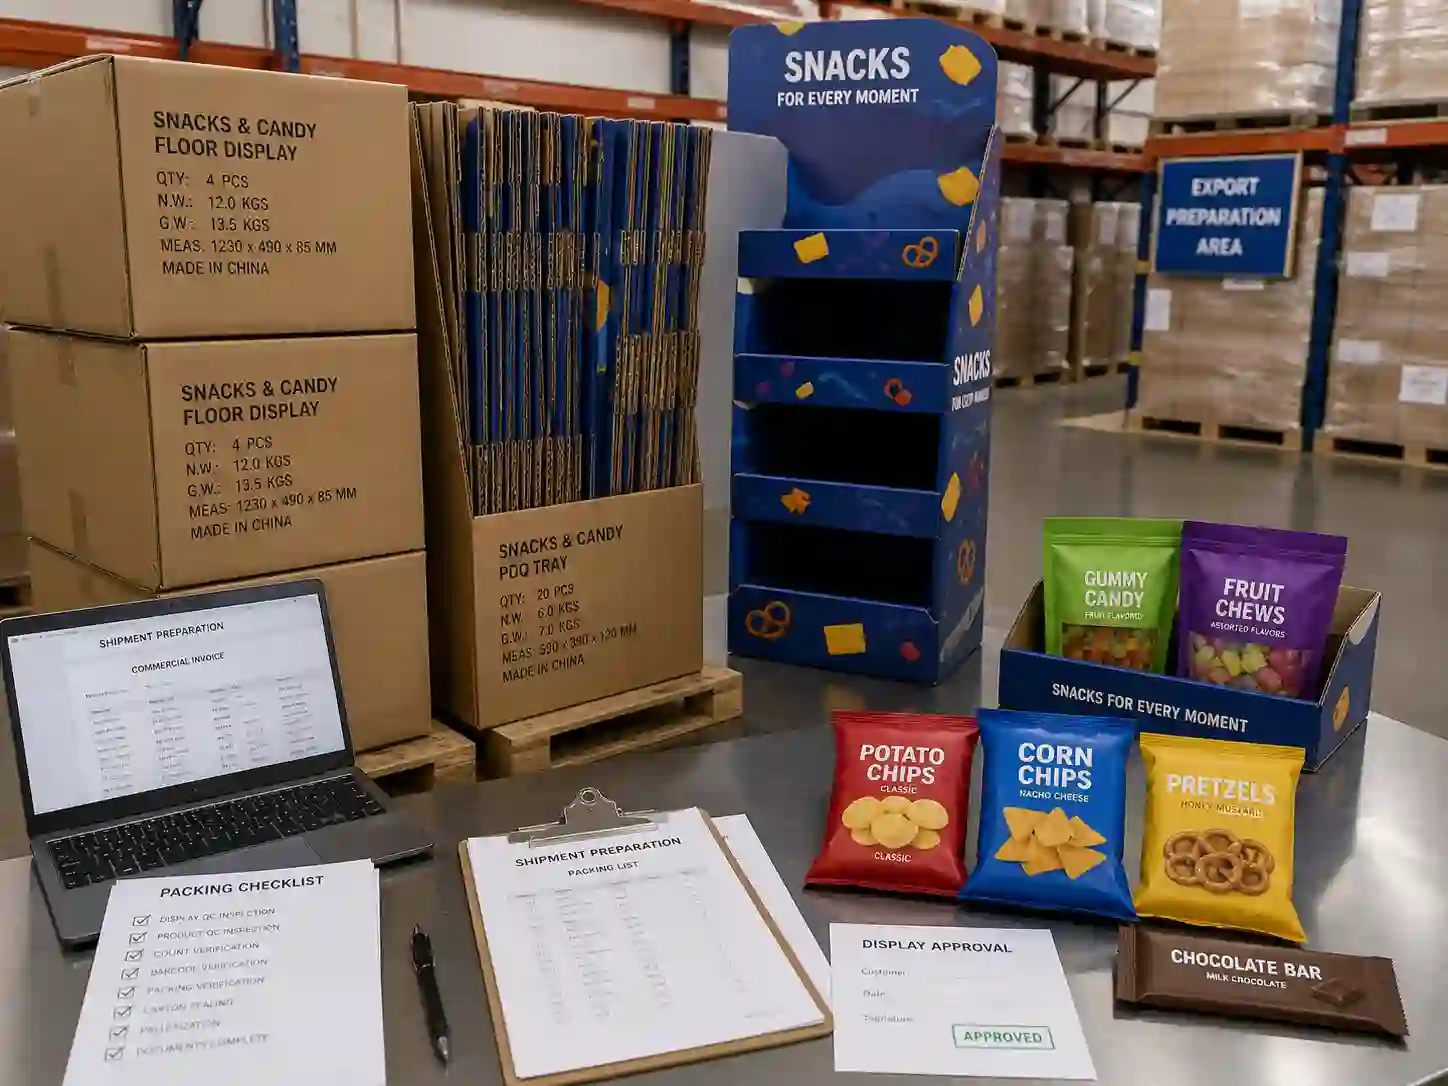
Export Packing
For international projects, export packing deserves careful planning. The display may need stronger master cartons, corner protection, moisture control, pallet packing, and clear carton marks.
Buyers should confirm:
- Carton size
- Carton weight
- Pallet quantity
- Loading method
- Shipping route
- Warehouse handling requirements
- Assembly instructions
- Spare parts or replacement display needs
A display that looks good in a sample room still needs to survive transport and retail handling.
Best Display Choices by Snack and Candy Product Type
Different snack and candy products require different display thinking.
Chocolate Bars and Candy Bars
Counter displays and PDQ trays are often the best choices. They keep products organized and visible near checkout areas. For premium bars, a clean printed counter display with dividers can support brand positioning.
Candy Bags and Gummies
Floor displays, peg displays, dump bins, and sidekick displays can all work. The choice depends on bag size and campaign volume. For small gummy bags, peg displays help maintain order. For larger promotional bags, dump bins can support fast selling.
Chips and Puffed Snacks
Bagged snacks need more space because the packaging contains air. Floor displays and dump bins are common. The display should not crush the product. Shelf depth and bin height must be checked.
Cookies and Crackers
Boxed cookies and crackers work well in shelf displays, PDQ displays, and floor displays. If products are stacked, shelf strength matters. If products are front-facing, the display should keep the pack upright.
Nuts, Protein Snacks, and Healthy Snacks
These products often sell through convenience stores, gyms, cafés, supermarkets, and specialty retailers. Counter displays, sidekick displays, and floor displays may all be suitable depending on pack size.
Seasonal Candy
Seasonal candy often needs strong artwork and fast production timing. Halloween, Christmas, Valentine’s Day, Easter, and back-to-school promotions may require special shapes, themed headers, or mixed SKU compartments.
For seasonal projects, confirm artwork, sample timing, production schedule, and shipping deadline early.
How to Choose the Right Cardboard Display for Snacks and Candy
A simple selection process can prevent costly mistakes.
First, decide the retail placement. Counter, shelf, side aisle, floor, and pallet areas all require different structures.
Second, confirm the total loaded weight. Product unit weight is not enough. The factory needs the full display loading quantity.
Third, define the refill method. Some displays are used once and recycled after the campaign. Others must support repeated refilling over weeks or months.
Fourth, decide whether the display ships flat or pre-packed. This affects structure, carton design, and logistics cost.
Fifth, check retailer rules. Some retailers may have requirements for pallet size, display height, material, printing, safety, or recycling.
Sixth, review artwork and brand message. Snack and candy displays need to attract attention quickly, but clear product access is still more important than decoration.
A good manufacturer will connect these points instead of treating the display as a print-only item.
Common Mistakes to Avoid
Many display problems start before production. The buyer may have a beautiful design, but the structure may not match the product or store environment.
Avoid these common mistakes:
- Choosing a floor display without checking total loaded weight
- Making a counter display too large for checkout placement
- Using shallow trays for unstable snack bags
- Forgetting refill access
- Ignoring export carton strength
- Approving artwork before confirming structure
- Using too many SKUs without dividers
- Choosing premium finishing without matching the retail budget
- Sending product photos without exact dimensions
- Assuming one display design will fit all retailers
The best projects start with product data and retail goals. Design follows those facts.
What to Send Before Requesting a Quote
To get a useful quote for a cardboard display for snacks and candy, prepare clear project information. This helps the manufacturer recommend the right structure and avoid repeated revisions.
Useful details include:
- Product photos
- Product dimensions
- Product weight
- Number of SKUs
- Units per display
- Target retail channel
- Display placement
- Approximate order quantity
- Artwork status
- Sample deadline
- Bulk delivery deadline
- Packing preference
- Destination country
If you already have a reference display, send photos from the front, side, back, and inside. If you do not have a design yet, the manufacturer can suggest structure options based on your product and retail plan.
For buyers comparing suppliers, custom cardboard displays can be planned around structure, printing, sampling, production, and export packing instead of appearance alone.
Manufacturer’s Recommendation
For small candy, chocolate bars, gum, and mints, start with a counter display or PDQ display. These options are compact, cost-effective, and strong for impulse buying.
For snack bags, gummies, cookies, and larger promotional packs, consider a floor display, dump bin, or sidekick display depending on store space and refill needs.
For hanging pouches, choose a peg display with proper hook spacing and reinforced back support.
For club stores, wholesale channels, and high-volume promotions, pallet displays or PDQ-ready cartons may be more practical than standard shelf units.
The best display is the one that balances product fit, store placement, loading strength, printing quality, assembly time, and shipping cost. When these details are checked before production, the display can support both retail presentation and smoother purchasing decisions.
Send product size, weight, quantity, and retail placement details to move from display idea to a workable sample plan.