Small hardware products look simple, but they can be demanding on retail displays. Screws, drill bits, hooks, fasteners, tape measures, small tools, blades, hinges, and repair kits often come in compact packs with concentrated weight, high SKU counts, and frequent customer handling. Choosing the right cardboard display for small hardware products means balancing strength, visibility, refill convenience, store layout, and export efficiency before bulk production starts.
For brand owners, wholesalers, retail buyers, and purchasing teams, the display is not only a shelf holder. It is a selling tool, a stock organizer, and a silent product guide inside the store.
Why Small Hardware Products Need a Different Display Strategy
Small hardware items are often heavier than they look. A display filled with metal fittings, screw boxes, blister packs, or boxed tools can carry more weight than a display used for cosmetics, snacks, or stationery.
The challenge is not only total weight. It is weight distribution.
A small peg hook area may carry many blister-packed accessories in one narrow zone. A PDQ tray may hold compact boxes that customers move around many times per day. A floor display may need to stay stable even when the front shelves are refilled and the back shelves are still half empty.
That is why the structure should be selected around real product data, not only appearance. Before a factory recommends a display style, the buyer should prepare several practical details:
- Product size and weight per unit
- Number of SKUs
- Quantity per display
- Retail location: shelf, counter, aisle, endcap, checkout area, or warehouse club floor
- Packaging type: blister card, small carton, pouch, clamshell, tube, or bulk pack
- Expected refill method
- Whether the display ships pre-packed or flat-packed
For hardware products, the strongest display is not always the biggest one. The best choice is usually the structure that keeps the product easy to browse while controlling load pressure and store handling risk.
Match the Display Type to the Retail Placement
A good hardware display starts with the store position. If the display location is wrong, even a well-made structure may underperform.
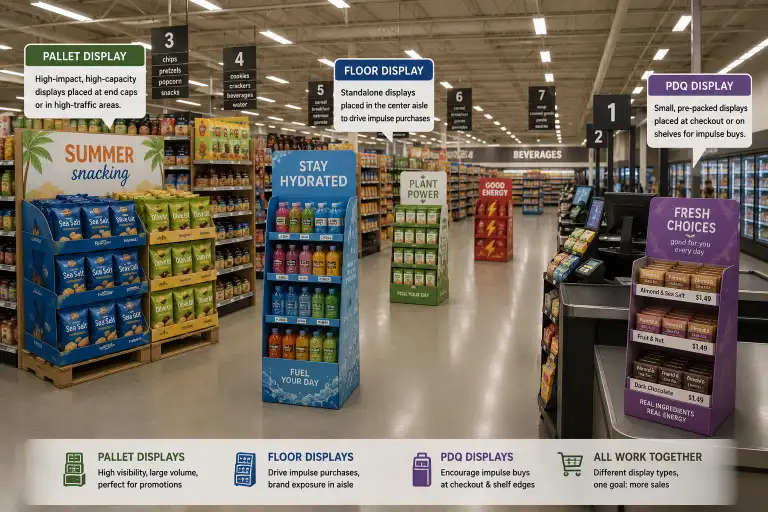
PDQ Displays for Shelf-Ready Hardware Packs
PDQ displays are useful for compact hardware items sold in small cartons, pouches, blister packs, or mixed kits. They are often placed directly on retail shelves, warehouse shelves, or promotional tables.
A PDQ display works well when the buyer needs fast setup and easy replenishment. For example, screw kits, wall anchors, drill bit sets, small adhesive hooks, or furniture repair accessories can sit neatly in separated compartments.
The key is to design the divider layout around the product width and facing count. If the compartment is too loose, products fall forward. If it is too tight, store staff may struggle to refill the tray.
For practical options, buyers can compare PDQ formats with broader custom cardboard displays when deciding between shelf placement and standalone display placement.
Counter Displays for Impulse Hardware Items
Counter displays fit small hardware products that sell near checkout counters, service desks, or tool rental areas. Examples include utility blades, small tape measures, repair patches, mini screwdrivers, key accessories, cable clips, and compact safety accessories.
A counter display should be easy to understand within a few seconds. Customers may not read long product descriptions at the counter, so the header, product arrangement, and front panel need to communicate use case clearly.
For small hardware products, counter displays often need reinforced base panels or double-wall side panels. A small footprint does not mean low load.
Peg Displays for Hanging Blister Packs
Peg displays are common for small hardware because many products are packed in blister cards or hang bags. They help customers compare SKUs visually and keep the display organized.
For peg displays, the hook length, hook spacing, back panel strength, and bottom support matter. Metal accessories hanging on the upper area can pull the back panel forward if the structure is too light.
A practical manufacturer will usually check the packed product weight per hook, number of hooks, peg board thickness, and whether plastic or metal hooks are required.
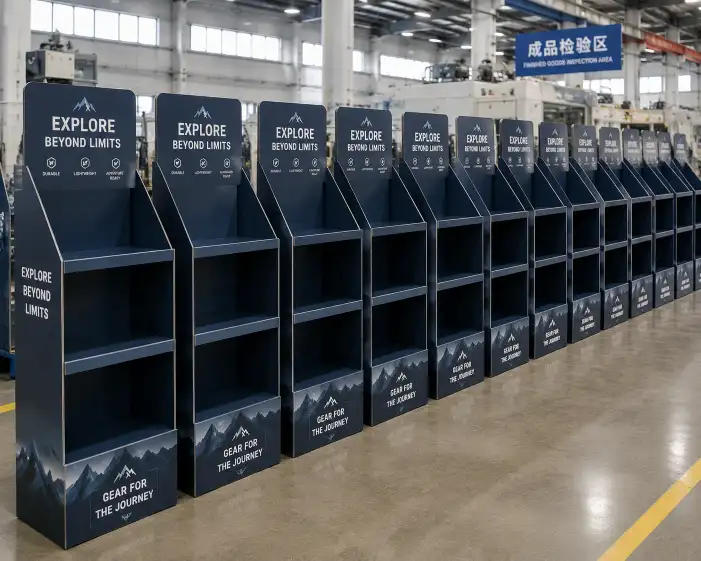
Floor Displays for Larger Promotions
Floor displays are suitable for seasonal campaigns, product launches, mixed hardware assortments, and aisle promotions. They can combine shelves, hooks, dump areas, and header panels in one unit.
For heavier small hardware products, floor displays should use stable base geometry, strong internal support, and shelf lips that prevent product movement. A display carrying compact tool kits or fastener boxes may need more board layers than a display carrying paper goods.
Buyers can review broader retail display structures on cardboard display pages before selecting the final format.
Sidekick Displays for Aisle Cross-Selling
Sidekick displays attach to store fixtures, pallet zones, or aisle sides. They are useful for small add-on hardware items such as hooks, batteries, replacement parts, fittings, cable ties, or repair kits.
The display should stay narrow and organized. A sidekick packed with dense metal goods needs extra attention to hanging balance and side-panel strength.
Compare Common Cardboard Display Options
The table below gives a practical starting point for hardware display selection.
| Display Type | Best For | Key Structure Point | Common Risk | Buyer Tip |
|---|---|---|---|---|
| PDQ display | Small boxed kits, pouches, fasteners | Divider fit and tray strength | Products tipping forward | Confirm product facing and refill quantity |
| Counter display | Checkout hardware accessories | Reinforced base and compact header | Base bending under concentrated weight | Test full loading before approval |
| Peg display | Blister packs and hang bags | Hook spacing and back panel support | Hooks pulling forward | Calculate weight per hook |
| Floor display | Mixed hardware promotions | Shelf load, base stability, internal support | Leaning or shelf sagging | Ask for load testing with real samples |
| Sidekick display | Cross-selling small accessories | Narrow profile and hanging balance | Display twisting on fixture | Confirm mounting method with retailer |
| Dump bin display | Bulk or loose small packs | Wall height and bottom support | Messy product presentation | Use inner dividers for mixed SKUs |
This table should not replace structural sampling. It helps the buying team narrow down the right direction before artwork, quotation, and prototyping.
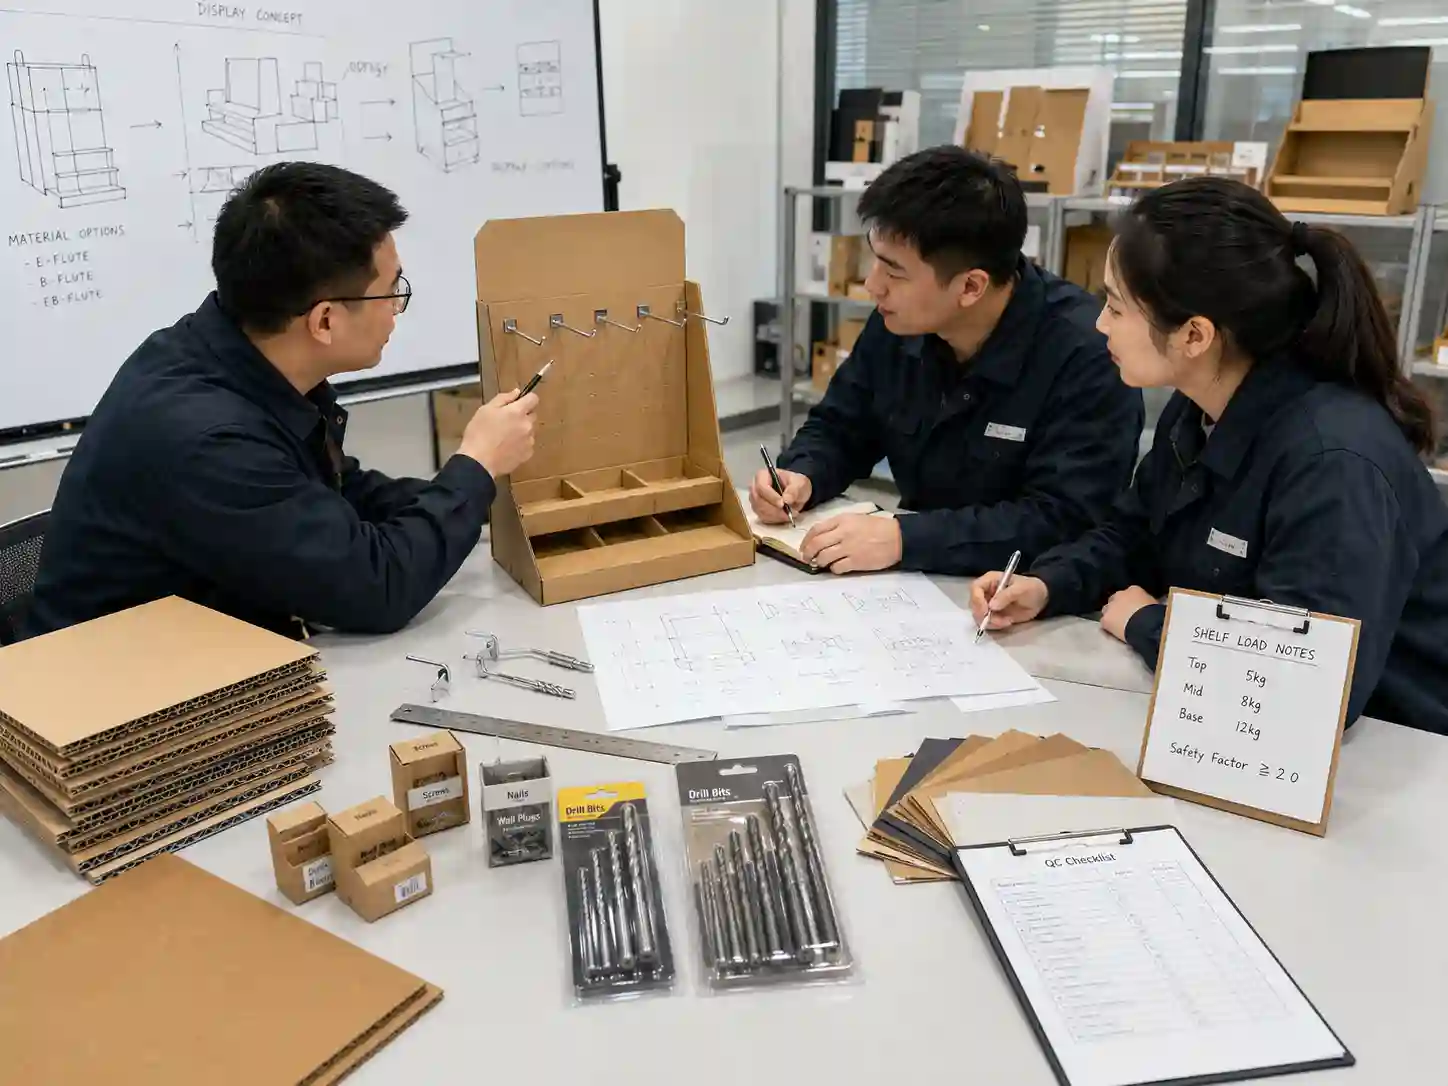
Calculate Product Weight Before Choosing the Structure
For a cardboard display for small hardware products, weight is one of the first details to confirm. Many display problems happen because the design starts with a nice shape but ignores the full loading condition.
A practical calculation should include:
- Weight per product unit
- Quantity per shelf, hook, tray, or compartment
- Total display load
- Weight distribution from top to bottom
- Extra load caused by customer handling
- Whether the display will be shipped with products inside
For example, a display holding 80 small boxes may look lightweight in a rendering. If each box weighs 180 grams, the total product load is 14.4 kg before adding display material, inserts, header, and packing.
A counter display with 14 kg of metal accessories would need a different structure than one holding paper cards or small plastic items. The factory may recommend thicker corrugated board, double side walls, reinforced shelves, inner support panels, or a smaller product count per display.
Do Not Overload the Top Area
Hardware displays should avoid placing too much weight in the upper section unless the base is designed to balance it. Heavy upper shelves can create leaning risk, especially for narrow floor displays.
For floor stands, heavier products often belong on lower shelves. Lighter blister packs or promotional messaging can sit higher.
It sounds simple. It saves headaches.
Choose the Right Board and Reinforcement
Material choice affects display strength, print quality, shipping cost, and assembly experience.
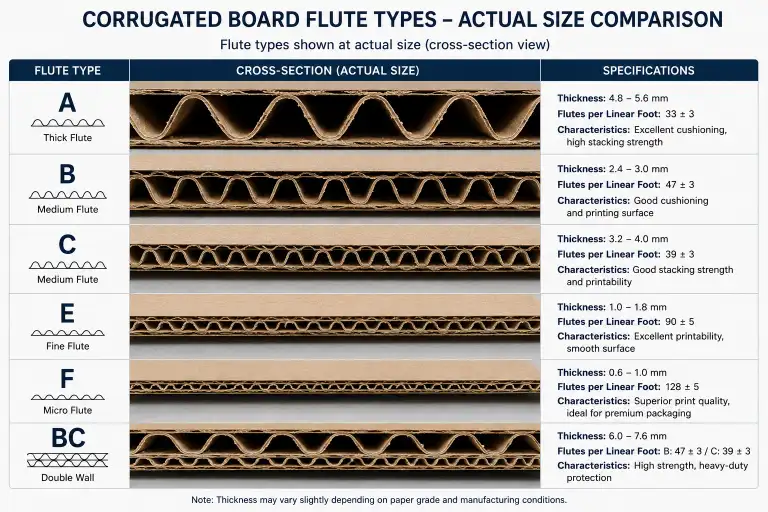
For many hardware displays, corrugated board is the main material. The flute type, paper grade, lamination, and support structure should match the product load and retail environment.
Common Material Considerations
E-flute can provide a smoother surface for printing and is often used for lighter displays or display panels. B-flute and stronger corrugated combinations can support heavier loads. Double-wall board may be considered when the display carries dense products or needs long in-store life.
For premium hardware brands, the visual surface still matters. A strong display does not need to look rough. With the right printed paper, lamination, and die-cutting control, the display can feel clean and retail-ready.
For responsible sourcing, some buyers may ask whether materials can follow FSC-related paper sourcing requirements. For production systems, ISO-related quality management language may also appear in supplier audits or buyer documentation. For corrugated packaging references, FEFCO standards are often useful when discussing carton styles and packing formats.
A manufacturer should be clear about what can be supported, what requires certification documents, and what needs to be confirmed before quotation.
Design Shelves, Hooks, and Compartments Around Real Products
Small hardware products often come with different packaging formats in one display. A mixed display may include blister packs, small boxes, tubes, sample cards, and refill cartons. The structure should guide the customer instead of turning the display into a crowded storage box.
Shelf Displays
For boxed hardware products, shelf depth and front lip height are important. The shelf should hold products neatly without hiding too much packaging information.
If the product is small, a deep shelf may cause the front row to sell out while the back row remains unseen. In that case, a stepped shelf or inner pusher-style arrangement may help, depending on budget.
Peg Hook Areas
For hanging packs, the back panel must stay flat. Hook holes should match the hook size and load. Reinforcement sheets can be added behind the peg area when needed.
The artwork should not place key text where hooks will cover it. Sounds obvious, but it happens in rushed projects.
Dividers and Trays
For fasteners, wall anchors, fittings, and small repair kits, dividers help separate SKUs. Divider height should keep products upright while allowing customers to remove items easily.
If a display includes many small SKUs, printed labels or SKU strips can improve browsing. For B2B programs, this can reduce store staff confusion during refill.
Think About Assembly Before Bulk Production
A display may look good in a 3D mockup, but store staff care about setup speed. For retailers, assembly should be simple, repeatable, and hard to misunderstand.
A practical cardboard display manufacturer will consider:
- Flat-packed structure for lower freight volume
- Clear folding lines
- Numbered assembly steps
- Pre-glued sections where possible
- Locking tabs that do not tear during setup
- Shelf panels that fit without forcing
- Header attachment that stays straight
If the display is going to stores across different regions, assembly instructions should use simple diagrams. Long text instructions are often ignored.
For hardware products, assembly testing should include full loading. An empty display may stand well, but the real test starts when all hooks, shelves, and compartments are filled.
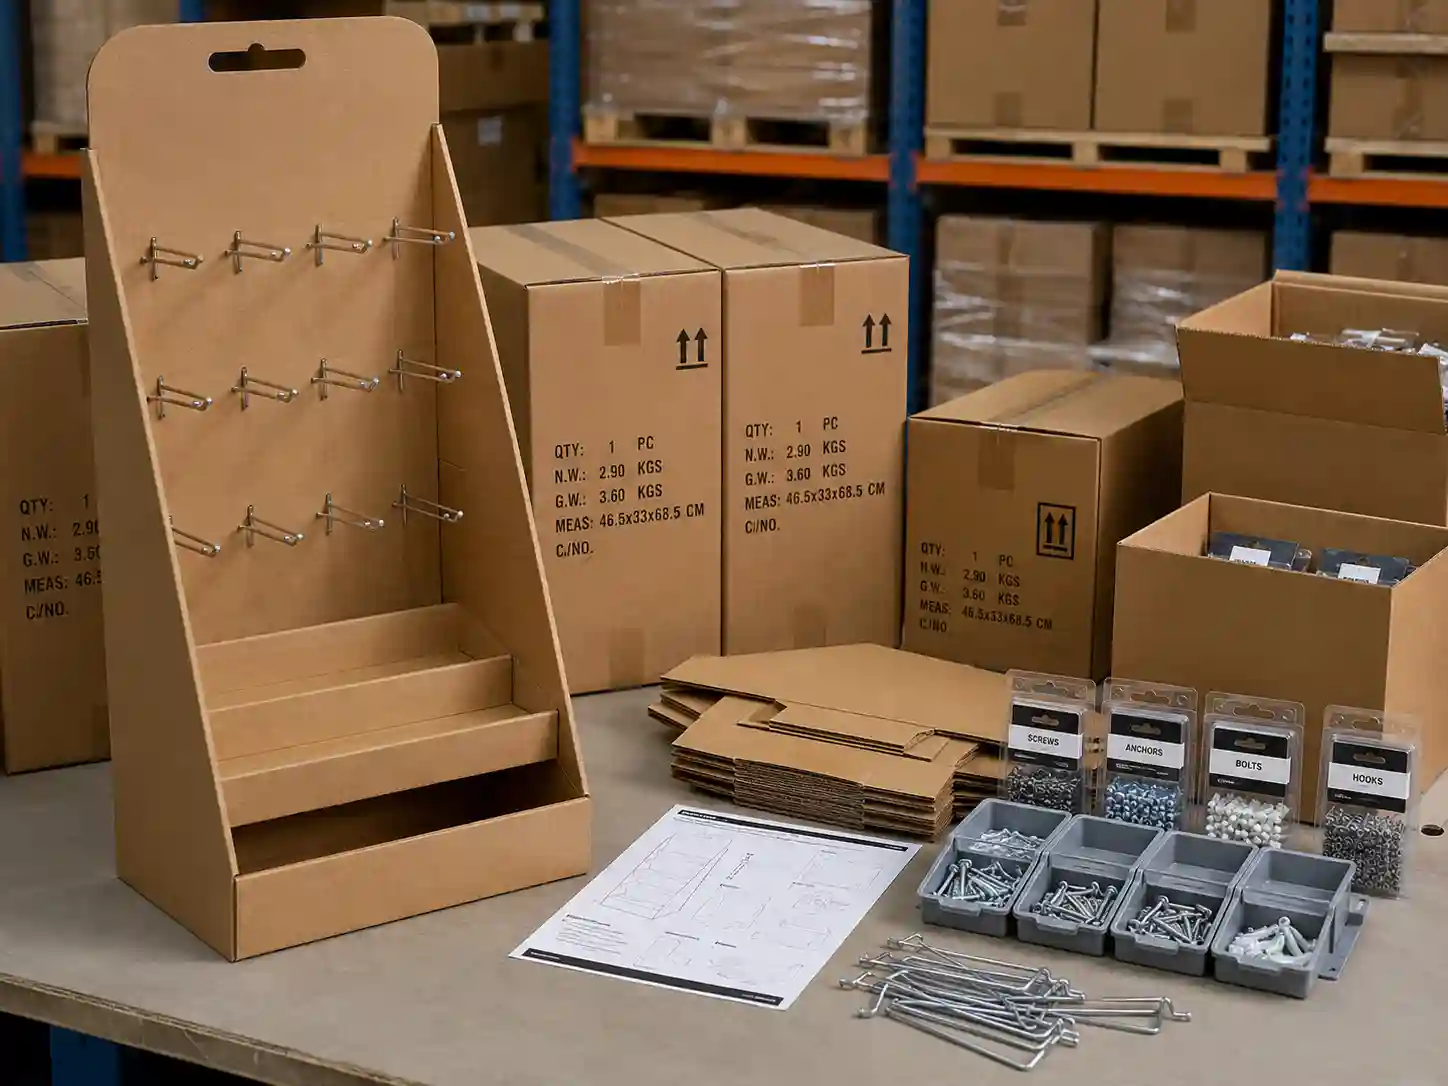
Decide Between Flat Packing and Pre-Packing
For export and retail rollout, packing method can affect cost and damage risk.
Flat-packed displays save shipping volume and are suitable when the retailer or distributor can assemble and fill the display locally. This works well for many floor displays, sidekick displays, and counter displays.
Pre-packed displays can save store labor and support faster promotion setup. However, they require stronger internal packing, product protection, and drop-test consideration. If the display ships with small metal items inside, the inner structure must prevent product movement during transportation.
A buyer should confirm the packing method early because it changes the structure. A display designed for flat packing may not be strong enough for pre-packed shipping without changes.
Export Carton Details Matter
For international shipments, export cartons should protect edges, headers, hooks, and printed panels. Corner protection, inner bags, instruction sheets, spare parts, and carton marks may be needed.
Leader Display works from a production viewpoint, so packing is not treated as an afterthought. The display must arrive ready for retail setup, not arrive as a repair project.
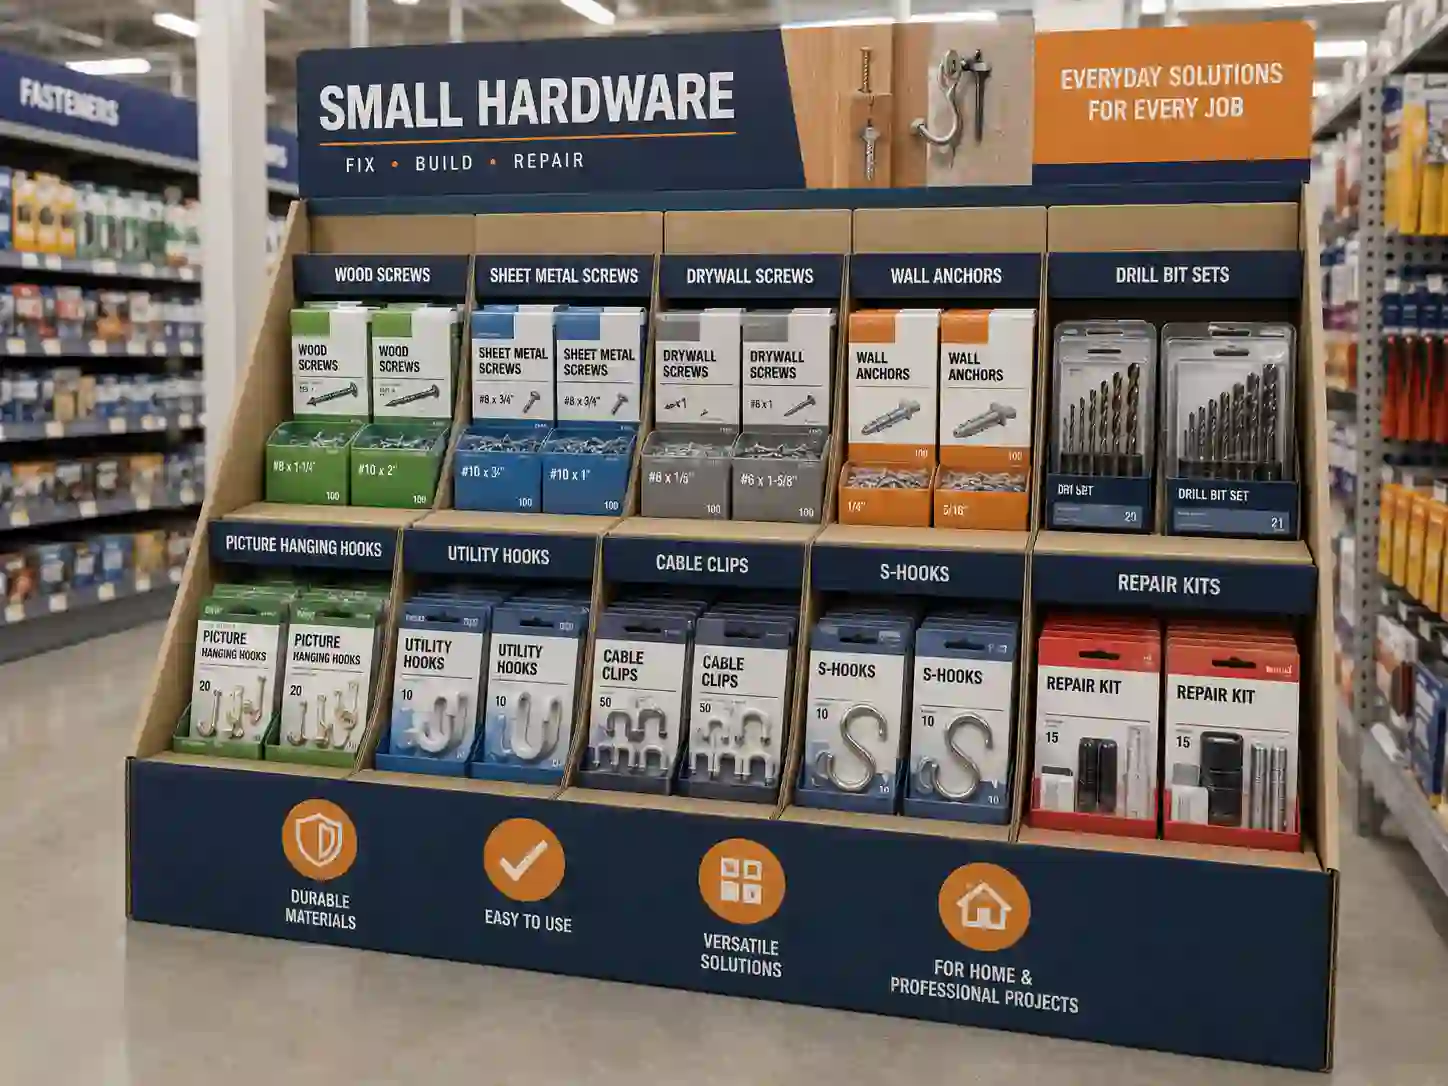
Plan Artwork for Hardware Buyers, Not Only for Decoration
Hardware shoppers often buy based on function, size, compatibility, and trust. The display artwork should help them choose quickly.
Useful artwork elements include:
- Product category name
- Application scene icons
- Size or compatibility notes
- “Best for” use cases
- Clear SKU grouping
- Strong header message
- Simple brand block
- QR code or instruction link when relevant
Avoid filling the display with decorative graphics that compete with product information. Hardware displays need clarity. A clean design often sells better than a crowded one.
For brand consistency, the display can still use strong colors, technical patterns, product photos, and structured information panels. The goal is to make the display look organized and useful.
Sampling Is Where Problems Get Caught
For custom hardware displays, sampling should not be skipped. A sample helps check material strength, assembly logic, printing effect, product fit, and retail appearance before mass production.
A useful sample review should answer these questions:
- Do all products fit as planned?
- Can customers remove and return products easily?
- Does the display stand straight when fully loaded?
- Are shelves bending after loading?
- Are hooks pulling against the back panel?
- Is the header stable?
- Can the display be assembled without special tools?
- Does the carton packing protect the display surface?
For heavier hardware products, a plain white structural sample can be made before printed sampling. This helps the buyer confirm strength before spending time on final artwork.
Once the structure is approved, printed sample review can focus on color, finishing, logo position, barcode areas, and retail presentation.
Consider Refill and Store Maintenance
A display that looks good on the first day may fail if it is hard to refill. Small hardware products are often sold in many SKUs, so refill logic matters.
For PDQ displays, stores may refill by tray, carton, or SKU bundle. For peg displays, hooks should allow staff to add products without removing the whole display. For floor displays, shelves should remain accessible even when the display is placed near other fixtures.
Refill planning should cover:
- Product access from the front
- SKU labels or printed compartment names
- Space for backup stock
- Strong shelf lips
- Stable dividers
- Easy cleaning around the base
- Replacement header or side panel needs
A display used for a short promotion may only need to last several weeks. A display used for ongoing retail replenishment needs stronger structure and clearer maintenance design.
Choose a Manufacturer That Understands Retail Display Production
A custom display project includes more than cutting cardboard. It involves structural design, sample making, printing, finishing, die-cutting, gluing, assembly checking, packing, and export coordination.
When choosing a supplier, B2B buyers should look for practical production support, not only a low unit price.
Important questions include:
- Can the factory design around product weight and retail placement?
- Can they make a structural sample before bulk order?
- Can they support different display types, including PDQ, counter, peg, sidekick, floor, pallet, dump bin, and standee displays?
- Can they help with flat packing or pre-packed solutions?
- Can they provide clear packing advice for export?
- Can they adjust the structure after testing?
- Can they communicate quickly during artwork and sampling?
Leader Display has been manufacturing B2B retail display solutions since 2004, with experience in custom cardboard display projects for different product categories and retail formats. For buyers comparing display options, the main Leader Display website can be used as a starting point for factory capability and project inquiry.
What to Prepare Before Requesting a Quote
A clear inquiry helps the factory provide a useful recommendation instead of a generic price.
Before sending an RFQ, prepare the following information:
Product Information
Share product dimensions, unit weight, packaging format, product photos, and quantity per display. If there are multiple SKUs, provide the size and weight range.
Retail Placement
Tell the factory whether the display will sit on a shelf, counter, aisle, pallet, side fixture, or trade show area. Placement changes the structure.
Display Goal
Explain whether the display is for a product launch, seasonal promotion, retail replenishment, distributor showroom, or wholesale presentation. A short-term campaign and a long-term in-store program may need different material choices.
Packing Requirement
Confirm whether the display should ship flat-packed, semi-assembled, or pre-packed with products. For export, also mention carton size limits if the retailer or logistics team has requirements.
Artwork and Branding
Share brand guidelines, logo files, color references, barcode areas, and any retailer requirements. If the artwork is not ready, the factory can still begin with structural planning.
Common Mistakes to Avoid
Many hardware display problems are preventable when the project is reviewed early.
One common mistake is choosing a display style from a photo without checking product weight. Another is using too many SKUs in one small display, making the layout hard to shop and hard to refill.
Some buyers focus on unit price but overlook packing volume. A cheaper display may cost more after shipping if it cannot be flat-packed efficiently. Others approve a design before confirming retailer placement, then discover the display is too wide, too tall, or unsuitable for shelf rules.
The best process is simple: confirm product data, choose the display type, test the structure, review artwork, approve packing, and then move to bulk production.
Build the Display Around the Product, Store, and Supply Chain
A successful cardboard display for small hardware products should hold the product securely, guide customers clearly, and support the retailer’s setup process. It should also fit the supplier’s production process and the buyer’s shipping plan.
When the display type, material, loading, assembly, refill method, and export packing are planned together, the project becomes easier to quote, sample, approve, and scale. Share your product size, weight, SKU list, and target retail placement with a practical display manufacturer, and the right structure can move from idea to sample with far less guesswork.