A brand spends $40,000 on a custom floor display. The graphic design is outstanding. The structure is engineered for a 12-week promotion. The product is a proven seller. The display is placed on an end cap in a mid-traffic aisle. Six weeks into the promotion, the category manager reviews the numbers: sell-through is 23%. The same product on a checkout counter display in a different chain sold through at 71% in the same period.
The display was not the problem. The placement was.
Where a display sits in a store determines how many shoppers see it, how many interact with it, and how many buy from it. Different placements have different traffic patterns, different shopper mindsets, and different suitability for different display types. Choosing the right placement is as important as choosing the right display.
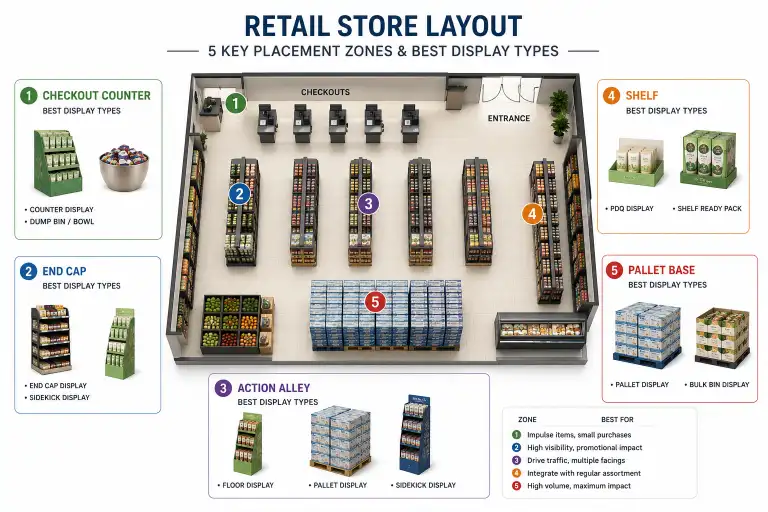
This guide covers the five main retail display placements — checkout, end cap, action alley, shelf, and pallet base — with traffic data, best-fit display types, and the strategic trade-offs for each location.
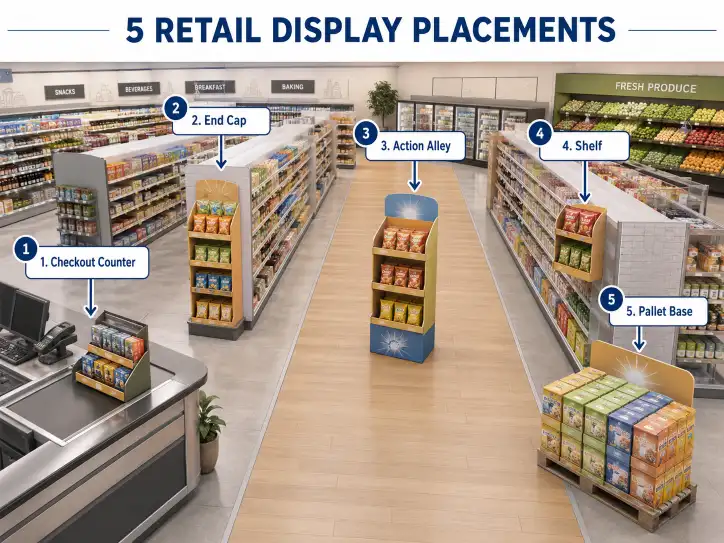
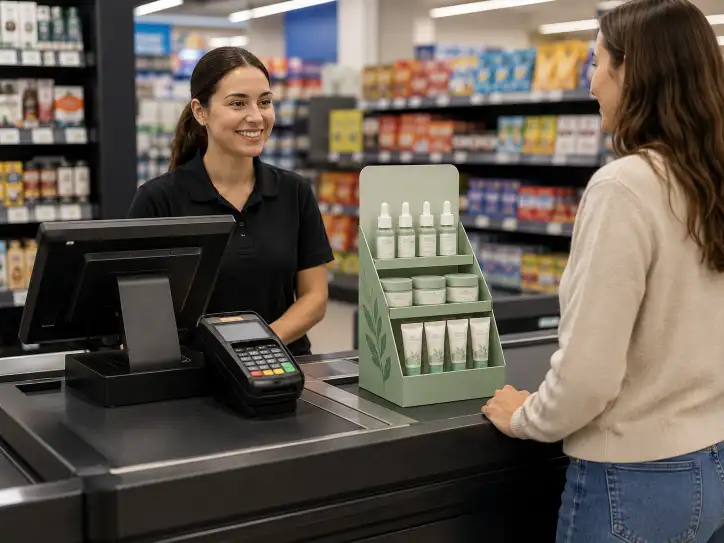
01 Checkout / Front-End
Traffic level: Highest in the store. Every shopper passes through checkout.
Shopper mindset: Waiting, looking for something to grab. Impulse buying peaks here.
Dwell time: 30 seconds to 5 minutes (queue dependent).
Traffic and Sales Data
Checkout aisles generate the highest sales per square foot of any location in a retail store. According to industry research, the front-end area accounts for a disproportionately high percentage of a store's total sales despite occupying less than 2% of floor space. Impulse purchases made at checkout account for a significant share of total store revenue.
Best display types for checkout:
| Display Type | Why It Works | Example Products |
|---|---|---|
| Counter Display | Small footprint (8"×10"), sits on the counter next to the register | Lip balm, gum, phone chargers |
| PDQ Display (small) | Sits on counter, holds 12–24 units in a branded tray | Snack bars, single-dose supplements |
| Peg Display | Hangs on checkout display racks or side panels | Keychains, small toys, earbuds |
What to avoid at checkout:
- Floor displays at checkout — the front-end area has no floor space for freestanding displays
- Large PDQs that take up more than 12" of counter depth — cashiers need counter space for bagging
- Heavy displays that could slide off or tip — checkout counters are not designed for display mounting
Design Considerations for Checkout
- Anti-slip base is mandatory — The polished counter surface and customer reaching motion make sliding a real risk
- Height under 12 inches — The display must not block the cashier's view of the customer or the payment terminal
- Easy-access opening — Customers should be able to grab product with one hand without moving the display
How to Get Checkout Placement
Checkout space is the most contested real estate in any store. Retailers allocate it to:
- High-impulse categories (candy, gum, batteries)
- New product launches with guaranteed sell-through
- Brand programs with proven checkout performance
- Seasonal promotions (holiday, back-to-school)
Strategy: Propose a display that takes minimal counter space, has a low unit cost (so the retailer risks little), and comes pre-assembled (so the cashier does not need to build it). A small counter display at 500–1,000 stores with a 4-week sell-through guarantee is a strong pitch. For counter display design specifications and cost ranges, see [[Counter Display Guide - Custom Countertop Display for Retail|Custom Counter Display Guide]].
02 End Cap
Traffic level: High. End caps are the most visible display positions in a store after checkout.
Shopper mindset: Browsing, open to discovery. End caps signal "featured" or "on promotion."
Dwell time: 5–15 seconds.
Traffic and Sales Data
End cap displays generate higher sales lift than same-product sales from the shelf. The lift comes from visibility — an end cap is visible from three sides (or one, depending on the position) and catches the shopper's attention from further away than a shelf placement.
Best display types for end caps:
| Display Type | Why It Works | Example Products |
|---|---|---|
| Floor Display (FSDU) | Freestanding, full-height, draws attention from the aisle | Brand campaigns, new product launches |
| Sidekick Display | Attaches to the side of the gondola, adds extra product capacity | Add-on items, accessories |
| Pallet Display (half size) | For club stores or mass retailers with wider end caps | Bulk snack packs, household items |
What to avoid on end caps:
- Small counter displays — they get lost in the visual noise of an end cap position
- Unbranded or under-designed displays — the end cap is prime brand-building real estate; generic designs waste it
End Cap Types
Front end cap (at the end of a main aisle, facing the front wall): Highest traffic end cap position. Often reserved for seasonal promotions or featured categories.
Side end cap (at the end of a side aisle, perpendicular to the main aisle): Good traffic but less visible than front end caps. Better for category-specific displays.
Valley end cap (between two gondola runs, facing into the aisle): Moderate traffic. Common in grocery stores for category-level promotions.
Design Considerations for End Caps
- Height compliance is critical — Most retailers have strict end cap height limits (typically 54"–66" depending on the store). A display that exceeds the limit will be rejected.
- 360-degree visibility — End caps visible from the main aisle need design consideration on all visible sides. A one-sided display on a three-sided end cap wastes exposure.
- Restock accessibility — Store staff need to restock end caps frequently. A display that is difficult to restock will be understocked and underperform.
How to Get End Cap Placement
End cap space is typically allocated by the category manager or the planogram team. Retailers rotate end cap placements on a 2–8 week cycle.
Strategy: Propose a display that matches the retailer's promotional calendar. If the retailer's planogram cycle is 4 weeks, a display that can be set up in 5 minutes and removed in 2 minutes is more likely to be used than one that requires 15 minutes of assembly. For end cap compliance height limits and installation requirements, see [[Guide to Target, Walgreens, Kroger, Publix, Home Depot, Lowe's Display Compliance|Major Retailer Display Compliance Guide]].
For details on compliance requirements at specific retailers, see [[Walmart Pallet Display Requirements Guide|Walmart Display Requirements]].
03 Action Alley
Traffic level: High. Action alley is the main aisle in club stores and mass retailers.
Shopper mindset: Moving with purpose. Shoppers are in transit between sections.
Dwell time: 2–5 seconds passing.
Traffic and Sales Data
Action alley is the central corridor that runs from the front to the back of a store. In club stores (Costco, Sam's Club), the action alley is the primary shopping path, and placement here guarantees near-100% shopper exposure. Action alley displays generate high volume but require quick-capture design — shoppers are moving and may not stop to examine the display.
Best display types for action alley:
| Display Type | Why It Works | Example Products |
|---|---|---|
| Pallet Display | Dominant visual in the aisle, holds large quantities | Bulk food, beverages, household goods |
| Half Pallet Display | Smaller footprint, fits narrower action alleys | Snack variety packs, seasonal items |
| Dump Bin | Low-profile, easy to grab from, works for impulse items | Seasonal candy, toys, small hardware |
What to avoid in action alley:
- Displays shorter than 48 inches — they get hidden by neighboring pallet displays
- Complex displays that require shoppers to read instructions — shoppers are moving
- Displays with small compartments that make it hard to grab product quickly
Design Considerations for Action Alley
- Bold visual at distance — Shoppers need to recognize the product from 15–20 feet away. Large product photography, minimal text.
- Grab-and-go access — The shopper should be able to pick up the product without stopping. Wide openings, no doors or flaps.
- Stable base required — Action alley displays are hit by passing shopping carts. The base must be wide enough to prevent tipping on impact.
- Forklift accessible — Club store action alley displays are often moved or repositioned by forklift. If the display is on a pallet, the pallet must be forklift-accessible from 4 sides.
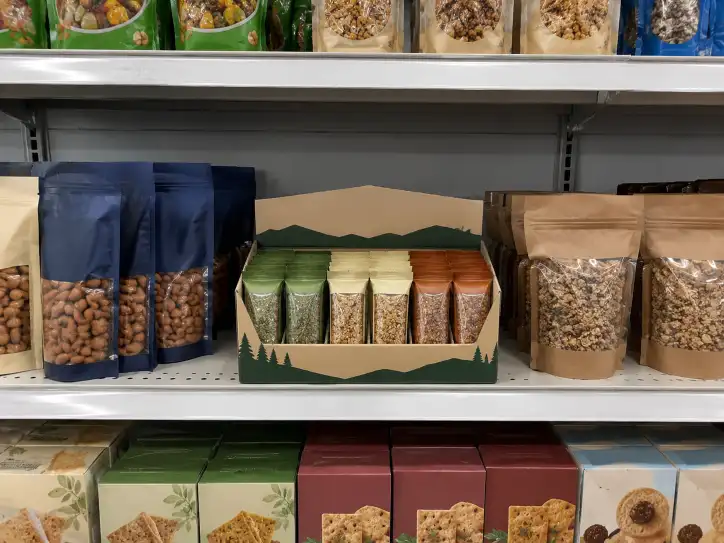
04 Shelf (In-Line)
Traffic level: Location-dependent. High for staple categories (dairy, bread), lower for specialty categories.
Shopper mindset: Seeking. Shoppers at the shelf are usually looking for a specific product.
Dwell time: 10–60 seconds.
Traffic and Sales Data
Shelf placement is the default position for most products. A PDQ display on a shelf can provide significant sales lift compared to the same product in its regular shelf position, particularly for new products that lack established shelf presence.
Best display types for shelf placement:
| Display Type | Why It Works | Example Products |
|---|---|---|
| PDQ Display | Sits on the shelf, organizes product in a branded tray, easy to restock | Single-SKU snacks, supplements, cosmetics |
| SRP (Shelf-Ready Packaging) | Ships flat with product, opens to a display tray | Multipack beverages, boxed goods |
| Sidekick Display | Attaches to the shelf edge or wing panel, adds capacity without taking shelf space | Impulse items, small accessories |
What to avoid on shelves:
- Displays that exceed the shelf depth — they overhang and get damaged by passing carts
- Displays that block access to adjacent products — retailers will remove them
- Displays that require assembly on the shelf — store staff prefer PDQs that open and unfold
Design Considerations for Shelf Placement
- Width must match shelf standard — Measure the retailer's standard shelf width for the category. Design to that width minus 0.5 inches for tolerance.
- Front-loading restock — PDQ displays should load from the front or top, not the back. Store staff will not restock from behind.
- Height below the shelf above — The display must fit under the next shelf. Typical grocery shelf spacing is 12–18 inches. Confirm before designing.
How to Get Shelf Placement
Shelf placement does not require end cap or action alley allocation — it goes directly in the regular shelf set. The brand pays for the display but the product stays in its standard shelf location.
Strategy: Propose a PDQ that replaces the product's standard shelf presence. The retailer gains organized presentation and easier restocking. The brand gains a branded display without competing for premium placement.
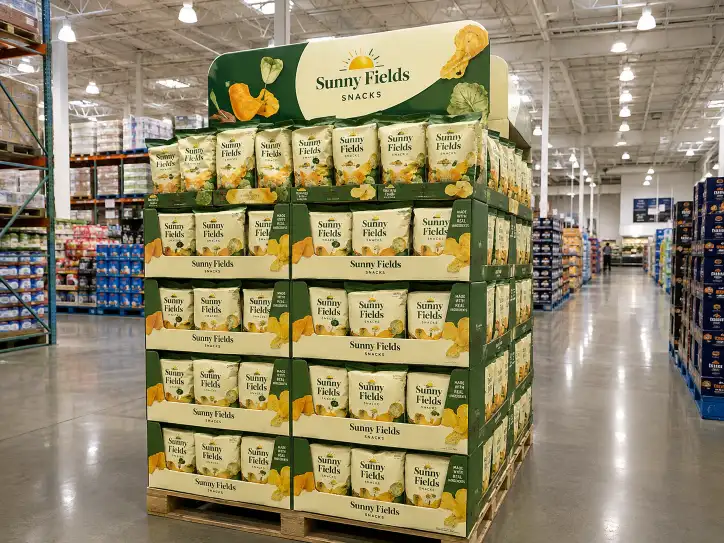
05 Pallet Base (Floor Stack / Bulk Display)
Traffic level: High in club stores, moderate to high in mass retail.
Shopper mindset: Bulk buying, value seeking. Pallet base displays signal a deal.
Dwell time: 10–30 seconds.
Traffic and Sales Data
Pallet base displays — products displayed directly on a pallet with or without a corrugated surround — are the standard format in club stores and are used for high-volume promotions in grocery and mass retail. They hold the largest product quantity of any display format and generate the highest absolute sales volume, though sell-through rate depends on the product category.
Best display types for pallet base:
| Display Type | Why It Works | Example Products |
|---|---|---|
| Full Pallet Display | surrounds the pallet with graphics, holds 100–300 units | Club store bulk items, seasonal promotions |
| Half Pallet Display | smaller footprint, fits standard grocery end caps | Beverage variety packs, snack boxes |
| Pre-Filled Pallet Display | factory-loaded product + display, ready to sell | Costco pallet programs, Sam's Club |
What to avoid on pallet base:
- Under-designed pallet displays — a bare pallet with shrink wrap signals "cheap," not "value"
- Pallet displays without tester or demo capability — club stores often expect sample or demo access
- Displays with unstable stacking — pallet displays need to survive forklift handling and floor impact
Design Considerations for Pallet Base
- Pallet quality matters — Use GMA-grade pallets in good condition. A broken pallet corner during shipment can destroy the display.
- Total height includes the pallet — A 72-inch display sits on a 5-inch pallet, so the corrugated structure is 67 inches. Confirm with the retailer whether the height restriction includes the pallet.
- Corner protection during transport — Pallet displays need corrugated corner protectors or edge guards to survive stacking during shipping.
- Shrink wrap specification — 3–5 mil shrink wrap, applied with a minimum of 2 layers, to hold the display together during transit.
How to Get Pallet Base Placement
Pallet base placement requires dedicated floor space. In club stores, this means a pallet position in the action alley or a side aisle. In grocery and mass retail, pallet displays go in the seasonal aisle or on the end cap.
Strategy: Pallet base placement works best when tied to a specific promotional event (holiday, seasonal, new item launch). Propose a display that arrives pre-assembled and pre-filled, requires zero store labor, and includes planogram-compliant labeling.
06 Placement Decision Matrix
| Placement | Traffic | Shopper Mindset | Best Display Types | Sales Lift Potential | Implementation Difficulty |
|---|---|---|---|---|---|
| Checkout | Highest | Impulse | Counter Display, small PDQ | High (per sq ft) | High (limited space, competitive) |
| End Cap | High | Discovery | Floor Display, Sidekick | Medium-High | Medium (requires retailer allocation) |
| Action Alley | High | Transit | Pallet Display, Dump Bin | High (absolute volume) | High (requires floor space) |
| Shelf | Medium | Seeking | PDQ, SRP, Sidekick | Low-Medium | Low (uses existing shelf space) |
| Pallet Base | Medium-High | Value | Pallet Display, Half Pallet | High (per display) | Medium (requires dedicated footprint) |
07 Placement Strategy by Campaign Goal
Goal: Maximum Impulse Sales
Best placement: Checkout
Display type: Counter Display or small PDQ
Why: Checkout captures shoppers at the moment of transaction, when they are most receptive to small, low-commitment purchases
Risk: Limited space availability; display must be very small and retailer-approved
Goal: Brand Awareness and Launch
Best placement: End Cap
Display type: Floor Display (FSDU) with large header and brand graphics
Why: End caps are the most visible brand-positioning real estate. A strong end cap display communicates "this product is here and it matters"
Risk: Higher display cost; requires retailer allocation; sell-through depends on product appeal, not just placement
Goal: High Volume Sell-Through
Best placement: Action Alley (club) or Pallet Base (mass)
Display type: Pallet Display or Half Pallet Display
Why: These placements hold the most inventory and generate the highest unit sales. Pallet displays are the most efficient format for moving volume
Risk: Largest investment in inventory and display cost; if the product does not sell, the write-off is significant. For pallet display cost breakdown and pre-filled vs flat-pack trade-offs, see [[How Much Does a Pallet Display Cost- 2026 Pricing Guide for Buyers|Pallet Display Cost Guide 2026]].
Goal: Shelf Presence for New SKU
Best placement: Shelf (In-Line)
Display type: PDQ Display
Why: A PDQ gives a new product branded shelf presence that stands out from the competition without requiring premium placement allocation
Risk: Modest sales lift versus shelf alone; PDQ may be removed if the product does not perform
08 Common Placement Mistakes
Mistake 1: Using a floor display on a shelf location
A floor display is designed to stand on the floor. A brand places it on a shelf or gondola base deck where it sticks out into the aisle. The display blocks the aisle and is removed by store staff.
Mistake 2: Designing a pallet display for an end cap without checking the end cap dimensions
End cap sizes vary by retailer and by store within the same chain. A pallet display designed for a 48" end cap will not fit a 40" end cap.
Mistake 3: Ignoring the restock path
A display placed in a high-traffic area that cannot be easily restocked will be understocked after the first week. The display looks great on day one and empty by day seven.
Mistake 4: Not confirming placement before designing
A buyer designs a floor display assuming end cap placement. The retailer assigns it to a shelf location. The floor display is too tall for the shelf, and the project is delayed by 4 weeks for a redesign. Use the [[Cardboard Display Selection Guide - Decision Framework for Buyers|Cardboard Display Selection Guide]] to check your display type against the confirmed placement before starting structural design.
09 Placement Strategy Checklist
Before selecting a placement:
- Target retailer confirmed
- Display location options identified (checkout / end cap / action alley / shelf / pallet base)
- Retailer's specific height and width restrictions obtained
- Traffic data for the location reviewed
- Shopper mindset for the location considered
- Restock accessibility confirmed
- Display type matched to placement
- Placement confirmed with retailer before display design begins