A PDQ display sample is more than a preview. It is the point where your product weight, retail shelf space, print design, packing method, and assembly process meet the real structure. Before mass production starts, a careful sample comparison can prevent weak trays, poor product fit, slow setup, carton damage, and costly rework.
For brand owners, wholesalers, and retail buyers, the sample stage should not be treated as a quick visual approval. It should be a practical test. As a cardboard display manufacturer, we use this step to confirm whether the display can hold products, ship flat, assemble cleanly, refill smoothly, and present the product in a way that fits the retail plan.
Why the Sample Comparison Stage Matters
A PDQ display often looks simple from the outside. In practice, it has many details that affect performance: board grade, flute direction, tray depth, divider strength, header stability, product facing, locking tabs, glue points, packing layout, and outer carton protection.
Once bulk production begins, small sample problems become large batch problems. A tray that bends with 12 products in the sample room may fail faster on a checkout shelf. A header card that looks fine in one display may tilt after overseas shipping. A dieline that works on screen may create slow assembly for store staff.
This is why sample comparison is a production checkpoint, not a decoration review.
For buyers preparing a custom retail display project, the sample should answer five questions:
Can the display hold the product weight?
Can the product fit without shaking or forcing?
Can retail staff assemble it without confusion?
Can the display survive flat packing and export cartons?
Can the final look support the campaign goal?
If the answer is unclear, the sample needs adjustment before bulk order approval.
Start with the Product, Not the Display
The first comparison point is the product itself. A PDQ display must be designed around the product size, weight, shape, quantity, and refill plan.
A light skincare carton needs different board support from a glass jar. A candy pouch needs different dividers from a small electronics accessory. A lip balm counter tray may need tight slots for neat facing, while boxed supplements may need a deeper tray and stronger side walls.
Before comparing two samples, place the real product into both structures. Do not rely only on empty display photos. Empty displays can hide weak load areas.
Check the following details:
Product quantity per tray
Total loaded weight
Product movement during handling
Front product visibility
Divider spacing
Shelf or counter footprint
Access for customer pickup
Refill space behind the first row
A good PDQ display should present the product clearly without making the tray difficult to refill.
Compare Structure and Load-Bearing Performance
Structural strength is one of the most important parts of sample approval. The sample should be tested in the same way it will be used in stores.
If the PDQ display is for a checkout counter, the buyer should check whether the base stays flat, whether the front lip holds shape, and whether the display remains balanced when products are removed from one side. If the display is for shelf-ready placement, the width, depth, and front opening must match the retail shelf plan. If it is part of a pallet or case stack display, the sample must be checked for stacking and transport pressure.
Key Structural Areas to Inspect
The base panel should not bow under the loaded product weight. Side walls should stand straight. Locking tabs should stay closed after assembly. Header cards should not lean forward. Product dividers should hold position after repeated pickup and refill.
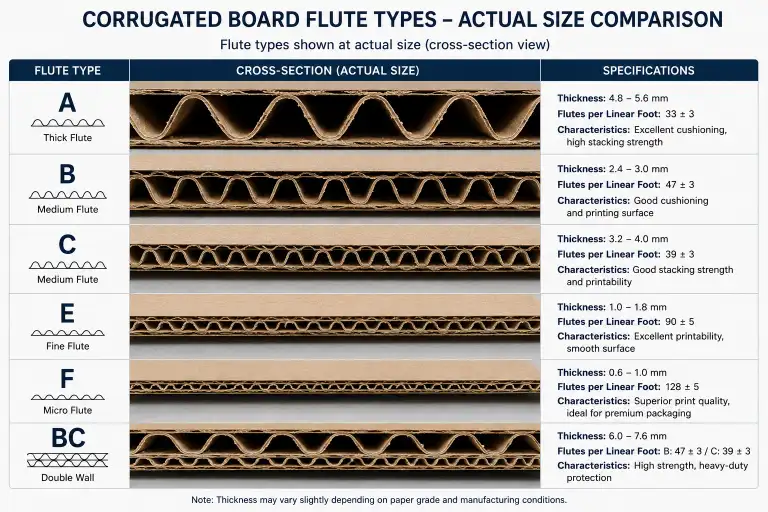
The flute direction also matters. Corrugated board can perform differently depending on how the flute runs through the base, side wall, and header. For heavier items, the wrong flute direction may reduce stiffness.
Board selection should be based on use. Common options include single-wall corrugated board, E-flute, B-flute, laminated paperboard, or stronger combined structures. For some retail programs, material sourcing may also connect with FSC-certified paper requirements. For export projects, consistent board grade and moisture control matter as much as print quality.
Review Print Color, Finish, and Brand Presentation
A sample should be checked under normal light, not only under factory inspection light. Retail displays are often seen under store lighting, warehouse lighting, or trade show lighting. Color can look different across these settings.
Compare the sample with the approved artwork file, color proof, or Pantone reference when available. Check logo size, product claims, barcode space, warning text, campaign message, and header readability from a normal shopper distance.
Print issues to review include:
Color shift
Low contrast text
Misaligned cutting
Cracked ink on folds
Unclear product images
Weak coating protection
Poor edge finishing
Surface finishing also affects both appearance and durability. Matte lamination can create a premium look. Gloss lamination can make colors stand out. Spot UV, foil stamping, embossing, or debossing can support special campaigns, but these finishes should not weaken fold lines or slow production.
For B2B buyers comparing several custom cardboard displays, it helps to approve one physical reference sample and use it as the standard for bulk production.
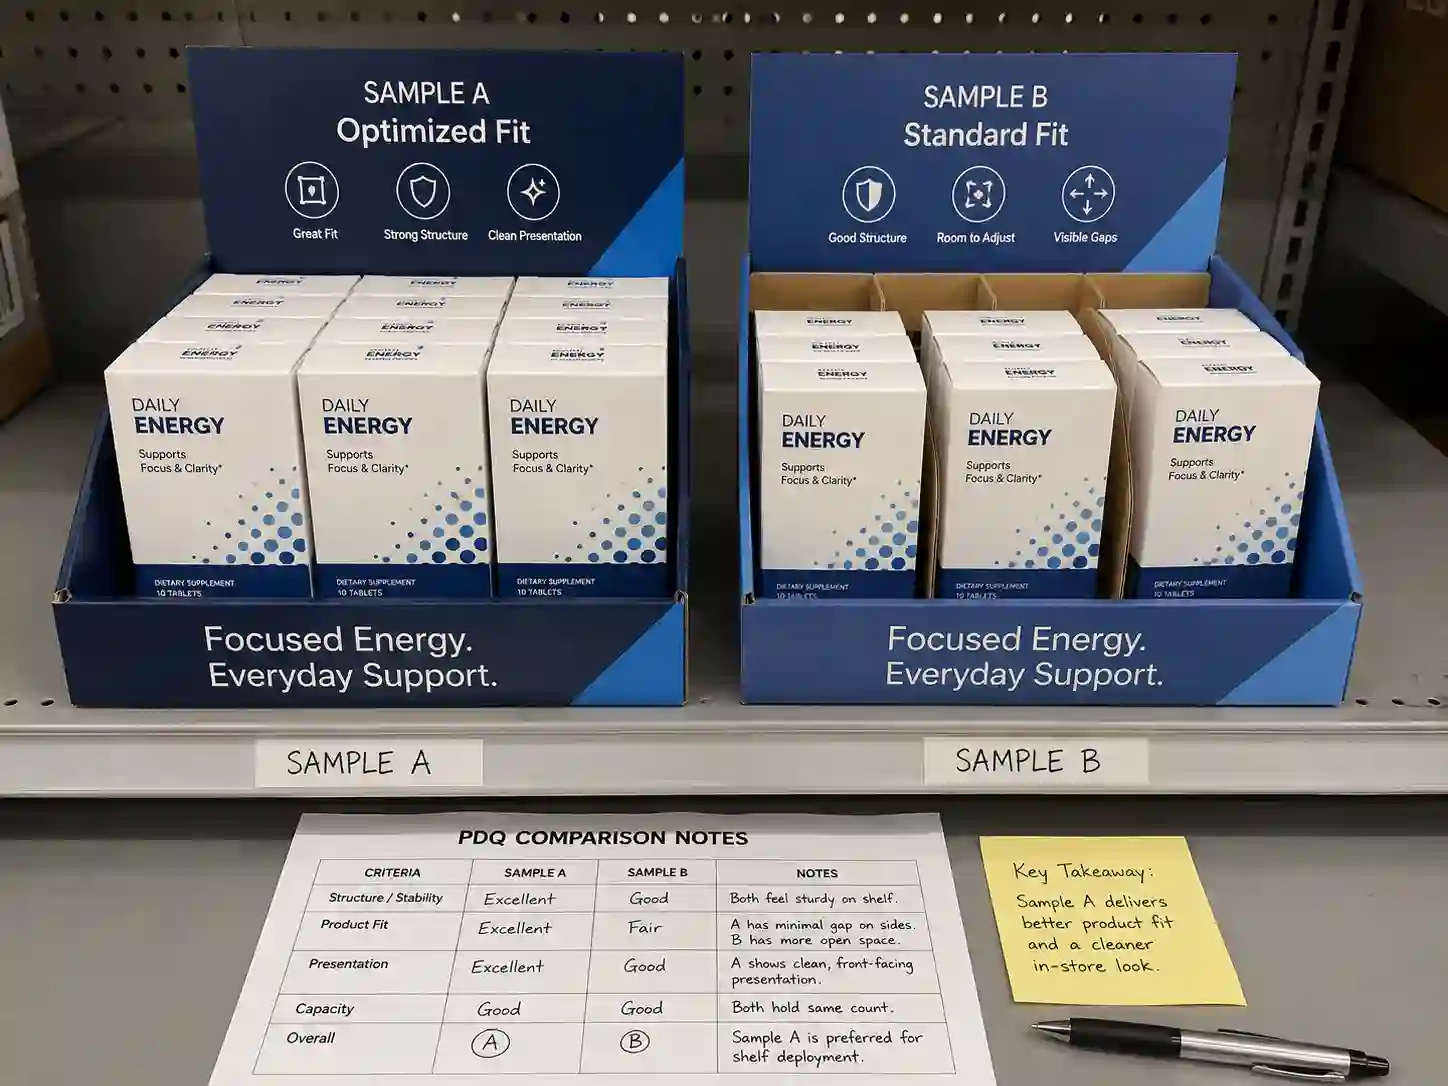
Use a Practical Sample Comparison Table
A clear table makes sample approval easier for purchasing teams, marketing teams, and suppliers. It also reduces vague feedback such as “make it stronger” or “looks better.”
| Sample Check Area | What to Compare | Common Risk | Recommended Action |
|---|---|---|---|
| Product fit | Size, quantity, spacing, access | Product too tight or too loose | Test with real products and final packing quantity |
| Load bearing | Base, side walls, dividers, header | Bending, leaning, collapse | Adjust board grade, flute direction, or support panels |
| Shelf placement | Width, depth, height, front view | Display does not fit retail space | Confirm shelf, counter, or floor dimensions early |
| Assembly | Tabs, folds, glue points, setup steps | Slow or confusing setup | Simplify locks and add clear assembly marks |
| Print quality | Color, text, logo, coating, finish | Brand image inconsistency | Compare with approved artwork and color reference |
| Flat packing | Display parts, carton layout, protection | Damage during shipment | Improve carton size, inserts, and packing order |
| Refill use | Product pickup and restocking | Messy display after use | Adjust dividers, tray depth, or refill access |
This table can be used during supplier meetings, internal approvals, and pre-production confirmation.
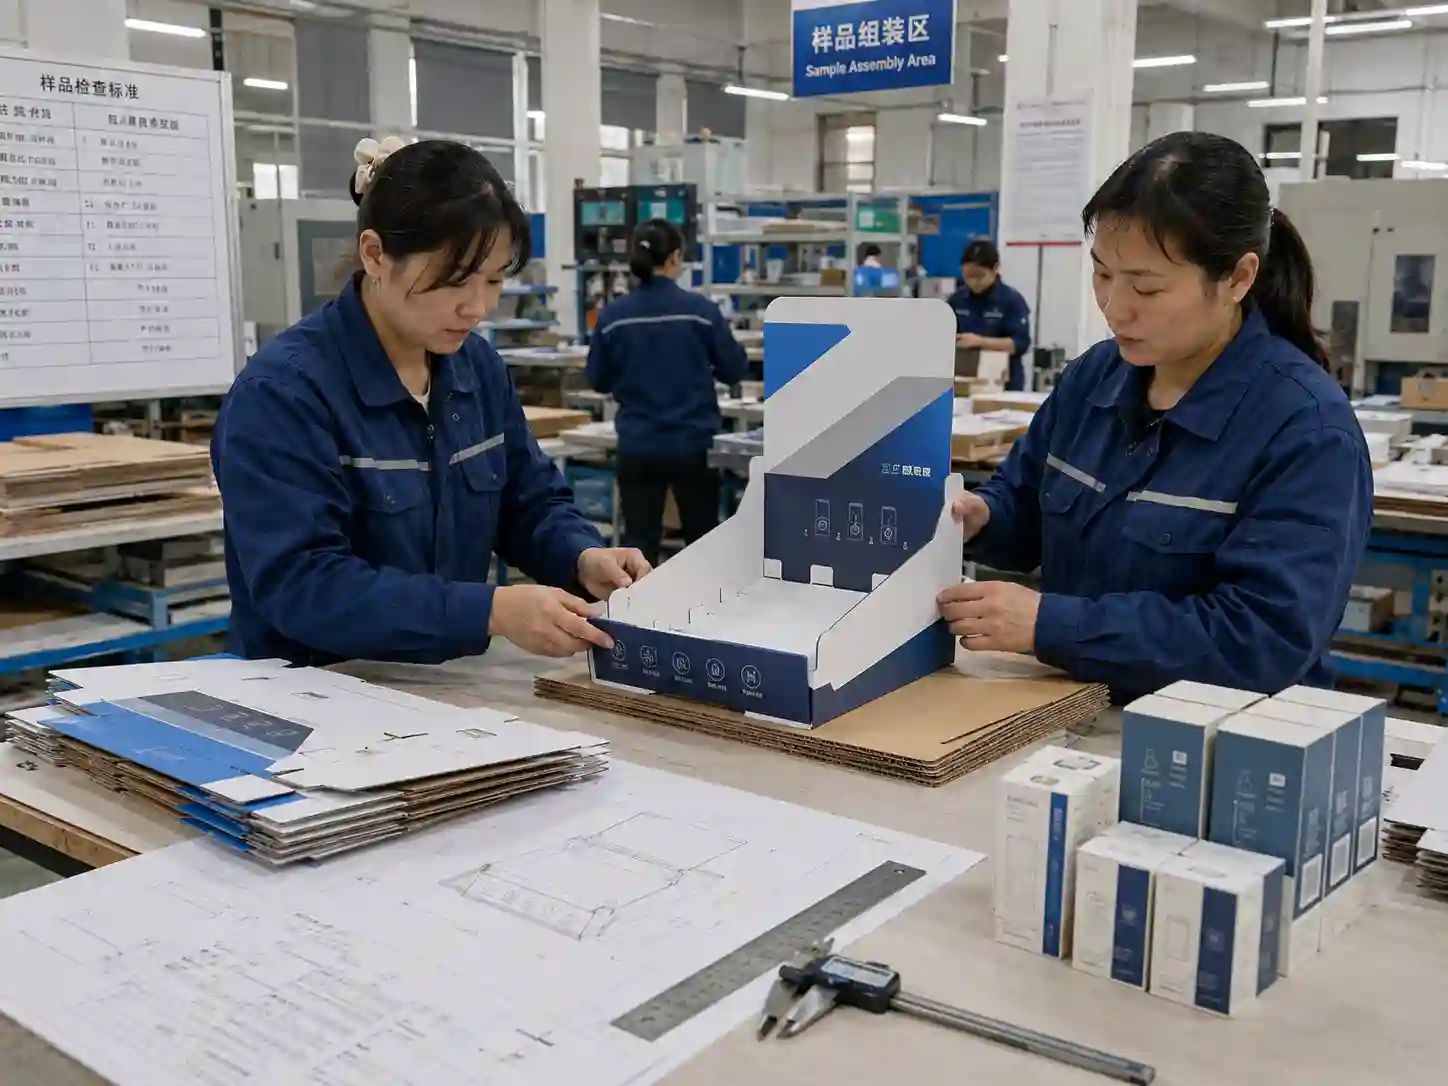
Test Assembly Like Retail Staff Will Use It
A PDQ display should not need a trained engineer to assemble it. Store teams often work fast, and retail setup conditions are not the same as a factory sample room.
During sample comparison, assemble the display without help from the designer. Follow only the printed marks, folding lines, or instruction sheet. Time the setup process. Check whether tabs lock in place smoothly. Confirm whether the header, tray, and dividers stay aligned after assembly.
If the setup feels slow, the bulk shipment may create problems for retailers. A display with unclear tabs can lead to wrong assembly, weak presentation, or lost campaign time.
Assembly Details Worth Checking
Look at the fold lines first. They should fold cleanly without tearing the printed surface. Then check tabs and slots. They should be tight enough to hold structure but not so tight that staff must force them.
For displays shipped flat, confirm that the sample can be opened and assembled without damaging corners. For pre-glued structures, check whether glue points are strong and neat. A small glue issue in the sample may become a quality problem across thousands of units.
A reliable cardboard display should balance factory efficiency with store-level ease of use.
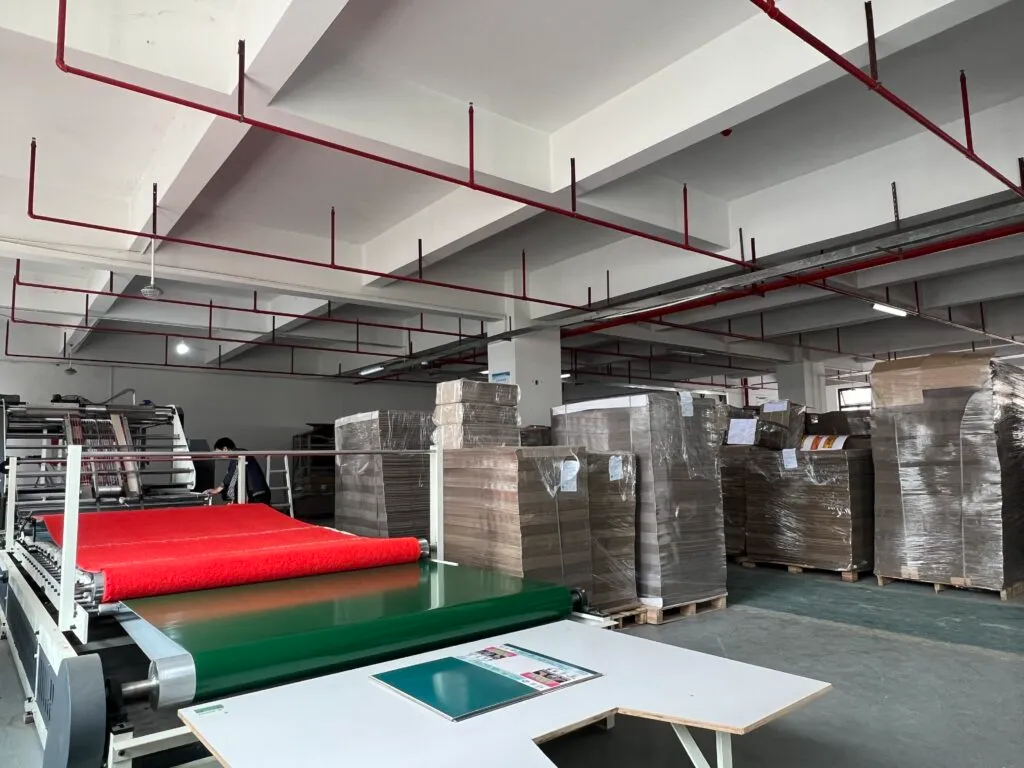
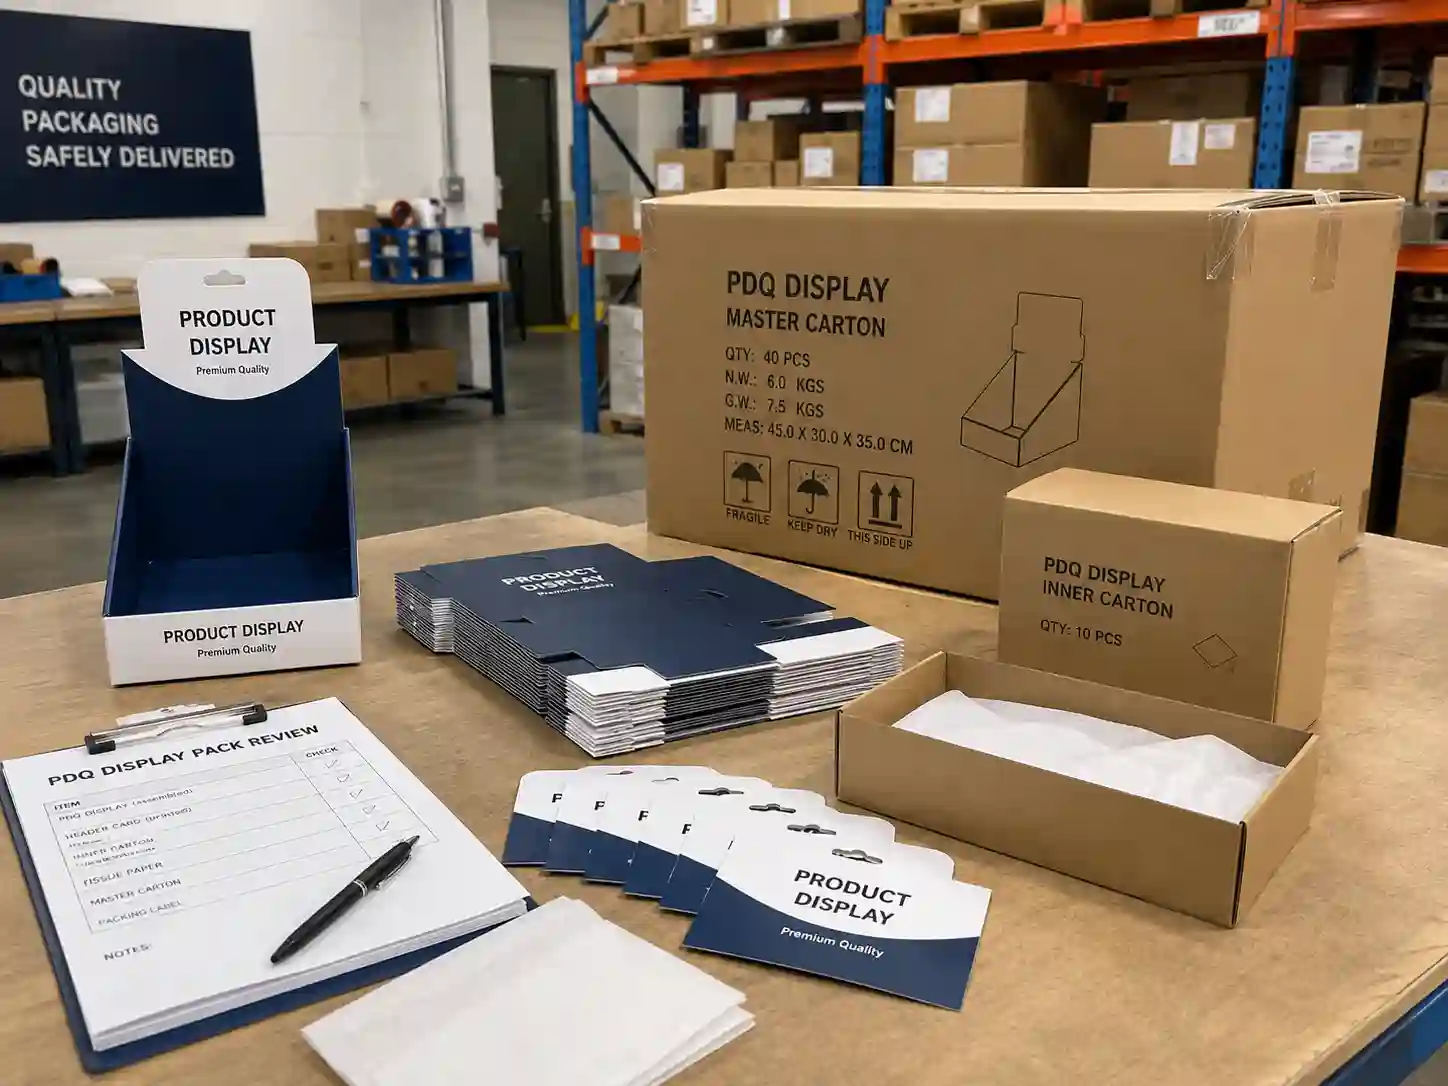
Check Flat Packing and Export Carton Protection
Many PDQ display projects are exported as flat-packed units. This reduces shipping volume and helps control freight cost, but it also makes carton protection important.
The sample stage should include a packing review. Place the display parts, instruction sheet, product inserts, header cards, and accessories into the planned inner carton or master carton. Check whether printed surfaces rub against each other. Check whether headers bend. Check whether corners have enough protection.
For export packing, the carton should match the shipment method. Air shipment, sea shipment, courier delivery, and palletized container loading can place different pressure on the display.
Packing Questions to Ask Before Bulk Production
How many displays go into one inner carton?
How many inner cartons go into one master carton?
Are header cards packed separately or attached?
Do printed surfaces need tissue paper or protective film?
Is the carton strong enough for stacking?
Can warehouse staff identify the display type quickly from carton marks?
International packaging references from groups such as FEFCO can help teams discuss carton structure and corrugated packaging formats. Quality systems such as ISO 9001 also support repeatable production control, especially when a buyer needs consistent sampling, inspection, and batch tracking.
Compare Refill Performance and Shopper Access
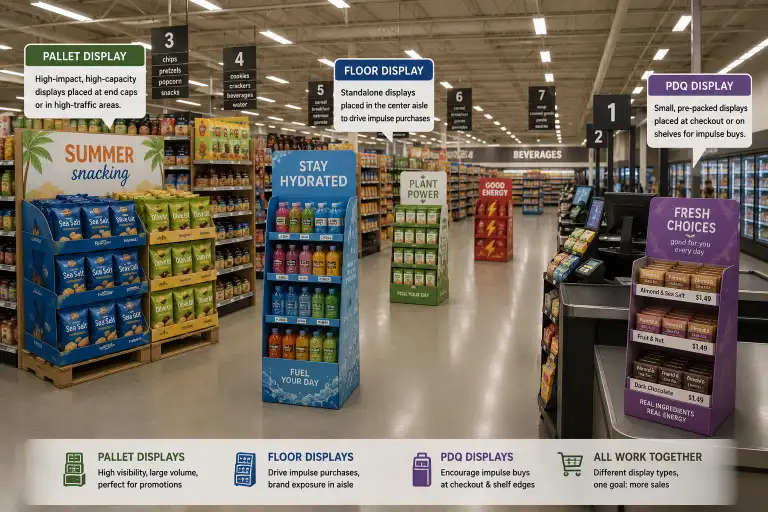
A PDQ display is often used near checkout areas, shelf ends, promotional tables, or category shelves. These locations need quick product access and a clean front-facing display after customers remove items.
During sample testing, remove products one by one from different positions. Does the display stay neat? Do products fall forward? Does the back row move into place? Can staff refill without removing the whole display from the shelf?
For fast-moving products, refill design matters. Deep trays may hold more stock but can hide products. Shallow trays may look clean but require frequent restocking. Dividers can improve facing, but they must not make refill slow.
If the product has multiple flavors, colors, or SKUs, compare the divider layout with the merchandising plan. A good sample should support both first display and refill use.
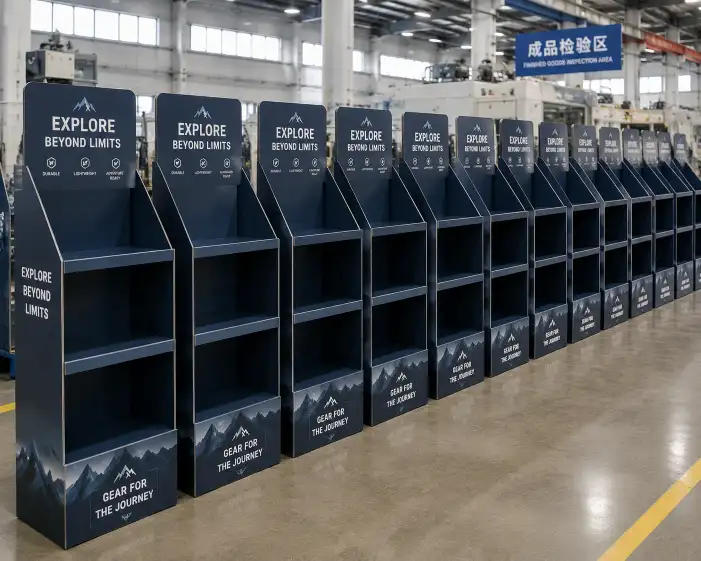
Review Shelf, Counter, or Floor Placement
Placement changes the design standard. A counter PDQ display must be compact and stable. A shelf-ready tray must fit the retailer’s shelf depth and height. A floor display or pallet program needs stronger lower support and better visibility from a distance.
Before mass production, compare the sample against the real retail space when possible. Use measurements from the buyer, retailer, or planogram.
Important dimensions include:
Display width
Display depth
Total height with header
Front lip height
Product facing height
Shelf clearance
Carton packing size
Loaded display weight
A display that is too tall may block sightlines. A display that is too deep may not fit shelf space. A display that is too narrow may not hold enough product for the promotion. Sample comparison should connect structure with store reality.
For brand teams planning several retail formats, Leader Display can help adjust one design direction into counter, shelf-ready, sidekick, or pallet display versions.
Check Material Choice Against Cost and Performance
Material choice affects strength, appearance, cost, and shipping. A stronger board may improve durability but increase unit cost and carton volume. A lighter board may reduce cost but create bending risk.
This is why sample comparison should include a material discussion, not only a visual check.
For lighter products, E-flute or laminated paperboard may create a clean printed surface. For heavier products, B-flute or reinforced corrugated structures may be safer. For premium campaigns, rigid paperboard or specialty finishes may support brand image, but the structure still needs practical assembly and packing.
Material decisions should consider:
Product weight
Display size
Retail use period
Shipment distance
Moisture risk
Print surface needs
Budget target
Sustainability requirements
When FSC paper is requested, confirm availability early. When buyers need audit-friendly production, ask the supplier what process control, inspection records, and material traceability they can provide.
Confirm Dieline, Artwork, and Production Tolerance
A physical sample is also a way to confirm the dieline. Small errors in the dieline can cause large problems during die cutting, folding, gluing, and assembly.
Check whether artwork sits correctly across fold lines and front panels. Confirm that text is not too close to cutting edges. Check whether holes, slots, and locking parts align with the structure. Confirm whether the header card has enough support area.
Production tolerance should also be discussed. Paper products can have small variations during cutting, folding, printing, and laminating. A practical manufacturer will design the display with tolerance in mind, so the structure still assembles well during bulk production.
A sample that only works when each part is forced into place is not ready for mass production.
Build a Clear Approval Process
Sample approval works best when each team knows what to check. Marketing may focus on color and messaging. Purchasing may focus on cost, carton quantity, and delivery. Sales teams may focus on retail presentation. The manufacturer should focus on structure, production stability, packing, and inspection.
A simple approval process can include:
First white sample for structure
Printed sample for artwork and finish
Loaded sample test with real products
Packing sample for export carton layout
Final pre-production sample for written approval
Not every project needs all five steps. A small counter tray may need fewer rounds. A large launch program may need more testing. The point is to match the approval depth with order quantity, retail risk, and product value.
For buyers sourcing custom cardboard display solutions, written comments are better than scattered chat feedback. Mark the sample issue, explain the expected change, and confirm whether a revised sample is needed before bulk production.
What a Manufacturer Should Provide Before Mass Production
A capable cardboard display supplier should provide more than a nice sample photo. The buyer should receive practical confirmation that the design can enter production.
Useful supplier support includes:
Confirmed dieline
Final artwork file check
Material specification
Sample photos and videos
Assembly guidance
Packing method
Carton quantity and size
Bulk inspection points
Production schedule
Export packing suggestion
For larger programs, the supplier may also provide a pre-shipment inspection plan. This can include checking print color, die-cut accuracy, glue strength, assembly performance, packing condition, and carton marks.
This production-focused approach helps buyers avoid surprises after shipment.
Common Sample Problems to Fix Early
Several problems appear often during PDQ display sampling.
The first is weak structure. This usually means the board grade, flute direction, base support, or locking design needs improvement.
The second is poor product fit. The product may shake, tilt, or sit too low. Adjusting divider spacing, tray angle, or front lip height can solve this.
The third is slow assembly. Too many loose parts, tight slots, or unclear folds can make setup difficult. A simpler lock structure often works better.
The fourth is poor packing protection. Header cards, corners, and printed panels can be damaged if the carton layout is not tested.
The fifth is unclear retail presentation. The product may be hidden, the header may be too small, or the message may not be visible from shopper distance.
Fixing these issues during sampling is far cheaper than fixing them after mass production.
Move from Sample Approval to Confident Production
A PDQ display sample should prove that the design can work in the factory, in the carton, in transit, and in the store. When the sample comparison covers structure, product weight, material choice, print quality, assembly, refill, and export packing, the buyer can approve production with clearer expectations.
The best sample is not always the most decorative one. It is the one that supports the product, fits the retail space, ships safely, assembles quickly, and keeps the campaign looking professional through its selling period.
Before approving your next display order, ask your supplier to compare the sample with real product loading, final artwork, flat packing, and retail placement in mind. That is how a promising design becomes a production-ready retail display.