Electronics accessories are small, high-turnover products, but they still need a display structure that can protect them, organize them, and help shoppers compare quickly. A well-designed cardboard display for electronics accessories can support retail visibility, reduce setup work, and make product refilling easier for store teams.
For brand owners, wholesalers, and retail buyers, the right display is not only about appearance. It is about product weight, hook layout, shelf depth, SKU count, packing method, store location, and how fast the display can move from carton to sales floor.
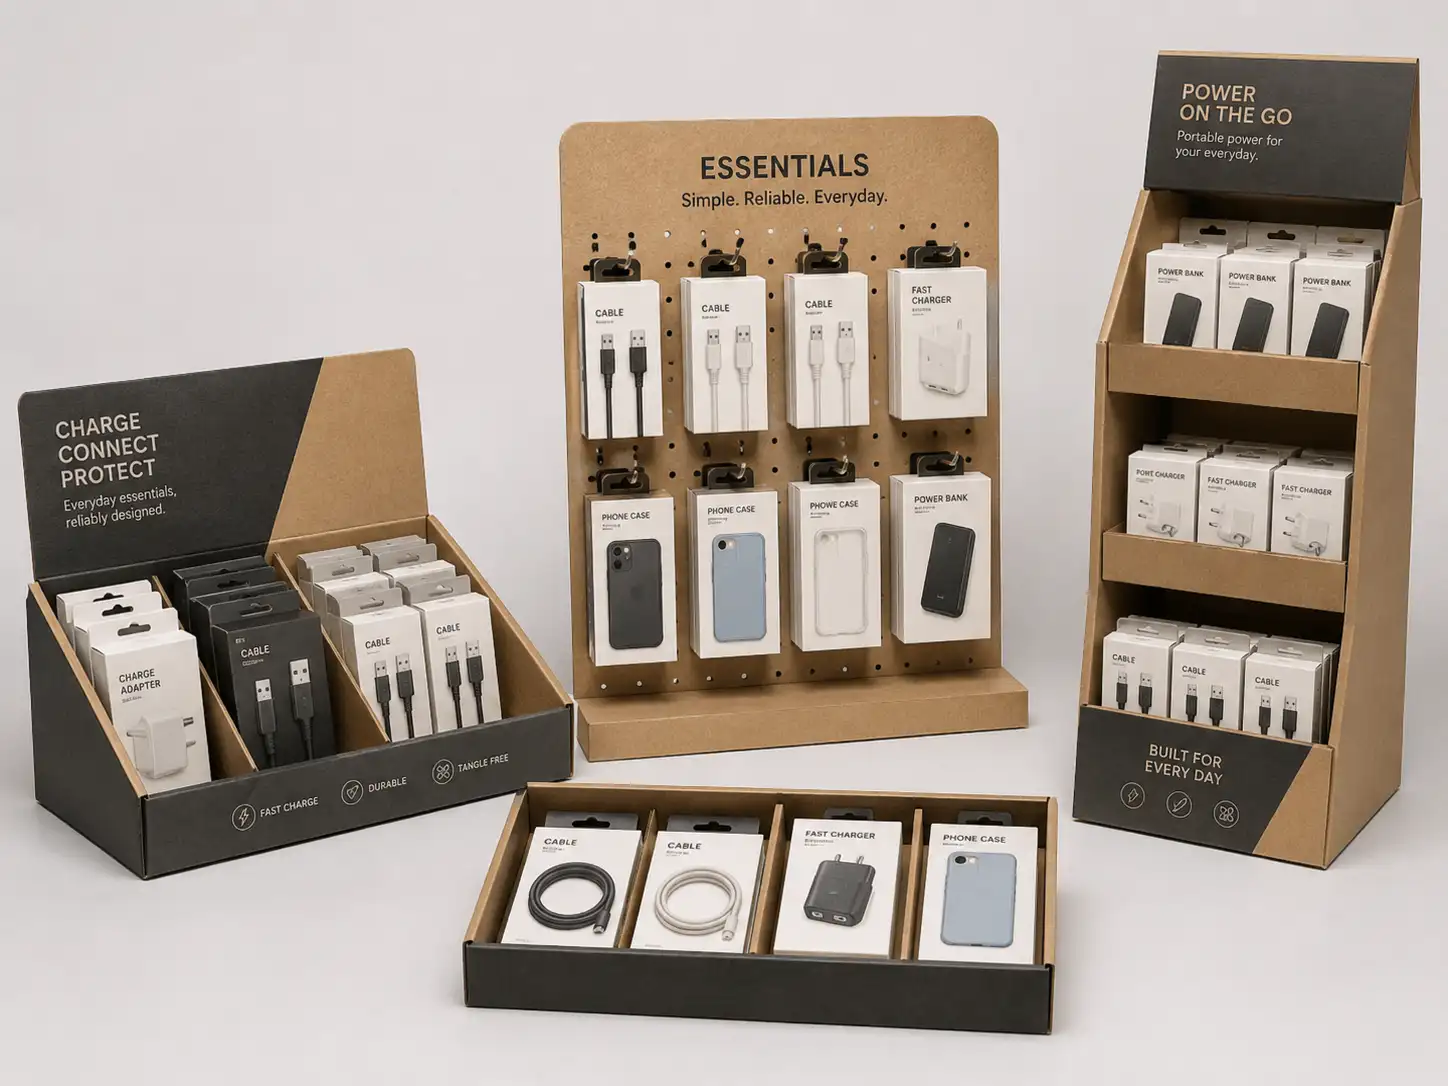
Why Electronics Accessories Need a Different Display Strategy
Electronics accessories often include charging cables, USB adapters, phone cases, screen protectors, earbuds, power banks, memory cards, small speakers, and device cleaning kits. These products are compact, but they can create several display challenges.
Many items hang in blister packs or small paperboard boxes. Some are light, while others, such as power banks or compact speakers, need stronger shelf support. Some products are impulse purchases near checkout, while others need clearer comparison on a retail shelf or promotional aisle.
That is why a cardboard display for electronics accessories should be planned from the product package outward. The display must match the product size, package hanging hole, retail environment, and refill plan.
A nice graphic design helps. A weak structure hurts.
Common Retail Display Options for Electronics Accessories
Different electronics accessories need different display structures. A phone cable display does not work the same way as a boxed power bank display. A screen protector display may need flat front-facing visibility, while earbuds may need small compartments or hooks.
Counter Displays for Small, Fast-Moving Items
Counter displays work well for charging cables, adapters, earphone cases, small cleaning kits, and impulse accessories. They are usually placed near checkout counters, service desks, repair shops, telecom stores, or electronics accessory sections.
A counter display should be compact, easy to refill, and stable enough to handle repeated shopper contact. For light products, corrugated cardboard with a printed header can be enough. For heavier small boxes, the base tray may need reinforced side walls or internal dividers.
Counter displays are useful when:
- The product is small and low to medium weight.
- The buyer wants checkout visibility.
- The store has limited shelf space.
- The campaign needs fast setup.
- The product range includes fewer SKUs.
For a practical manufacturer, the key is to confirm the exact packaged product size before structure design. Even a 5 mm change in package width can affect how many units fit per row.
Peg Displays for Hanging Electronics Accessories
Peg displays are one of the most practical options for cables, adapters, chargers, packaged earbuds, phone straps, screen protector packs, and small carded accessories. They allow products to hang clearly and help shoppers compare models, cable lengths, connector types, or colors.
A cardboard peg display can be designed as a counter peg display, floor peg display, sidekick display, or pallet-side promotional unit. The structure depends on product weight and store placement.
For light blister packs, cardboard backing with plastic or metal hooks can work well. For heavier items, the peg area may need thicker corrugated board, back support, or reinforced hook holes. The bottom base also needs enough weight distribution so the display does not lean forward after loading.
Peg displays are especially helpful when the product line includes many SKUs. Shoppers can scan options quickly, and store staff can refill each hook without reorganizing a full tray.
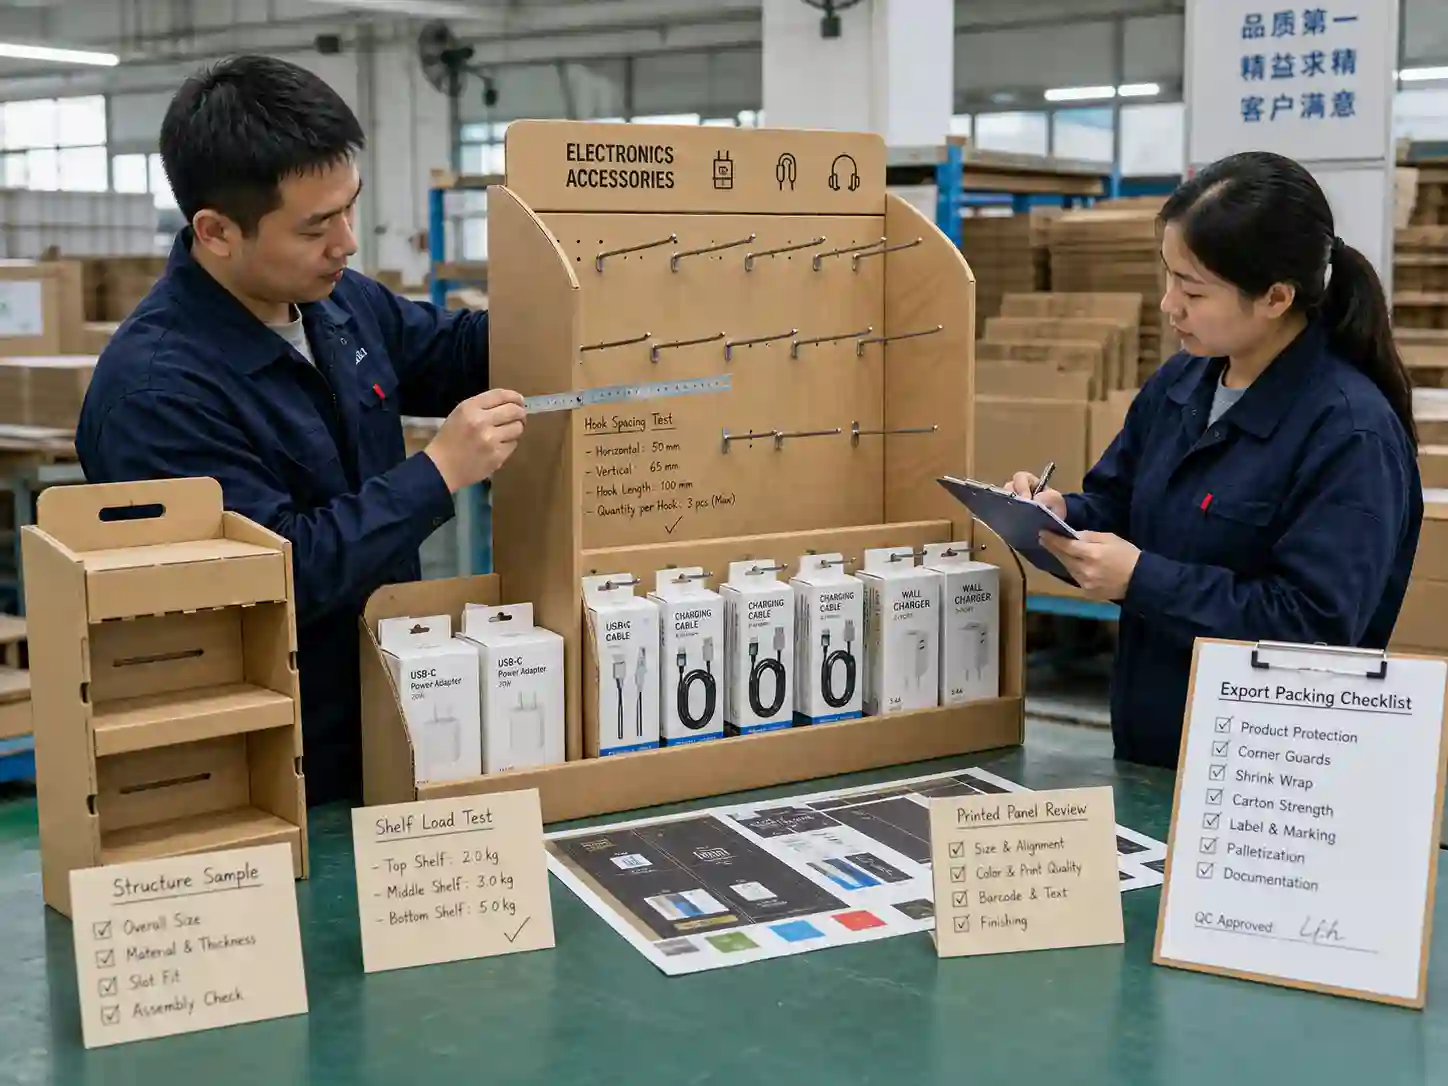
Hook Spacing Matters
Electronics accessories often look similar at first glance. Poor hook spacing can create confusion. For example, USB-C cables, Lightning-compatible cables, HDMI cables, and adapter kits may need different rows, clear labels, and enough finger space between packs.
Before bulk production, a manufacturer should test:
- Hook length against package depth.
- Distance between hooks.
- Product swing after loading.
- Header height and visibility.
- Stability when one side sells faster than the other.
This is where sampling saves money. A structural sample can show whether the display works before printing plates, cutting dies, or bulk material orders begin.
Floor Displays for Larger Promotions
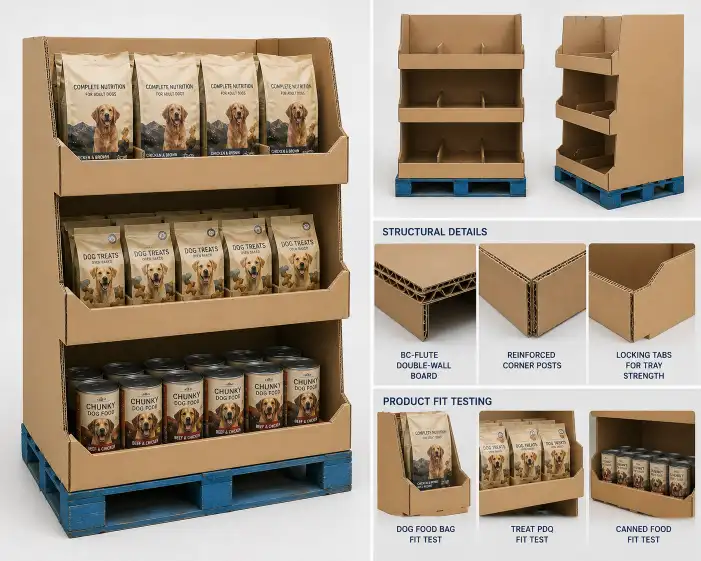
A floor display is a strong choice when the electronics accessory range includes more units, mixed SKUs, or heavier boxed products. It can be placed in electronics stores, supermarket promotional aisles, telecom retail spaces, warehouse clubs, and seasonal campaign areas.
Floor displays can include shelves, peg panels, dump areas, or mixed structures. For example, the upper section may use hooks for cables and adapters, while the lower shelves hold power banks, chargers, and compact speakers.
A good floor display should balance three goals:
- Show the brand clearly from a distance.
- Keep products organized by type or price point.
- Stay stable during retail use and transport.
For electronics accessories, shelf loading must be checked carefully. A shelf filled with power banks may carry far more weight than one filled with phone cases. The board grade, flute type, shelf depth, and reinforcement method should be selected according to real product load, not estimated visuals.
PDQ Displays for Retail-Ready Promotions
PDQ displays are useful when products need to move from shipping carton to retail shelf with minimal handling. They are common for small boxed accessories, charging cables, screen cleaning kits, adapters, and seasonal tech bundles.
A PDQ tray can be packed with products at the factory or by the brand’s packing team. Store staff can open the outer carton, remove or tear away the cover, and place the loaded tray directly on the shelf or counter.
This saves setup time. It also protects product arrangement during shipping.
PDQ displays work best when:
- The product count per tray is fixed.
- The package size is consistent.
- The buyer wants retail-ready packaging.
- The store needs quick replenishment.
- The display will sit on existing retail shelving.
For more practical ideas, buyers can review custom cardboard displays to see how different retail display structures can be adapted for small consumer products.
Sidekick Displays for Aisle Visibility
Sidekick displays can be attached to retail shelving, aisle fixtures, or promotional zones. They are useful for small accessories that benefit from impulse traffic, such as cables, chargers, phone grips, screen protectors, or travel adapters.
Because sidekick displays hang from existing fixtures, weight control is important. The display should not be overloaded. The carton structure, hanging method, and product quantity should match the store’s fixture requirements.
A sidekick display for electronics accessories usually needs:
- A strong back panel.
- Secure hanging tabs or attachment points.
- Clear product grouping.
- Lightweight but stable structure.
- Flat packing for efficient export.
Sidekick displays are not always suitable for heavy boxed power banks or dense accessory kits. For those items, a small floor display or shelf display may perform better.
Choosing the Right Cardboard Display by Product Type
The best structure depends on product size, package format, weight, SKU quantity, and store location. The table below gives a practical starting point.
| Electronics accessory type | Common package format | Suitable display type | Key design focus |
|---|---|---|---|
| Charging cables | Hanging blister card or small box | Peg display, counter display, sidekick display | Hook spacing, product grouping, quick refill |
| Wall chargers | Small box or blister pack | Counter display, PDQ tray, floor display | Shelf strength, front visibility, SKU separation |
| Phone cases | Slim hanging pack or box | Peg display, floor display | Model sorting, large face-out display area |
| Screen protectors | Flat paperboard sleeve | Counter display, shelf tray, peg display | Upright support, easy browsing, anti-bending design |
| Power banks | Boxed product | Floor display, shelf display, reinforced counter display | Weight load, shelf reinforcement, stable base |
| Earbuds and small audio items | Box or hanging pack | Peg display, counter display, floor display | Security, comparison layout, premium look |
| Travel adapters | Blister pack or compact box | Counter display, sidekick display, PDQ tray | Clear labeling, travel theme, compact footprint |
| Cleaning kits | Small pouch, bottle, or box | Counter display, PDQ tray | Impulse placement, easy restocking |
This table is not a fixed rule. It is a decision guide. A practical factory will still check the real product weight, packaging format, loading quantity, and retailer requirements before confirming the final structure.
Material Choice: Strength Without Overbuilding
Cardboard displays for electronics accessories need enough strength, but they should not be overbuilt without reason. Overbuilding increases material cost, shipping volume, and assembly time.
Common material choices include corrugated cardboard, laminated printed paper, greyboard components, and internal support pieces. The exact choice depends on display size and product load.
For small counter displays, E-flute or B-flute corrugated board may be enough. For floor displays carrying heavier accessories, stronger corrugated board or reinforced shelf structures may be needed. For premium electronics accessory launches, printed surfaces can use matte lamination, gloss lamination, spot UV, or foil details when the brand wants a higher-end look.
Material decisions should consider:
- Total loaded product weight.
- Shelf span and depth.
- Display height.
- Store handling conditions.
- Export packing method.
- Assembly process.
- Budget target.
Many international buyers also ask about responsible sourcing and quality systems. When relevant, suppliers can discuss FSC-certified paper options, ISO-related management practices, and packaging structure references from organizations such as FEFCO. These references help buyers align display production with purchasing, compliance, and sustainability expectations.
Structure Testing Before Bulk Production
A display that looks good on screen can still fail in store. That is why structure testing should happen before mass production.
For electronics accessories, testing usually includes product fit, shelf load, hook strength, base stability, assembly sequence, and carton packing. If the display will be shipped flat, the team should confirm whether store staff can assemble it without tools or confusion.
A practical sampling process may include:
- White sample for structure checking.
- Printed sample for color and layout approval.
- Product loading test with real product packs.
- Assembly test by someone outside the design team.
- Drop or packing check based on shipping requirements.
- Final confirmation before bulk cutting and printing.
Small details matter here. Hook holes may tear if the product is too heavy. Shelves may bend if the span is too wide. A header may hide the top row if the angle is wrong. A base may need a stronger insert if the display stands in a busy aisle.
Manufacturing experience helps reduce these risks early.
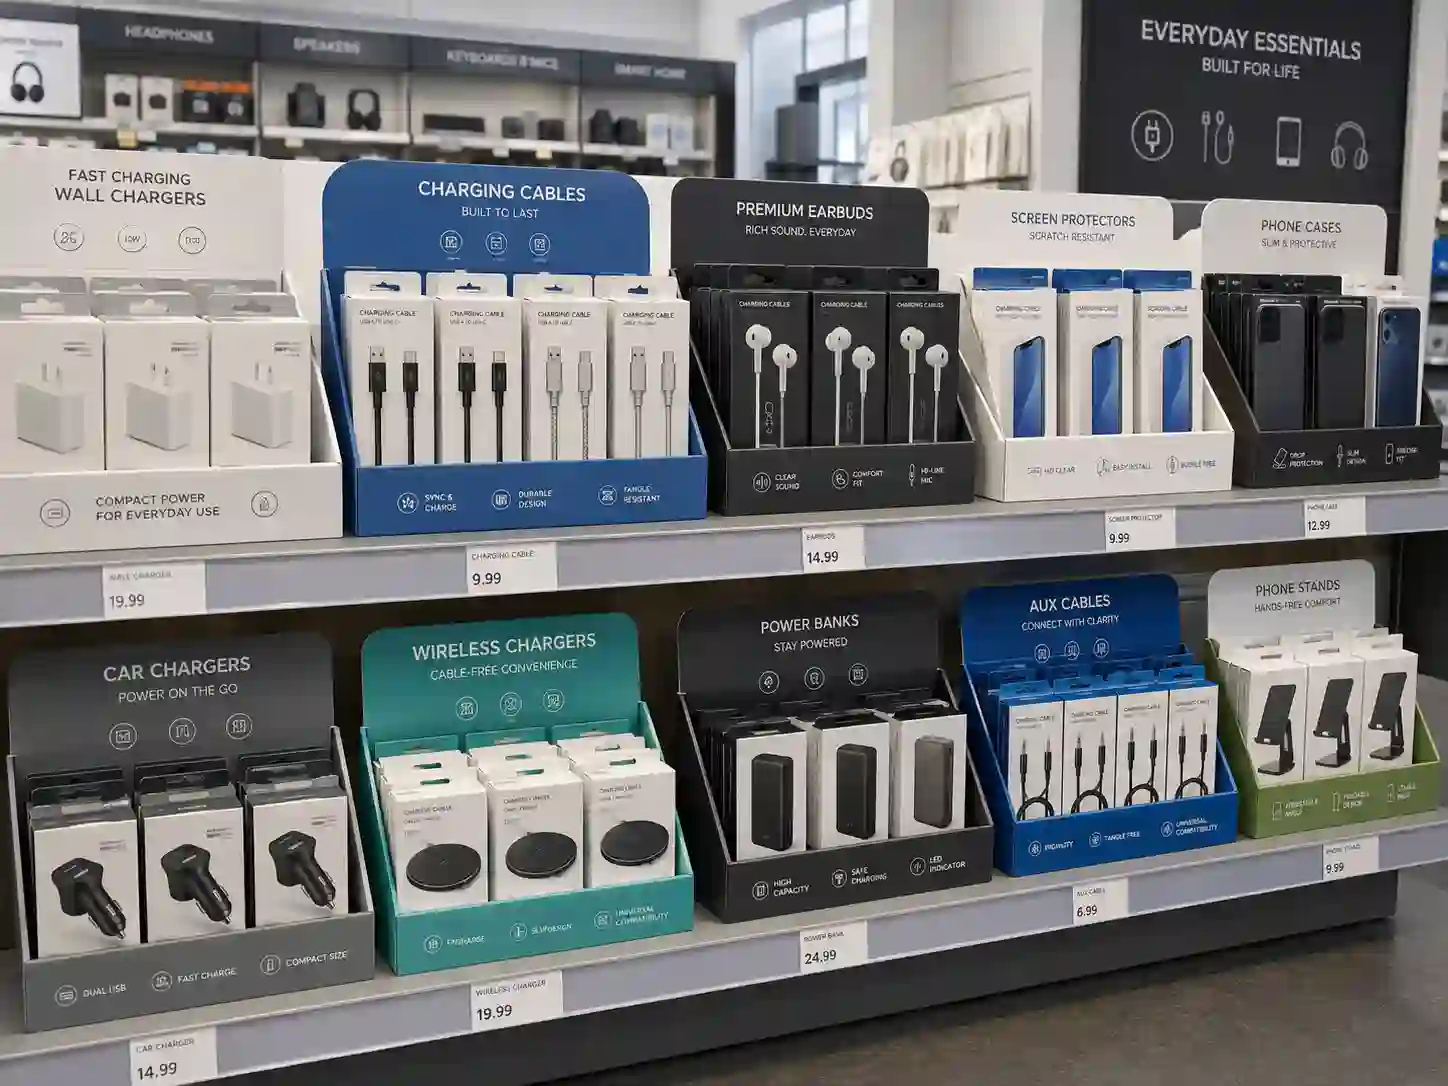
Graphic Design Should Support Shopper Decisions
Electronics accessory shoppers often make quick comparisons. They check connector type, device compatibility, cable length, charging speed, color, size, or price tier. The display graphics should help this decision instead of creating visual noise.
A good cardboard display for electronics accessories usually uses:
- Clear category headers.
- Simple icons for product type.
- Visible product segmentation.
- Clean color zones for different SKUs.
- Short benefit claims.
- Enough white space.
- Readable text from normal shopping distance.
Avoid putting too much technical text on the display. Product packages can carry detailed specifications. The display should guide attention, support the brand, and help shoppers locate the right item.
For B2B projects, buyers should send brand artwork, product packaging dielines, retail requirements, and product dimensions together. This helps the display supplier plan structure and graphics as one system.
Shelf Placement, Checkout Placement, and Promotional Placement
Placement changes the best display choice.
A counter display works well near checkout because shoppers can pick up small items quickly. A peg floor display works better when a brand needs many hanging products in one promotional zone. A PDQ tray fits retail shelves when the buyer wants quick setup and tidy stocking. A sidekick display works when aisle traffic matters and the product is light.
Retail placement also affects display height and footprint. A display designed for a low shelf needs a different header than one standing at eye level. A checkout display should not block the cashier’s working area. A floor display should not be too wide for the aisle.
For broader structure ideas, buyers can explore cardboard display solutions and compare display types before starting a custom project.
Flat Packing and Export Packing for Electronics Accessory Displays
For international B2B orders, packing efficiency matters. A display may look simple after assembly, but the export packing plan can affect freight cost, damage rate, and store setup.
Flat packing is common for cardboard displays because it saves space. However, the display must still be easy to assemble. If the display has too many loose parts, store staff may assemble it incorrectly or skip important support pieces.
For electronics accessory displays, export packing should consider:
- Flat packed panel size.
- Protection for printed surfaces.
- Separate bags for hooks or accessories.
- Clear assembly instruction sheets.
- Carton strength for overseas shipping.
- Pallet loading plan.
- Labeling for SKU or campaign identification.
If the display is pre-loaded with products, the packing plan becomes more complex. Product movement, tray strength, carton compression, and retail-ready opening style all need attention.
A good manufacturer should not only make the display. The team should also help the buyer think through how it is packed, shipped, opened, assembled, filled, and refilled.
Refill Design: The Detail Many Buyers Forget
Refill design has a direct effect on store performance. If the display is hard to refill, store staff may leave gaps, mix SKUs, or remove the display earlier than planned.
For peg displays, refill is usually simple if hooks are clearly grouped. For shelf displays, dividers can help maintain product rows. For counter trays, front lips and side walls should hold products upright after partial selling.
A practical refill plan should answer these questions:
- Can staff refill one SKU without removing other products?
- Will products stay upright when the display is half empty?
- Are SKU labels visible after refilling?
- Can heavy products be placed at the bottom?
- Does the structure still look clean after repeated handling?
These points are important for electronics accessories because many items are small and easy to mix. Good structure keeps the display organized even after shoppers browse it throughout the day.
Customization Options for Electronics Accessory Brands
A custom cardboard display can be adjusted for product line, retail channel, brand campaign, and shipping method. For electronics accessories, customization often includes structure size, hook layout, shelf quantity, divider style, header shape, printing, finishing, and packing plan.
Common customization options include:
Custom Structure
The display can be designed as a counter unit, peg display, PDQ tray, sidekick display, floor display, dump bin, or mixed display. The structure should match product weight and store placement.
Custom Printing
Brand colors, product icons, campaign graphics, QR codes, model labels, and short selling points can be printed directly on the display. Printing should stay clean and readable.
Custom Inserts and Dividers
Dividers help separate cables, adapters, phone cases, or small boxed accessories. Inserts can reduce product movement during shipping or keep rows aligned in store.
Custom Hooks and Accessories
Peg displays may need plastic hooks, metal hooks, label holders, hanging tabs, or reinforced peg zones. Hook choice depends on product weight and store expectations.
Custom Packing
Displays can be shipped flat packed, semi-assembled, or retail-ready depending on the campaign. Export cartons, inner protection, and assembly instructions should be planned before bulk production.
For buyers who need a supplier with broad structure experience, Leader Display can support custom display development from structure planning to production and export packing.
What Buyers Should Prepare Before Requesting a Quote
A clear inquiry helps the supplier give a faster and more accurate proposal. For electronics accessory display projects, buyers should prepare product information, retail requirements, and artwork details as early as possible.
Useful information includes:
- Product photos.
- Product package dimensions.
- Product weight per unit.
- Number of SKUs.
- Quantity per display.
- Target retail placement.
- Preferred display type.
- Store or retailer requirements.
- Artwork files or brand guidelines.
- Target order quantity.
- Shipping destination.
- Need for flat packing or pre-loading.
A rough sketch is also useful. It does not need to be professional. A simple drawing showing product rows, hooks, shelves, or display height can help the structure team understand the goal.
Manufacturer Perspective: What Makes a Display Production-Ready
From a factory perspective, a display is production-ready only after structure, material, printing, loading, assembly, and packing have been checked together.
A display drawing alone is not enough. The team needs to know whether the selected board can hold the products, whether the printed panels align after folding, whether the display can stand safely, and whether the carton can protect it during export.
For electronics accessories, production readiness often depends on:
- Accurate product size and weight.
- Confirmed retail placement.
- Approved structural sample.
- Approved artwork and color proof.
- Clear assembly method.
- Confirmed hook and accessory list.
- Final carton packing method.
- Bulk production tolerance control.
This is why early communication is important. The more complete the project information, the easier it is to avoid delays during sampling and production.
Best Display Choice for Different Buying Goals
There is no single best display for every electronics accessory project. The best choice depends on the buyer’s commercial goal.
For checkout impulse sales, use a compact counter display or PDQ tray. For many hanging SKUs, use a peg display. For a larger brand campaign, use a floor display with mixed shelves and hooks. For aisle add-on sales, use a lightweight sidekick display. For retail-ready replenishment, use PDQ packaging.
A strong display project starts with the product and the retail environment, then moves into structure and graphics. When buyers share product samples, package dimensions, loading plans, and store requirements early, the manufacturer can design a display that is easier to produce, pack, ship, assemble, and refill.
Moving From Display Idea to Custom Sample
A custom cardboard display for electronics accessories should help products stay organized, visible, and easy to shop. It should also support the buyer’s supply chain, from sampling and print approval to flat packing and export delivery.
The next step is to turn product details into a workable structure. Prepare the packaged product size, unit weight, SKU count, target placement, and display quantity, then work with a manufacturer to build a sample that can be tested before bulk production. That is where a display idea becomes a retail-ready tool for sales.