A buyer sends artwork to a factory. The file is a JPEG exported from Canva. The factory asks for an AI or PDF with bleeds. The buyer does not know what a bleed is. The factory spends 3 days redrawing the artwork. The buyer gets charged for the revision. The timeline slips.
This happens every week.
Most display delays are not caused by production capacity or material availability. They are caused by artwork files that do not meet the factory's requirements. The factory can cut corrugated board in 3 days. But if the artwork is wrong, nothing starts until the file is fixed.
This guide covers exactly what artwork files factories need, what format to send, what bleed and die-line requirements mean, and how to prepare files that let the factory start production immediately.
01 What Factories Actually Need
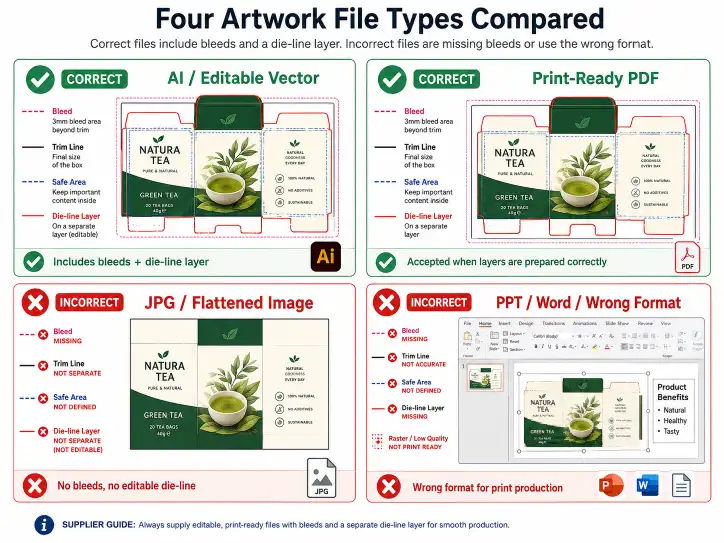
A factory needs one thing to start printing: a print-ready artwork file. "Print-ready" means the file includes all the information needed to produce the printing plates or litho-laminate sheets without additional editing.
Minimum requirements
| Requirement | Specification |
|---|---|
| File format | AI (Adobe Illustrator), PDF, or CDR (CorelDRAW) |
| Color mode | CMYK (not RGB) |
| Resolution | 300 DPI at actual size |
| Bleed | 3–5 mm on all sides (confirm with factory) |
| Die-line layer | Separate locked layer, 100% magenta, 0.1–0.25 pt stroke |
| Safe zone (keep-out area) | 5 mm inside the die-line on all sides |
| Fonts | Converted to outlines (curves/paths) or embedded |
| Images | Embedded (not linked) at 300 DPI |
Files that do not meet these requirements will be rejected by the factory's prepress department. The factory will ask for a corrected file or offer to fix it for an additional charge.
02 File Format: Which One to Use
Best: AI (Adobe Illustrator)
AI is the standard format for corrugated display artwork. It is vector-based, supports layers (critical for separating die-line from artwork), and handles CMYK color accurately. Most factories' prepress teams work directly in Adobe Illustrator.
When to use: Anytime you have access to Adobe Illustrator. This is the format factories prefer.
Acceptable: PDF
A PDF exported from Illustrator or InDesign with the correct settings is acceptable. The PDF must be:
- Saved as PDF/X-1a or PDF/X-4 (these standards ensure CMYK colors and embedded fonts)
- High-resolution (not "Smallest File Size" preset)
- Include a separate layer for the die-line
When to use: When you cannot provide an AI file but can export a properly configured PDF.
Acceptable: CDR (CorelDRAW)
Some factories, particularly in Asia, use CorelDRAW. If the factory asks for CDR, save from CorelDRAW with all fonts converted to curves and all images embedded.
When to use: Only if the factory specifically requests CorelDRAW format.
Avoid: JPEG, PNG, TIFF
Raster formats (JPEG, PNG, TIFF) should not be used for corrugated display artwork. The factory cannot separate the die-line from the artwork, cannot adjust colors, and cannot scale the file without losing quality. A factory that accepts a JPEG will almost always charge a prepress fee to convert it to a vector format.
Exception: If the artwork is a photographic image that will be printed as-is with no text or vector elements, a high-resolution TIFF at 300 DPI may be acceptable — but confirm with the factory first.
Avoid: Canva exports
Canva exports JPEG and PNG by default. Canva Pro allows PDF export, but the PDF quality is often inconsistent for commercial printing. If your design is created in Canva, ask a designer to recreate it in Illustrator or pay the factory's prepress team to rebuild it.
03 Bleed: What It Is and Why It Matters
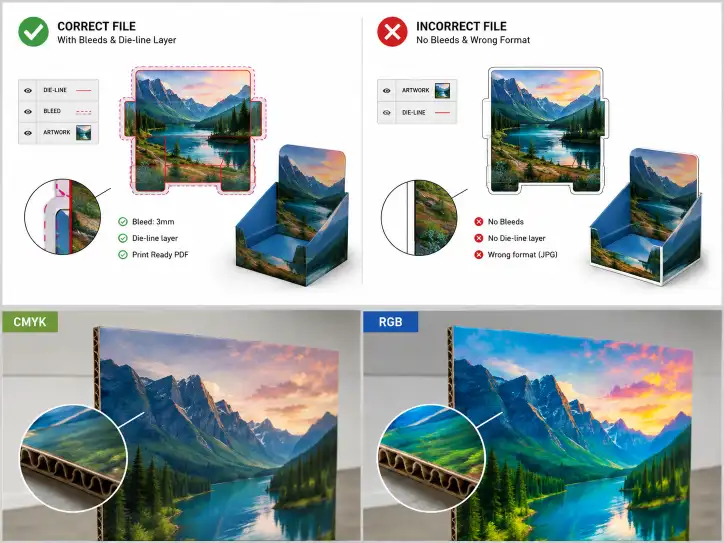
Bleed is the extra 3–5 mm of artwork that extends beyond the final cut line. It ensures that after the display is die-cut, there are no unprinted white edges where the cut line shifted slightly.
How bleed works
The factory prints the artwork on a sheet larger than the final display panel. The die-cut press cuts inside the printed area. If the artwork stops exactly at the cut line, a 1 mm shift in the die-cut registration will leave a white strip along one edge.
| Bleed amount | Safe? | Notes |
|---|---|---|
| 0 mm (no bleed) | No | Guaranteed white edges on at least one side |
| 2 mm | Risky | Acceptable for some factories with tight registration |
| 3 mm | Standard | Minimum for most corrugated display printing |
| 5 mm | Safe | Recommended for litho-laminate displays with large solid-color areas |
How to set bleed in the artwork file
In Adobe Illustrator:
- Document setup → Bleed → 3 mm all sides
- Design the background to extend to the bleed edge
- Keep all critical content (text, logos, barcodes) at least 5 mm inside the die-line
What happens if there is no bleed
The factory has two options:
- Add bleed by extending the background color in prepress (chargeable, $50–$150)
- Print as-is and accept the risk of white edges
Option 1 costs time and money. Option 2 risks a rejected display.
04 The Die-Line Layer
The die-line is the cutting line that the die-cut press follows to cut the corrugated board into the display shape. It must be a separate, clearly marked layer in the artwork file.
How to set up the die-line layer
| Setting | Value |
|---|---|
| Layer name | "Die-line" or "Cut Line" (clearly labeled) |
| Stroke color | 100% magenta |
| Stroke weight | 0.1–0.25 pt (hairline) |
| Fill | None (transparent) |
| Layer | Locked and labeled as "Do Not Print" |
Common die-line mistakes
Die-line set to "Overprint" — If the die-line is set to overprint, it may appear in the printed artwork. Set the die-line stroke to overprint fill only (not stroke).
Die-line on the same layer as artwork — The prepress team cannot separate the cut line from the design. They must manually trace it, which takes time and introduces error.
Die-line stroke too thick — A 1 pt magenta line will be visible in the printed piece if the overprint setting is wrong. Keep the die-line stroke at hairline thickness.
No die-line at all — Without a die-line, the factory must create one from your dimensions. This adds 1–3 days and $100–$300 to prepress.
05 Color: CMYK and Pantone
CMYK vs RGB
All corrugated display printing uses CMYK (Cyan, Magenta, Yellow, Black). RGB files (Red, Green, Blue) must be converted to CMYK before printing. Conversion is not automatic — RGB colors shift when converted to CMYK, and some bright RGB colors cannot be reproduced in CMYK.
Rule: Always work in CMYK from the start. Convert from RGB to CMYK in Adobe Illustrator (Edit → Edit Colors → Convert to CMYK) and check the result before sending.
Pantone colors
If your brand uses specific Pantone colors, include them in the artwork file:
- Define Pantone colors as spot colors in Illustrator's Swatches panel
- Label each Pantone color with its number (e.g., "PANTONE 186 C")
- Do not convert Pantone to CMYK and expect an exact match — Pantone-to-CMYK conversion is approximate
Many factories offer Pantone matching as an add-on service. If color accuracy is critical, request a printed sample and compare to the physical Pantone book before approving production.
For a detailed guide on what to check in the printed sample stage, see [[Cardboard Display Sample Approval Checklist- What to Check Before Mass Production|Cardboard Display Sample Approval Checklist]].
06 Fonts: Convert to Outlines
Fonts are the most common file problem factories encounter. If the factory does not have the exact font installed, the text will be substituted with a different font, changing the layout.
What to do
In Adobe Illustrator or CorelDRAW, select all text and convert to outlines (curves/paths):
Illustrator: Type → Create Outlines (Shift+Ctrl+O)
CorelDRAW: Arrange → Convert to Curves (Ctrl+Q)
What to check after conversion
- All text converted ✅
- No missing fonts in the file ✅
- Check that no text overlap was created by the outline conversion (letters with tight spacing may touch after outlining)
If you cannot convert to outlines (because the file is shared with other stakeholders who need editable text), embed the fonts in the PDF and list the font names in your email to the factory.
07 Image Resolution: 300 DPI Minimum
Corrugated board has a coarse surface. Low-resolution images (72 DPI from web graphics) print blurry and pixelated on corrugated board.
| Image Source | Typical DPI | Suitable for Display Printing? |
|---|---|---|
| Web download | 72 DPI | No |
| Smartphone photo | 72–240 DPI | No (unless resampled) |
| Stock photo (purchased) | 300 DPI | Yes |
| Professional product photo | 300 DPI+ | Yes |
| AI-generated image | 72–150 DPI | Usually no (check resolution) |
How to check resolution
In Adobe Illustrator: Window → Document Info → Objects (selected). The effective DPI is shown. If it is below 200 DPI at the size used in the display, find a higher-resolution source.
For a guide on board grades and print methods that affect image quality, see [[Corrugated Grades Explained- How to Choose the Right Material for Displays|Corrugated Grades Explained: How to Choose the Right Material for Displays]].
08 What to Send the Factory
Minimum file package
Create a ZIP folder containing:
- Print-ready artwork file — AI or PDF with bleeds, die-line layer, CMYK, fonts outlined, 300 DPI images
- Product photo or rendering — Shows the factory what the finished display should look like (reference only, not for production)
- Die-line dimension sheet — A PDF or image showing the overall dimensions of each panel with measurements marked
Good file package
Add to the minimum package:
- Brand style guide PDF — Includes Pantone references, logo usage rules, and typography specs
- Retailer compliance labels — If the display requires barcodes or retailer-specific labels, include the label artwork and placement instructions
- Print method confirmation — State whether printing is flexo, litho-laminate, or digital (each requires different file preparation)
Best file package
Add to the good package:
- Approved blank sample photos — Photos of the approved blank sample with product loaded, labeled with panel numbers that correspond to the artwork file panels. This eliminates confusion about which artwork goes on which panel
- Print position reference — A marked-up image showing exactly where print should start and end on each panel
09 Five Artwork Mistakes That Delay Display Projects
Mistake 1: Sending a JPEG and asking the factory to "fix it"
A buyer sends a brand logo as a JPEG downloaded from the website. The factory's prepress team spends 4 hours manually tracing the logo into a vector. The buyer is charged $80 for prepress. The logo is slightly different from the brand standard because it was traced, not recreated from the original vector file.
Prevention: Always send vector files (AI, EPS, PDF) for logos. JPEG is for web display only.
Mistake 2: No bleed on a full-bleed design
A buyer creates artwork that fills the entire display panel but does not include bleed. The factory adds bleed by stretching the background. The stretched background creates a 2 mm visible distortion on one edge. The display is printed, assembled, and shipped. The brand manager notices the edge distortion and rejects 500 units.
Prevention: Add 3–5 mm bleed to every full-bleed design. If you cannot add bleed, leave a 5–10 mm white border around the edge.
Mistake 3: Text too close to the cut line
A buyer places promotional text 2 mm from the edge of the die-line. After die-cutting, the text is 1 mm from the edge on one side and 3 mm from the edge on the other — the cut registration shifted by 1 mm, and the text looks off-center.
Prevention: Keep all critical content (text, logos, barcodes) at least 5 mm inside the die-line.
Mistake 4: RGB colors that cannot be matched
A buyer designs artwork in RGB. The factory converts to CMYK. The bright red brand color shifts from a vibrant RGB red to a muddy CMYK red. The buyer blames the factory. The factory explains the RGB-to-CMYK conversion limitation.
Prevention: Design in CMYK from the start. If the brand uses a specific Pantone red, specify it as a spot color.
Mistake 5: Sending different file versions to different factories
A buyer sends slightly different artwork files to three factories during the quoting process. Each factory prepares printing plates based on their version. When the buyer selects one factory and sends the "final" version, it does not match the plates already made. The factory charges for new plates.
Prevention: Create one master artwork file. Send the same file to every factory during quoting. Use the same file for production with the selected factory.
10 Artwork File Checklist (Printable Summary)
Before sending artwork to the factory:
- File format: AI or PDF (not JPEG, PNG, TIFF)
- Color mode: CMYK (not RGB)
- Resolution: 300 DPI at actual size
- Bleed: 3–5 mm on all sides
- Die-line layer: separate locked layer, 100% magenta, hairline stroke
- Safe zone: all critical content 5 mm inside die-line
- Fonts: converted to outlines (curves)
- Images: embedded at 300 DPI
- Pantone colors: labeled as spot colors (if applicable)
- File package includes: artwork file + dieline dimension sheet + product photo reference
Final check before sending:
- File opens correctly on another computer
- Die-line layer is visible and labeled
- No missing fonts or linked images
- Artwork extends to bleed edge (for full-bleed designs)
- All text is readable at actual print size