Your products blend into the background on crowded store shelves. Without a unique display, customers walk right by, leaving your brand unseen and your sales potential untapped.
Customizing a cardboard display is the best way to make your brand stand out. You achieve this by selecting specific shapes, sizes, colors, and printing your unique graphics. Adding your logo and brand message turns a simple stand into a powerful marketing tool that perfectly reflects your identity.

For the last 16 years, I've seen firsthand how the right customization can completely change a product's success in-store. It’s the difference between being ignored and being the star of the aisle. But before we get into all the creative possibilities, it’s really important to get the basics right. Understanding the fundamentals is the first step to building something that not only looks great but also works perfectly for your brand. Let's start with the simple stuff, like what we even call these displays and how they come to life.
What are cardboard displays called?
Do you ever feel lost in industry jargon? Using the wrong term for a display can lead to confusion and mistakes with your supplier, which costs you time and money.
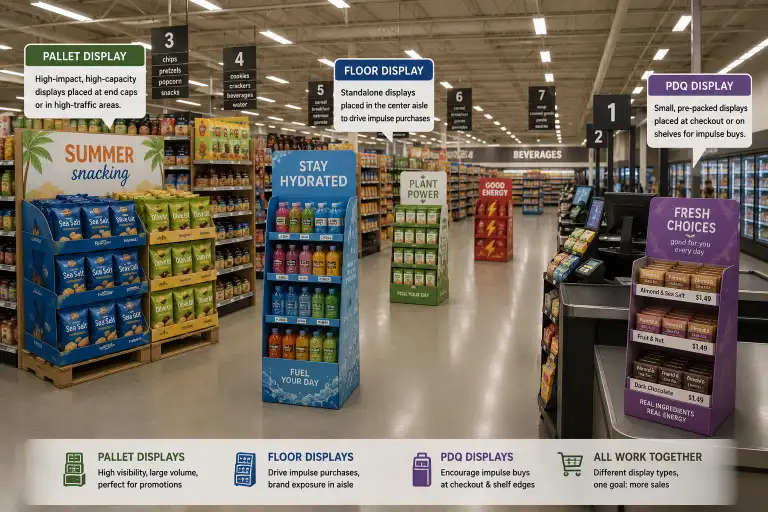
Cardboard displays are most commonly called Point of Purchase (POP)1 or Point of Sale (POS)2 displays. More specific names describe their function, such as floor displays3, counter displays4, pallet displays5, or dump bins6. Knowing these terms helps you communicate your needs clearly.

In my experience, clear communication is the foundation of a successful project. I remember a client asking for a "big cardboard box thingy for the aisle." We had a good laugh, but it highlighted how important it is to have a shared language. We quickly figured out he needed a floor display. Getting the name right from the start put us on the same page and made the whole process smoother. To help you avoid that confusion, let's break down the common terms.
Point of Purchase (POP)1 vs. Point of Sale (POS)2
People often use these terms interchangeably, and that's usually okay. However, there is a small difference. A POP display can be anywhere in a store where a customer might make a buying decision—in an aisle, at the end of a row (an endcap), or hanging from a shelf. A POS display is more specific, referring to displays located right at the checkout counter where the sale is finalized.
Common Display Types and Their Names
The name of a display often tells you where it goes or what it does. Understanding these helps you choose the right one for your product.
| Display Type | Common Location | Best Use |
|---|---|---|
| Floor Display | Store aisles, open spaces | Showcasing a product line, launching new items |
| Counter Display | Checkout counters, service desks | Encouraging impulse buys for small items |
| Dump Bin | High-traffic areas, front of store | Promotions, discounted items, irregularly shaped products |
| Pallet Display | Main aisles, warehouse clubs | Selling large volumes of product directly from a pallet |
| Endcap Display | At the end of a store aisle | Highlighting featured products or seasonal specials |
How to make a cardboard display stand?
You have a great idea for a display, but how does it actually get made? The process can seem complicated, and without knowing the steps, your design might not be practical to produce.
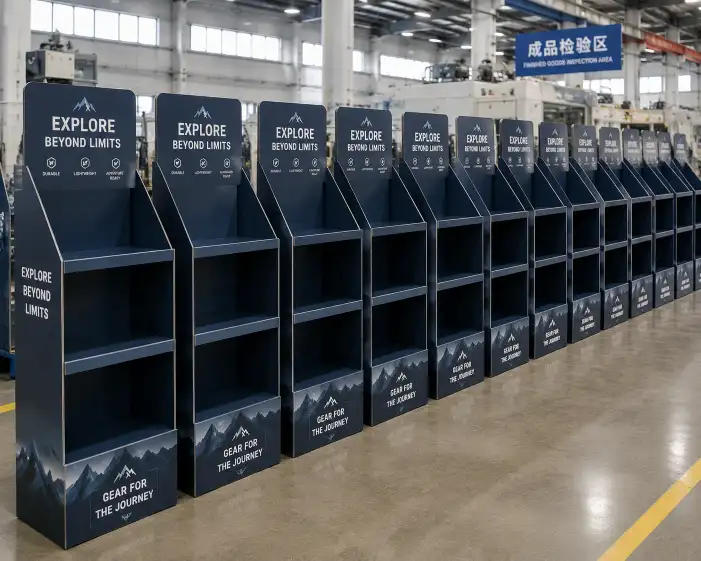
Making a cardboard display involves design and structural engineering7, creating a physical prototype, printing the graphics onto cardboard, die-cutting8 the shapes, and finally, assembling the pieces. Each step is crucial for creating a sturdy and eye-catching final product.

Over the years, I've guided countless clients through this process. It’s a journey from a simple idea to a physical object that sells your product. The magic happens when creativity meets engineering. One client came to me with a very complex, multi-tiered design. It looked amazing on paper, but during the prototyping stage, we realized it wasn't stable enough for a busy retail environment. By working together, we simplified the structure without losing the visual appeal. This collaboration saved the project from failure and resulted in a display that was both beautiful and strong.
Step 1: Design and Prototyping
This is where it all begins. First, a designer creates a 3D model of the display using software like CAD. This step focuses on two things: how the display looks (the visual design) and how it holds up (the structural design). We have to think about the weight of your products and the retail environment. Once the digital design is approved, we create a physical, unprinted prototype. This sample lets you see and feel the display, test its strength, and make sure your products fit perfectly before we start mass production.
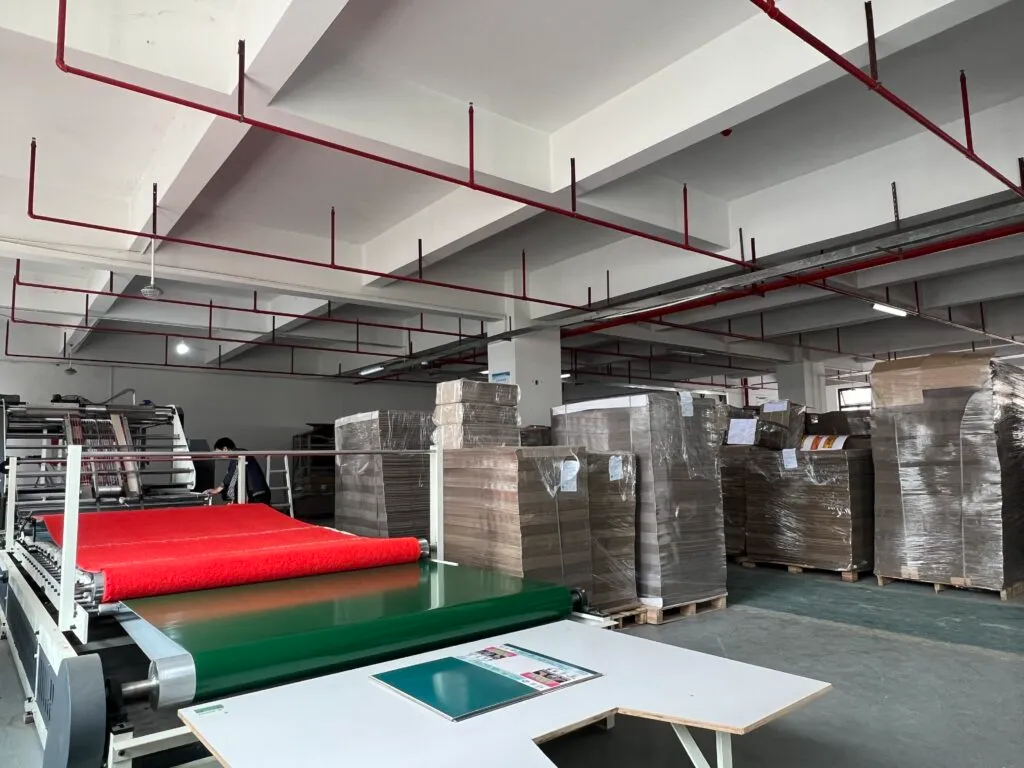
Step 2: Printing and Finishing
With the prototype approved, we move to printing. Your branding, logos, and marketing messages are printed directly onto large sheets of cardboard. We can use different printing methods9, like offset printing for large runs or digital printing for smaller quantities with complex graphics. After printing, we often add a finish, like a varnish or lamination. This not only makes the colors pop but also protects the display from moisture and wear.
Step 3: Die-Cutting and Assembly
Next, we cut the printed sheets into the final shapes. This is done with a machine called a die-cutter, which uses a custom-made tool, or "die," to stamp out each component with incredible precision. Think of it like a giant, industrial cookie cutter. After all the pieces are cut, the display is ready for assembly. To save on shipping costs, most displays are sent flat-packed to the client or a distribution center, along with easy-to-follow assembly instructions.
What are the three types of cardboard?
Choosing the right material seems tricky. You know you need cardboard, but which kind is best? Making the wrong choice can lead to a display that collapses or one that's too expensive.
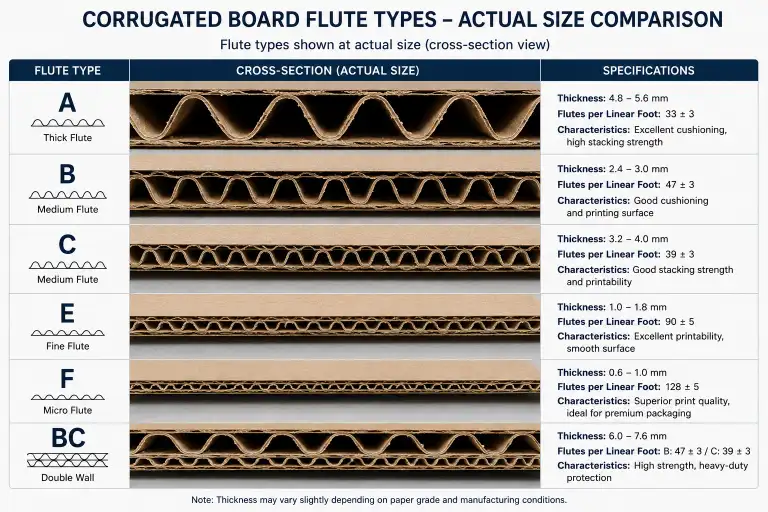
The three key components of corrugated cardboard10 are two flat outer layers (linerboard) and a wavy layer in the middle (flute). The thickness of this flute and the number of layers determines the board's strength and best use for your display.

The material choice is more important than many people think. I once worked with a beverage company that wanted to display heavy glass bottles. Their initial design used a standard B-flute single-wall board. During prototyping, we saw the shelves starting to sag under the weight. We recommended switching to a stronger, BC-flute double-wall board. It was a small change in specification, but it made all the difference. The final display was rock-solid and kept their products safe and looking great.
Understanding the Structure: Liner and Flute
It's the combination of layers that gives corrugated cardboard10 its strength.
- Linerboard: These are the flat sheets on the outside of the board. They provide a smooth surface for printing and act as the board's skin.
- Flute (or Medium): This is the wavy, zig-zag layer of paper sandwiched between the liners. The arches of the flute create air pockets that provide cushioning and rigidity. The size of these arches matters.
| Here are some common flute profiles used in displays: | Flute Profile | Thickness | Characteristics |
|---|---|---|---|
| E Flute | ~1.5 mm | Very thin, provides an excellent printing surface. Great for counter displays4. | |
| B Flute | ~3 mm | Good balance of strength and printability. A workhorse for floor displays3. | |
| C Flute | ~4 mm | Thicker than B flute, offers more cushioning. Often used for shipping boxes. |
Corrugated Board Grades: Wall Thickness
Beyond the flute profile, the number of layers, or "walls," also defines the type of cardboard.
- Single Wall: This is the most common type, with one flute layer between two linerboards (e.g., E Flute or B Flute). It's perfect for most retail displays holding lightweight products.
- Double Wall: This board has two flute layers and three linerboards (e.g., BC Flute, which combines a B and a C flute). It offers significantly more strength and is ideal for displays holding heavier items like drinks, cans, or ceramics.
- Triple Wall: With three flute layers, this is an incredibly strong and rigid material. It's less common for displays and is typically used as a lightweight alternative to wooden crates for shipping very heavy items.
What are pop displays in marketing?
You've built your display, but how does it function as a marketing tool11? A display that just holds things is a huge missed opportunity. It should be actively selling for you.
In marketing, a POP (Point of Purchase) display is a retail fixture designed to grab a customer's attention and encourage an impulse purchase. It acts as a silent salesperson by promoting a product or special offer right where buying decisions are made.

This is where everything we've talked about comes together. Customization isn’t just about making something look nice; it’s about creating a powerful marketing tool. A generic rack can't tell your brand's story. But a custom display can. I saw this with a client who launched a new line of organic snacks. We designed a colorful dump bin with fun graphics that appealed to kids. We placed it near the checkout aisles, and sales a few weeks later were 40% higher than projected. The display did more than just hold snacks—it created a moment of connection with shoppers.
The Silent Salesperson on the Shop Floor
Think of a POP display as your best salesperson, working 24/7 without a break. In a busy store filled with endless choices, your display has to break through the noise. It does this by:
- Using bold graphics and unique shapes to interrupt a shopper's journey.
- Communicating a clear message about what makes your product special.
- Creating a distinct space for your brand that separates it from competitors on the shelf.
Driving Impulse Buys and Brand Recognition
The ultimate goal of a POP display is to drive sales. They are experts at triggering impulse buys. By placing an attractive display with a special offer in a high-traffic area, you create a sense of urgency and opportunity that shoppers find hard to resist. Beyond a single sale, every custom display reinforces your brand identity. Consistent use of your logo, colors, and messaging across your displays helps build brand recognition12 and trust with consumers over time.
Conclusion
Ultimately, customizing your cardboard display is essential for brand success in retail. Understanding the terms, the creation process, and material options helps you build a powerful marketing tool11 that really works.
-
Learn about POP displays and how they can effectively attract customers in retail. ↩ ↩
-
Understand the nuances between POS and POP displays for better marketing strategies. ↩ ↩
-
Discover the effectiveness of floor displays in showcasing products and driving sales. ↩ ↩
-
Find out how counter displays can boost sales at checkout counters. ↩ ↩
-
Explore how pallet displays can help sell large volumes of products efficiently. ↩
-
Learn about dump bins and their role in promoting discounted or irregularly shaped products. ↩
-
Learn how design and engineering work together to create effective displays. ↩
-
Understand the die-cutting process and its importance in creating precise display shapes. ↩
-
Explore various printing techniques to enhance the visual appeal of your displays. ↩
-
Discover the advantages of using corrugated cardboard for durable and effective displays. ↩ ↩
-
Explore how effective displays can enhance brand storytelling and drive sales. ↩ ↩
-
Understand the importance of consistent branding in retail displays for consumer trust. ↩

One Response