Your product is amazing, but the packaging falls flat. It gets lost on the shelf and fails to connect with customers. Let's create packaging that truly represents your brand.
The best way to make packaging for your product is to focus on four key areas. First, ensure it protects the product. Second, create a simple, clear design. Third, control your costs. Finally, design for a great user experience. This approach balances function, branding, and budget effectively.

This might sound like a lot to juggle. I've spent my entire career in the paper and display industry, from working in a paper mill to running my own factory. I've seen firsthand what works and what doesn't. The good news is that creating effective packaging isn't as complicated as it seems. It follows a clear logic. Let's break it down together, step by step, so you can create packaging that not only protects your product but also helps it sell.
How to create product packaging?
You have a great product but no idea where to start with packaging. A bad start can waste a lot of time and money. I can guide you through the process.
To create product packaging, start by deeply understanding three things. First, your product's needs, like size and fragility. Second, your target customer. And third, your brand's core message. These three pillars will guide all your material, design, and structural decisions from the very beginning.

When I first started in this industry, I was fascinated by the raw materials at the paper mill. I saw how different types of paper were made for very specific purposes. Some were thick and strong for shipping boxes, while others were thin and elegant for luxury items. The principle is the same for your packaging. You must match the solution to the problem. Before you even think about colors or logos, you need to think about the journey your product takes to get to the customer.
Key Foundational Questions
- What is the product? Is it fragile glass? Is it an electronic device sensitive to moisture? Is it a food item that needs to be kept fresh? The product itself dictates the level of protection needed.
- Who is the customer? Are you selling to eco-conscious millennials? Or perhaps to busy parents who value convenience? Your design choices should appeal directly to them.
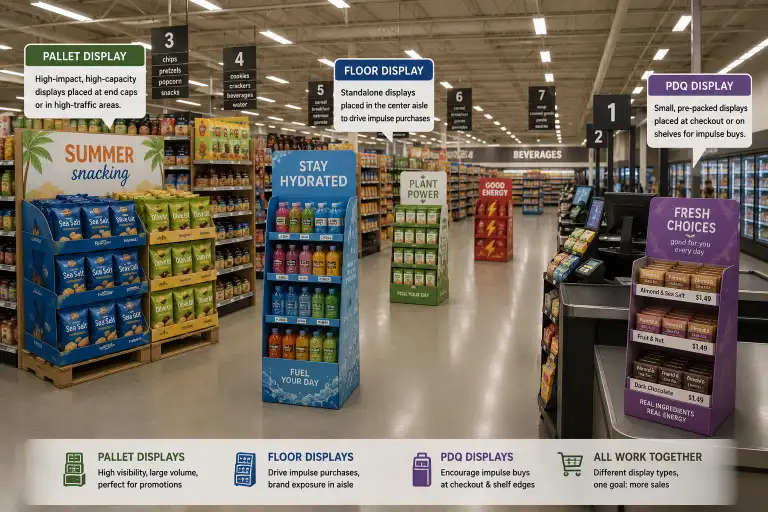
- How will it be sold? An e-commerce product needs to withstand rough shipping. A product on a retail shelf needs to grab attention in three seconds.
Here is a simple way to think about it:
| Product Type | Primary Packaging Need1 | Ideal Material Example2 |
|---|---|---|
| Glass Bottle | High-Impact Protection3 | Molded Pulp or Thick Corrugated Cardboard |
| T-Shirt (Online) | Low Weight, Tear Resistance | Poly Mailer or Branded Kraft Mailer |
| Luxury Watch | Premium Feel, Security | Rigid Box with Foam Insert |
| Fresh Cookies | Freshness, Visual Appeal | Tin Tie Bag with a Clear Window |
Start with these basics. Nailing this foundation makes every other decision much easier.
What are the 7 basic steps to packaging design?
The design process feels huge and complicated. If you miss a critical step, you could face costly reprints or failures. Let's break it down into seven manageable parts.
The 7 basic steps of packaging design are: 1. Define packaging requirements. 2. Choose your packaging layers. 3. Select the right materials. 4. Create the structural and graphic design. 5. Get feedback and prototype. 6. Test your prototype. 7. Prepare for production.

I have a client, a young entrepreneur, who was so excited about his product that he rushed the process. He designed beautiful graphics but skipped the testing phase. When the first batch shipped, over 30% of the products arrived damaged because the box structure was too weak. He had to scrap everything and start over. It was a painful lesson. Following a clear process prevents these kinds of disasters.
A Breakdown of the Steps
- Define Requirements: This is the foundation we just discussed. Know your product, audience, and sales channels inside and out.
- Choose Packaging Layers: Decide if you need outer packaging (the shipping box), inner packaging (the retail box), and product wrapping (like tissue paper).
- Select the Right Materials: Based on your requirements and budget, choose your materials. Think about cardboard, plastic, glass, or metal. This is where you balance cost, protection, and eco-friendliness.
- Create the Design: This has two parts. First, the structural design (the dieline or template). Second, the graphic design (the colors, fonts, and images). I always tell designers like JC to get the structure right before spending too much time on graphics.
- Get Feedback & Prototype: Create a physical mock-up. Show it to stakeholders and potential customers. Does it look good? Is it easy to open? Does it feel right?
- Test Your Prototype: This is the step my client skipped. Put your product in the prototype and simulate the shipping process. Drop it, shake it, leave it in a damp place. Does it hold up?
- Prepare for Production: Once the prototype is approved and tested, create the final files for your manufacturer. Ensure your dielines and artwork are in the correct format.
How to make your own packing material?
You want unique packaging, but custom-printed boxes seem way too expensive. Off-the-shelf options feel generic and don't fit your brand. You can still create a unique experience on a budget.
"Making your own" packing material often means customizing standard materials affordably. You can use custom stamps on plain boxes, order branded stickers or tape, or use unique tissue paper to create a premium, branded experience without the high cost of fully custom manufacturing.

When you're starting out, every dollar counts. I always advise new businesses to be smart and creative. You don't need to order 10,000 custom-printed boxes from a factory like mine right away. You can build up to that. The goal is to make the customer feel special. You can achieve this with simple touches. Think of it as dressing up a simple, solid outfit with unique accessories. The outfit is your standard box; the accessories are your custom touches.
Low-Cost Customization Methods
- Custom Rubber Stamp: Buy a simple kraft box and a custom stamp with your logo. It's an affordable, rustic, and effective way to brand your packaging.
- Branded Stickers: Design a beautiful sticker with your logo or a thank-you message. You can place it on boxes, tissue paper, or mailers to seal them.
- Custom Packing Tape: Instead of clear tape, use custom-printed tape. Every package you send becomes a mini-billboard.
- Printed Tissue Paper or Inserts: A small postcard with your story or a thank-you note inside the box adds a powerful personal touch. Custom tissue paper also elevates the unboxing experience.
Here’s how these methods compare for a startup:
| Customization Method | Initial Cost | Per-Item Cost | Effort Level |
|---|---|---|---|
| Custom Stamp | Low | Very Low | Medium |
| Branded Stickers | Low | Low | Low |
| Custom Packing Tape | Medium | Low | Low |
| Printed Inserts | Low | Low-Medium | Low |
These small details show you care and help build a strong brand identity from day one.
What are the four rules of packaging?
There are so many packaging tips out there. Following the wrong advice will just confuse you and hurt your sales. These four simple, timeless rules will always keep you on the right track.
The four essential rules of packaging are: 1. Protect the product above all else. 2. Be clear and simple in your design. 3. Manage and control your costs effectively. 4. Always consider the end-user's experience, from opening the box to its disposal.

In my years of helping clients, I've seen that success always comes back to these four principles. They are not just suggestions; they are the pillars of effective packaging. If you get these four things right, your packaging will do its job perfectly. It will protect your creation, communicate your brand, fit your budget, and delight your customer. Let's look at each one.
Rule 1: Practicality First
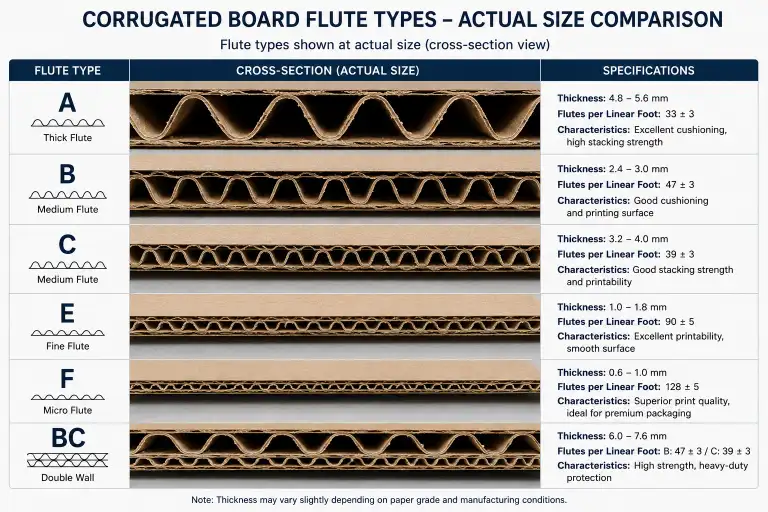
Your packaging's number one job is protection. A beautiful box is useless if the product inside arrives broken. Think about drop tests, moisture resistance, and shelf life. I remember from my days at the paper mill how corrugated cardboard gets its strength from the fluted layer inside. That engineering is all about protection. Don't let your design compromise the structure.
Rule 2: Simple and Clear Design
A customer on a store aisle or scrolling online gives your product about three seconds of attention. Can they understand what your product is and who makes it in that time? Avoid clutter. I tell designers like JC to focus on a clear brand name, a simple description of the product's function, and clean graphics. Don't make the customer guess.
Rule 3: Control Your Costs
Your packaging is part of your Cost of Goods Sold (COGS). Fancy materials and complex designs can destroy your profit margins. Start with affordable yet sturdy materials. As your sales grow, you can reinvest in upgraded packaging. Always get quotes for different quantities to see where the price breaks are.
Rule 4: Think About the User Experience
How does your customer feel when they receive and open your package? This is the "unboxing experience." Make it easy and enjoyable. Avoid "wrap rage" from impossible-to-open plastic shells. Use easy-tear strips. If possible, make the packaging reusable. A positive unboxing experience is a powerful marketing tool that builds loyalty.
Conclusion
Creating great packaging is simple. Focus on protection, clear design, cost control, and user experience. Follow these steps, and your product will stand out for the right reasons.
-
Understanding primary packaging needs helps in selecting the right materials for product protection and appeal. ↩
-
Exploring ideal material examples can guide you in choosing the best packaging solutions for your products. ↩
-
Learning about high-impact protection can ensure your fragile products are safely packaged during shipping. ↩