Your cardboard display is collapsing under your products. This damages stock, creates a mess, and harms your brand image. But you can make cardboard surprisingly strong with a few tricks.
To make cardboard hold more weight, you must focus on its structure. Use lamination to create thicker sheets and design with vertical flutes for better compression strength. Adding internal supports like honeycomb inserts or cross-bracing and using folds to create triangles will also dramatically increase rigidity.

It sounds simple, right? But the magic is really in the details. I’ve spent 16 years figuring out how to turn flimsy sheets into load-bearing champions. Understanding these principles will completely change how you approach cardboard design. Let's dive into the specific techniques that have worked for me and my clients time and time again.
Which Cardboard Type is Best for Strength?
Choosing the wrong cardboard grade can doom your project from the start. That guesswork is frustrating, and a wrong choice means wasted materials and failed displays. Understanding flute types fixes this.
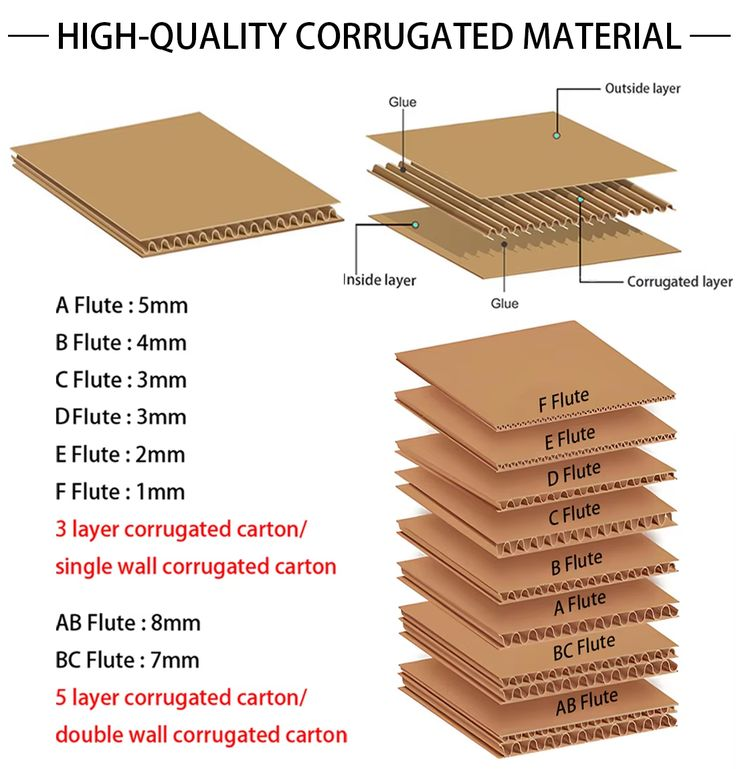
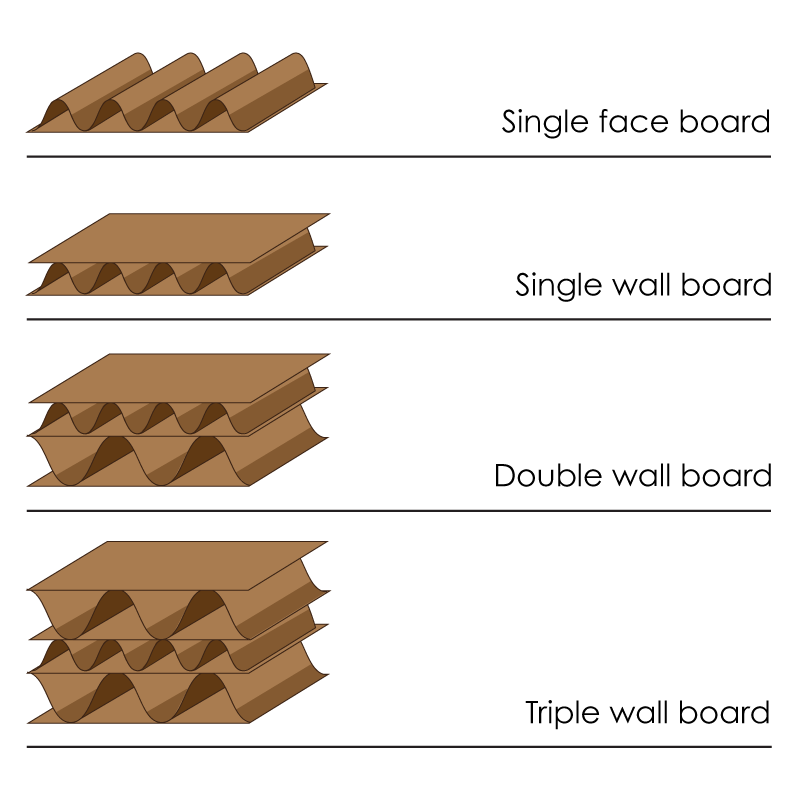
For maximum strength, choose double-wall or triple-wall corrugated board. The flute type is key; C-flute has great stacking strength, while BC-flute double-wall board combines different flutes. This mix gives you the best performance for heavy-duty display applications.
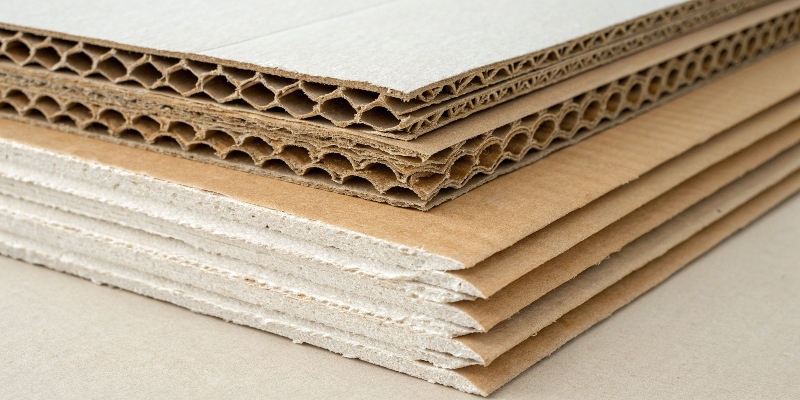
When we talk about cardboard strength, we are really talking about two things: the paper liners and the wavy part in the middle, called the fluting. The strength comes from this sandwich-like structure. Over my years in the business, I've learned that not all cardboard is created equal. The key is matching the material directly to the job it needs to do.
Understanding Flutes and Liners
The flutes are the unsung heroes of cardboard. They create pockets of air that give the board its cushioning and, more importantly, its rigidity. The bigger the flute, the better the stacking strength. A simple way to think about it is the Edge Crush Test (ECT). This test tells you how much weight a piece of cardboard can handle on its edge before it crushes. It’s the best indicator for stacking strength.
I remember a client who needed a display for heavy glass jars of sauce. We first designed it with a standard C-flute board. But in our testing, the shelves started to sag a little. We switched to a BC-flute double-wall board. It was a bit thicker and cost a little more, but the display became rock-solid. The client was thrilled, and the displays are still in use today.
| Flute Type | Characteristics | Best For |
|---|---|---|
| B-Flute | Thin profile, good crush resistance | Inner packaging, small product boxes |
| C-Flute | The industry standard, good all-around stacking | Standard shipping boxes, most displays |
| E-Flute | Very thin, provides an excellent printing surface | Retail packaging, point-of-purchase signs |
| BC-Flute | Double-wall, combines B and C flutes | Heavy-duty displays, shipping heavy items |
How Do Structural Designs Increase Load Capacity?
You have strong cardboard, but your display still wobbles and bends. It's frustrating when good materials fail from poor design, making your work look unprofessional. The secret is how you shape it.
Structural design increases strength by distributing weight well. Always orient the flutes vertically for compression strength. Folding cardboard into triangles, the strongest shape, creates powerful support beams. Internal baffles or cross-sections also stop shelves from bowing and add stability.
A good piece of cardboard is just the start. The real engineering comes into play with the design. I’ve seen brilliantly simple folds completely transform a weak sheet into a structural element capable of holding serious weight. It’s all about using geometry to your advantage. This is where a good designer shows their true value, and where I've focused much of my career.
The Power of Geometry in Cardboard
The number one rule I tell my design team is "flutes to the floor." Think of the corrugated flutes as tiny columns. When they stand vertically, they can support a lot of weight from above. If they are horizontal, they crush easily. So, for shelves, base panels, and side walls, always make sure the flutes run up and down.
Beyond that, folding is your best tool. By folding the edges of a shelf, you create a beam that is much more resistant to bending. The most powerful shape in engineering is the triangle. We often design triangular support beams that are hidden behind or under shelves. They are incredibly light but add immense strength. Interlocking different pieces with tabs and slots also creates a stronger, unified structure that distributes load across the entire display, not just one weak point.
| Shape | Structural Benefit | Common Use in Displays |
|---|---|---|
| Triangle | Extremely rigid, distributes force evenly | Hidden support beams, corner reinforcements |
| Folded Edges | Creates a "beam" effect, prevents sagging | Shelf fronts, structural corners, back panels |
| Interlocking Tabs | Secures panels together without glue or tape | Assembly connections, modular displays |
Can Reinforcements Really Double the Strength?
Your standard cardboard design is at its limit, but you need it to hold even more. Starting over with a stronger, more expensive material is not always an option. What if you could just add a simple reinforcement?
Yes, reinforcements can easily double or even triple a cardboard structure’s strength. Inserting support beams made from rolled or folded cardboard, using internal honeycomb structures, or adding small plastic or wood inserts at critical load points are all very effective methods.
Sometimes, even the best board and the smartest design aren't enough for very demanding products. That’s when we bring in reinforcements. This doesn't mean the design has failed; it means we are optimizing it for extreme performance. These little additions can make a world of difference and are often the secret behind the most durable cardboard displays you see in stores.
Advanced Reinforcement Techniques
One of my favorite tricks is what we call an "egg crate" or grid insert. I once had a project for a hardware store displaying small but heavy paint cans. A single shelf, even a double-wall one, would start to bow in the middle. So, we designed a simple grid of interlocking cardboard strips that sat underneath the main shelf. This transferred the weight down to the base through dozens of small vertical walls. The shelf became unbelievably strong, and we didn't have to use any other materials.
You can also laminate, which just means gluing two or more sheets of cardboard together. This is great for base plates or shelves that need to be extra stiff. For extreme loads, don't be afraid to mix materials. We sometimes place a thin wooden dowel inside a folded cardboard beam or use small, hidden plastic clips under a shelf's front edge to stop any chance of sagging. These small supports cost pennies but add huge reliability.
| Reinforcement Method | How It Works | Best For |
|---|---|---|
| Internal Beams (Folded Cardboard) | Creates an I-beam structure under a shelf. | Long shelves, preventing bowing in the middle. |
| Honeycomb Inserts | Fills a void with a dense cellular structure. | Large flat surfaces, overall structural rigidity. |
| Support Clips (Plastic/Metal) | Prevents sagging at the front edge of a shelf. | High-traffic displays, heavy point loads. |
| Lamination | Glues multiple layers of board together. | Shelves, base plates, and high-stress panels. |
Conclusion
Making cardboard stronger is about a smart material choice, clever structural design, and strategic reinforcements. Master these, and you will build displays that are both durable and very cost-effective.


One Response