Struggling to make your school supplies stand out in crowded stores? Products get lost on messy shelves, leading to missed sales during the crucial back-to-school season.
A 1/4 pallet corrugated hook shipper display is the perfect solution. It organizes various products, ships ready for the floor, and uses strong graphics to attract customers. This combination makes shopping easier for parents and boosts your sales significantly during the peak season.

I’ve spent 16 years in this industry, and I’ve seen firsthand how the right display can make or break a product launch. A simple box on a shelf just doesn't cut it anymore, especially when competition is fierce. You need a tool that works as hard as you do, from the warehouse to the checkout counter. That's why I always recommend a well-designed shipper display. It's more than just packaging; it's a silent salesperson. Let’s dive into how you can make this tool work for you.
Why is a Corrugated Hook Shipper the Best Choice for Back-to-School?
Your products are great, but they get lost on generic store shelves. This makes it hard for busy parents to find what they need, and you lose potential sales.
A corrugated floor display that doubles as a shipper is ideal. It’s cost-effective, lightweight, and fully customizable with branding. It arrives pre-stocked, allowing retailers to place it on the floor instantly, saving time and labor during the hectic back-to-school rush.

Over the years, I've worked with countless brands getting ready for the back-to-school season. It's a make-or-break time for many. The key is to make things as simple as possible for both the retailer and the customer. This is where the beauty of a corrugated shipper display really shines. It's a single unit that solves multiple problems at once. You are not just sending products; you are sending a complete, ready-to-sell marketing tool. Let's break down exactly why this approach is so effective for a designer like you.
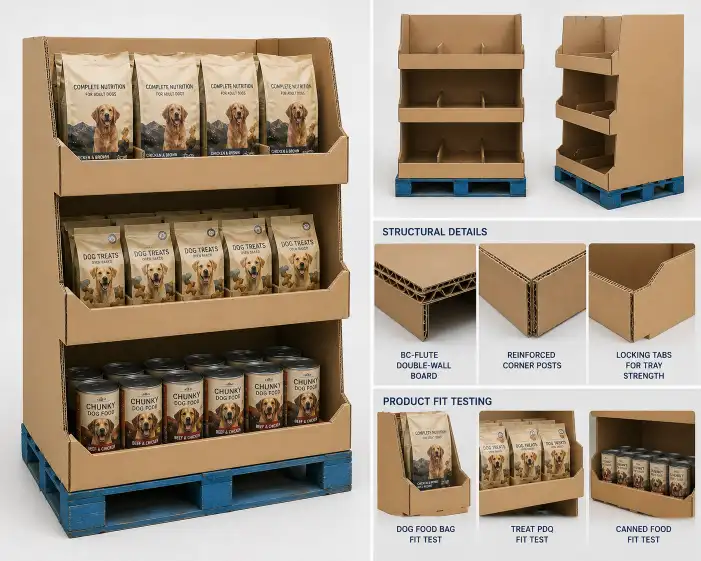
The Power of Corrugated Material
Corrugated cardboard is the hero of retail displays for a reason. First, it’s incredibly lightweight, which helps keep shipping costs down. Second, it's strong. With the right design, it can hold a surprising amount of weight. I remember a project where we had to hang heavy packs of notebooks, and the client was skeptical. By using a double-wall B/C flute board and internal supports, we created a display that was rock-solid. Finally, its surface is perfect for high-quality printing. You can get vibrant, eye-catching graphics that make your brand pop, which is essential for grabbing a shopper's attention.
The Shipper + Display Advantage
The term "shipper display" means it serves two purposes. It acts as a protective shipping box to get your products safely to the store. Then, once it arrives, store staff can quickly remove the outer layer and set it up as a display in minutes. This eliminates the need for employees to unpack each item and stock shelves one by one. This is a huge advantage for retailers, who are always looking for ways to save on labor costs. For your brand, it ensures your products are displayed exactly as you intended, creating a consistent brand experience.
| Feature Comparison | Traditional Shelving | Corrugated Shipper Display |
|---|---|---|
| Setup Time | High (15-30 mins) | Low (1-2 mins) |
| Branding Space | Minimal (Product Only) | High (360-degree branding) |
| Labor Cost | High | Low |
| Placement | Restricted to Aisles | Flexible (Aisles, Endcaps) |
How Do You Design a Hook Display That's Both Strong and Eye-Catching?
You worry that your display will fail. Weak hooks might bend or the main body could collapse under the product's weight. This leads to damaged goods and a messy store appearance.
Focus on a strong foundation, smart structural supports, and proper weight distribution. I always use reinforced bases and internal corrugated grids. Choosing the right hook type and length for each product is also critical to prevent sagging and ensure the display looks perfect.

Designing a display that looks good is one thing. Designing one that stands up to the rough retail environment is another challenge entirely. I learned this the hard way early in my career. We designed a beautiful display, but we underestimated the total weight of the products. A week later, I got a call from the client that some of them were collapsing. It was a tough lesson, but it taught me that structural integrity must come first. You have to think like an engineer before you can think like an artist.
Choosing the Right Hooks
The hooks are the most critical part of a hook display. You have two main options: plastic and metal. Plastic hooks are cheaper and great for very light items like single pens or erasers. For heavier items like scissors, glue bottles, or bundled notebooks, you must use metal hooks. They cost a little more but provide the strength and durability needed. You also need to consider the length. A hook that is too long will sag under weight, making the display look sloppy. I always recommend testing your heaviest product on a sample hook to be sure.
Structural Integrity is Key
The main body of the display must support the total weight of all products. Here are the areas I always focus on:
- The Base: The base needs to be wide and stable. I often add a corrugated grid or "egg crate" structure inside the base to prevent it from being crushed or wobbling.
- The Back Panel: This is where the hooks attach. It must be made from a strong grade of cardboard, often double-wall. I also design internal vertical supports that run from the base to the top, acting like a spine to carry the load.
- Weight Distribution: Plan where your products will hang. Place heavier items closer to the bottom and the central support panel. Lighter items can be placed higher up and further out. This simple step helps maintain the display's center of gravity and prevents it from tipping over.
What Are the Key Cost-Saving Secrets for Pallet Shipper Displays?
You have a tight budget for your project. High costs for materials, printing, and shipping can make a custom display seem impossible, forcing you to use a generic, less effective solution.
The biggest savings come from smart design for logistics. Design the display to ship flat and be easy to assemble. Also, use standard material grades and limit complex cuts. This reduces manufacturing time and freight costs, making a big impact on the final price.

Every designer, including me, wants to create something amazing. But in the real world, budget is always a factor. One of my clients, a startup stationery company, came to me with a fantastic product idea but a very limited budget. They thought a custom pallet display was out of reach. I showed them how we could make small adjustments to the design to make it much more affordable without sacrificing the visual impact. It’s not about cutting corners; it’s about being smarter with your resources. This is where experience really helps you guide clients to the best solution.
Smart Design for Logistics
Shipping air is expensive. A display that is bulky or comes pre-assembled takes up a lot of space on a truck. The key is to design every component to pack as flat as possible. I work with my engineering team to create designs that can be neatly packed into a single master carton. This not only cuts down on shipping costs from our factory to the client's warehouse but also makes it easier and cheaper for them to distribute the displays to individual retail stores. A good design thinks about the entire journey, not just its time on the sales floor.
Material and Production Choices
The choices you make here have a direct impact on the final cost.
- Material: Do you really need the thickest, strongest board for a lightweight product? Maybe a C-flute is enough instead of a B-flute.
- Printing: A full-color lithographic print looks amazing, but it's more expensive. If the design allows, a 2- or 3-color flexo print can look just as professional and save you a lot of money, especially on large runs.
- Finishes: Coatings like gloss or matte lamination add cost. Ask yourself if it's essential for the brand's image or if a simple varnish will achieve a similar protective effect.
| Cost Factor | High-Cost Option | Low-Cost Option |
|---|---|---|
| Design | Complex, many parts | Simple, few parts |
| Shipping | Pre-assembled | Ships flat |
| Printing | 4-Color Litho + Lamination | 2-Color Flexo |
| Quantity | Small run (e.g., 100 units) | Large run (e.g., 1000+ units) |
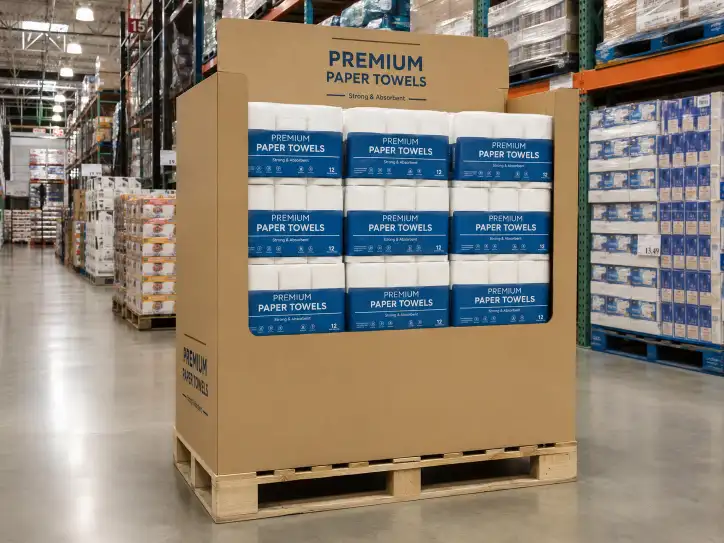
How Can You Maximize Product Visibility on a 1/4 Pallet Footprint?
Retail floor space is expensive and limited. If your display is small, you worry it will be overlooked by shoppers, getting lost between larger, more dominant displays.
Use a four-sided, tower-style design to create a 360-degree shopping experience. A tall, bold header with clear branding acts like a beacon. Also, use smart graphic design with bright colors and clear messaging to draw the eye from across the aisle.

A 1/4 pallet is a standard retail footprint, but it’s not very big. The challenge is to make it feel bigger than it is. I always tell my clients to think vertically. You want to own the space from the floor up to the shopper's eye level and even above. It's like building a skyscraper on a small plot of land; you build up! We once designed a display for pens that used this concept. It was a tall, thin tower. Even though its footprint was tiny, its height and bright yellow color made it visible from the moment a customer entered the aisle.
The 360-Degree Shopping Experience
A display that can only be shopped from the front is wasting 75% of its potential. With a 1/4 pallet, you can easily create a four-sided display. This allows multiple shoppers to look at your products at the same time without feeling crowded. It also means that no matter which direction a customer is walking down the aisle, your products are visible. This is a huge advantage. When we create these custom display solutions, we think about how the product mix looks from every single angle, ensuring there are no "bad sides" to the display.
Using Graphics to Guide the Eye
Your display's graphics are its voice. They need to be loud and clear.
- Header Card: This is your billboard. It should feature your brand logo and a simple, powerful message like "Back-to-School Essentials." It needs to be visible over the tops of the shelves.
- Color Blocking: Use bold, contrasting colors to separate different product categories. For example, use a blue background for pens, a red one for notebooks, and a yellow one for art supplies. This makes it easy for shoppers to find what they need quickly.
- Call-to-Action: Use simple text on the display body or side panels, like "Get Ready for School!" or "All You Need in One Spot," to engage customers and encourage them to buy.
Conclusion
A well-designed pallet hook shipper is your best tool for back-to-school success. It saves time, cuts costs, and makes your products the star of the aisle.