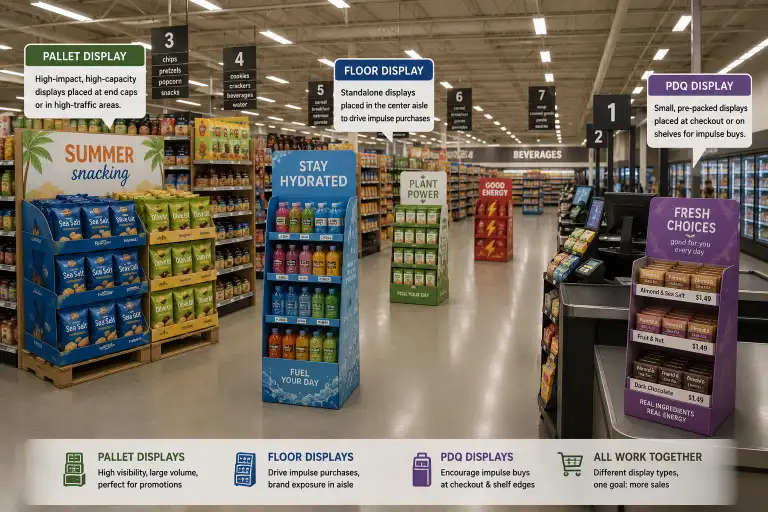
Struggling to get your product noticed in a crowded store? A generic display just won't cut it. You need something that grabs attention and sells.
To design the perfect cardboard display, you must first define your goals and budget. Then, focus on a strong structural design with the right materials, create eye-catching graphics that reflect your brand, and always test a prototype before final production to ensure it works perfectly in-store [1].

Getting a display from an idea to the shop floor seems complex, but it's a journey I've taken hundreds of times in my 16 years in this business. It's about breaking it down into manageable steps. A great display doesn't just hold your products; it tells your brand's story and connects with customers. Let’s walk through the steps together, so you can turn a simple sheet of cardboard into your most powerful sales tool.
How do you start the design process?
Do you have a great product but no idea where to begin with its display? This uncertainty can lead to missed opportunities and wasted marketing dollars.
Start by defining your objectives, understanding your target audience, and setting a clear budget and timeline [3]. This initial planning phase is the foundation for a successful display that meets your specific marketing goals and stays within your financial limits.

Before we even think about the physical display, we have to do our homework. I always tell my clients, "A great display starts with great questions." What is this display supposed to do? Are we launching a new product, pushing a seasonal promotion, or just trying to build brand awareness? The goal changes everything. At the same time, we need to know who we're talking to. A display for a kid's toy will look very different from one for a luxury cosmetic item. Thinking about your target audience helps guide the colors, shapes, and messaging. And of course, we need to talk about the practical stuff: budget and timeline. Knowing these from the start helps us make smart decisions and avoids surprises down the road. It’s all about building a solid foundation before we start constructing the house.
| Planning Step | Key Question | Why It's Important |
|---|---|---|
| Define Objectives | What is the main goal of this display? | Guides the entire design, from messaging to structure. |
| Know Your Audience | Who are you trying to reach? | Ensures the design resonates with potential customers. |
| Set Budget | How much can you invest? | Determines the materials, size, and complexity possible. |
| Establish Timeline | When do you need it in stores? | Keeps the project on track through production stages. |
What makes a display strong and stable?
Worried your display might look great but collapse under the weight of your products? This fear can lead to damaged goods, a messy retail space, and a bad brand image.
Structural integrity comes from two key areas: choosing the right corrugated cardboard grade (flute size and paper weight) and creating an expert structural design with internal supports [2]. These elements work together to ensure your display can handle the product load safely.

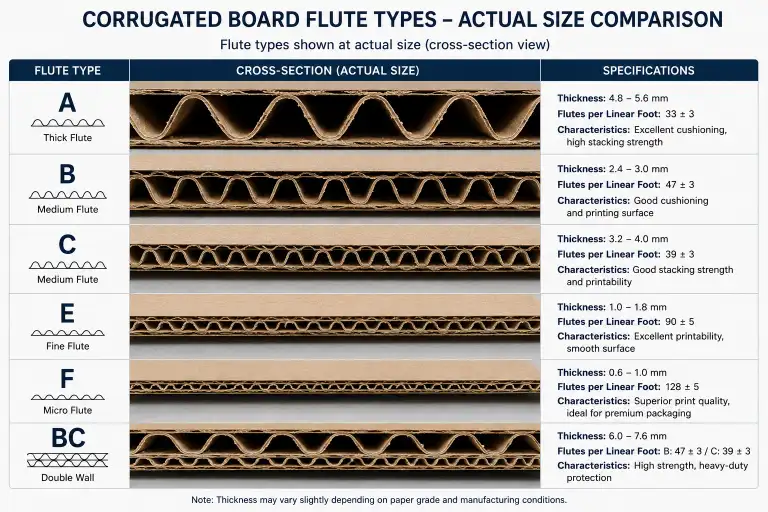
The strength of a display is its most important, yet invisible, feature. It all starts with the material. We don't just pick any cardboard; we select a specific flute type and paper combination based on what it needs to hold. For instance, a display for heavy soda bottles needs a much stronger board, like a B-flute or even a double-wall BC-flute, compared to a display for lightweight chip bags, which might use a finer E-flute [2]. Our structural designers then act like architects, using software to engineer a skeleton for the display. This often involves adding hidden internal supports, crossbeams, and locking tabs that distribute the weight evenly from the shelves down to the base. This isn't just guesswork; it's a science. The goal is to make sure the display not only looks good on day one but stays standing strong for its entire life in the store.
| Flute Type | Characteristics | Common Use Cases |
|---|---|---|
| E-Flute | Thin with a very smooth printing surface. | Lightweight product displays, cosmetic boxes. |
| B-Flute | Good balance of strength and print quality. | Floor displays, dump bins, heavier products. |
| BC-Flute | Double-wall for maximum strength and durability. | Pallet displays, heavy bulk items like beverages. |
How can you make your display visually pop?
Fearful that your display will just blend in with all the others on the shelf? A boring design fails to attract shoppers, making your product invisible.
To make your display pop, use bold, eye-catching graphics that align with your brand identity. Your message should be clear and easy to read from a distance, using a well-chosen color palette and high-quality printing to grab customer attention instantly [1].

This is where art meets commerce. Once we have a strong structure, we need to make it beautiful. Your brand’s colors are a huge part of its identity, and we have to get them right. Studies have shown that color can increase brand recognition by up to 80%, so this isn't something to take lightly [3]. We always start with high-resolution artwork and ensure it’s set up for CMYK printing. Before the main production run, we provide digital or even physical proofs for approval. This ensures that the specific shade of your brand's red is perfect, not just "close enough." The message on the display, or the "call to action," needs to be simple and direct. Shoppers make decisions in seconds, so they need to understand what you're selling and why they should care, all in a single glance. Great graphics turn a simple box into a silent salesperson.
Why is prototyping so important?
Ever thought about skipping the prototype to save time or money? This is a huge gamble that can lead to discovering a major flaw only after you've produced thousands of units.
Prototyping is a critical step to test the display's design in the real world. It allows you to check product fit, assess structural stability, and confirm ease of assembly before committing to the full production run, preventing costly mistakes [2].

I learned the importance of prototyping the hard way many years ago. We were working on a big project for a new snack brand, and the deadline was incredibly tight. To speed things up, the client and I agreed to rush through the prototype approval. The digital 3D model looked perfect. But when the first batch of 1,000 displays arrived at the co-packer, we discovered the product slots were just a few millimeters too small. The snacks wouldn't fit. It was a disaster. We had to remake the cutting die and reprint the entire order, which cost us both time and a lot of money. That mistake taught me a lesson I'll never forget: always test a real, physical prototype. We build a full-scale model and load it with the actual products it will hold. We shake it, push it, and see how it holds up. It’s the ultimate safety check that ensures what looks good on a computer screen also works perfectly in the real world.
Conclusion
Designing a great cardboard display is a step-by-step process. By focusing on clear goals, strong structure, bold graphics, and proper testing, you can create a display that truly sells.