Ordering custom displays can feel like a puzzle with too many pieces. You need a great result but worry about the process. I'll show you how simple it can be.
The process for ordering custom floor displays involves six key stages: Initial Consultation, Design and Dieline Creation, Quotation, Prototyping, Mass Production, and finally, Logistics and Shipping. Following these steps with your supplier ensures your project runs smoothly from concept to the retail floor.

Getting a custom display made for your product shouldn't be a headache. Over my 16 years in this business, I've refined this process with hundreds of clients, just like you. It's designed to be clear and predictable, so you always know what's next. This guide will walk you through everything, making sure no detail is missed and your final display is exactly what you imagined. Let's break down each part so you feel confident from start to finish.
What are the 5 steps to creating a display?
You have a product but no display idea, leaving you staring at a blank page. This uncertainty can be frustrating. I will give you a clear 5-step creative process.
The five creative steps are: defining your goals1, brainstorming concepts2, creating the structural design3, applying the graphics4, and building a prototype5. This framework turns your initial idea into a functional, eye-catching display ready for the store. It ensures what you design can actually be built.

As a designer, you know that a good process leads to a good result. It's no different with floor display6s. Before we even talk about ordering, you need a solid concept. I've seen many projects succeed or fail right at this stage. It’s all about building a strong foundation.
Step 1: Clarifying Your Objectives
First, you must know what you need the display to do. How many products will it hold? What are their dimensions and weight? Where will the display be used—a large supermarket or a small local shop? What is your budget? Answering these questions first saves a lot of time and prevents major revisions later.
Step 2: From Concept to Structure
Next, we move from ideas to a physical plan. This is where your skills in CAD software come in. We create a "dieline," which is the flat template for the display. This structural design3 must be strong enough to hold your products securely. I always double-check the material specs here to prevent any collapses on the retail floor. A weak display is worse than no display at all.
This table breaks down the creative journey:
| Step | Key Action | Goal |
|---|---|---|
| 1. Define Goals | List product specs, budget, and retail needs. | Create a clear project brief. |
| 2. Brainstorm | Sketch ideas for themes and shapes. | Develop a unique visual direction. |
| 3. Structural Design | Create a CAD dieline. | Ensure the display is strong and stable. |
| 4. Graphic Design | Apply artwork and branding to the dieline. | Make the display visually appealing. |
| 5. Prototyping7 | Build a physical sample. | Test and confirm the final design. |
What is the first step in product display?
Starting a new display project can feel like a huge task. You wonder where to even begin. I'll show you the single most important first step to get you started right.
The very first step is to define your project's objectives clearly. You need to know your product, your target customer8, the retail environment9, and your budget inside and out. Without this foundation, your design will lack direction and might fail to meet your marketing goals10.

I can't stress this enough: a project without a clear goal is set up for failure. I once had a client who was so excited about a creative idea that they skipped this step. They designed a beautiful, large display without first confirming the store's size restrictions. In the end, half of the displays couldn't be used because they simply didn't fit in the smaller retail locations. They lost a lot of time and money.
Understanding Your Product's Needs
Start with the basics. What is the size and weight of each product? How many units do you want on a single display? This information directly impacts the materials we choose and the structural engineering of the display. A display for light cosmetic boxes is very different from one for heavy beverage bottles.
Analyzing the Retail Space and Audience
Think about where this display will live. Is it for a high-traffic area in Walmart or a quiet corner in a boutique? The environment dictates the display's durability, size, and even the style of the graphics. At the same time, who are you trying to attract? The design should appeal directly to your target customer8's tastes.
This simple table shows why this step is so critical:
| Project Aspect | Poorly Defined (The Risk) | Well-Defined (The Goal) |
|---|---|---|
| Structure | Display collapses under product weight. | Sturdy, safe, and holds the required stock. |
| Size | Too large for the store, gets rejected. | Fits perfectly in the designated retail space11. |
| Budget | Costs spiral out of control with changes. | Project stays on budget from start to finish. |
| Graphics | Fails to attract the right customers. | Design resonates with the target audience. |
What is a floor display?
You hear "floor display6" all the time in our industry, but what does it really mean? The term can feel a bit general. I'll give you a simple, clear definition.
A floor display is a standalone point-of-purchase (POP) fixture that sits directly on the retail floor. It is designed to grab a shopper's attention, promote specific products, and encourage impulse buys, separate from the standard store shelves. Most are made from corrugated cardboard.

Think of a floor display as your brand's salesperson in the aisle. Its job is to interrupt the customer's normal shopping pattern and say, "Hey, look over here!" For the 16 years I've been making these, their purpose has always been the same: to make a product stand out in a crowded store. They are powerful tools for new product launches, seasonal promotions, or clearing out inventory. Because they are temporary and cost-effective, brands can use them to create excitement for a short period without committing to expensive permanent fixtures12.
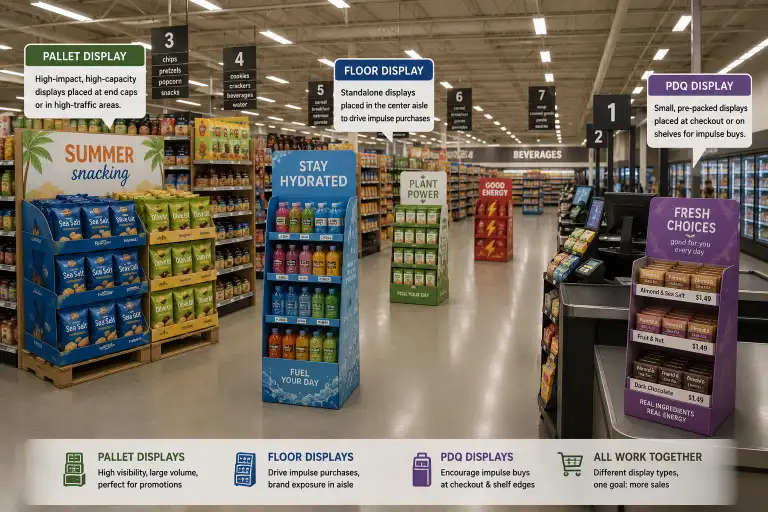
Common Types of Floor Displays
Not all floor displays are the same. They come in different shapes and sizes, each suited for different needs.
- Standard Shelf Displays: These are the most common type. They look like a small shelving unit and are great for displaying various products in an organized way.
- Dump Bins: These are large, open bins. They are perfect for small, individually wrapped items like candy or small toys, encouraging shoppers to "dump" them into their carts.
- Pallet Displays: These are large displays that come pre-stocked on a pallet. Retailers can move them directly onto the sales floor with a forklift, making setup incredibly fast.
Here’s a quick comparison:
| Display Type | Best For | Capacity | Main Benefit |
|---|---|---|---|
| Shelf Display | Organized products (boxes, bottles) | Medium | Neat, versatile presentation. |
| Dump Bin | Small, irregular-shaped items | High | Encourages grab-and-go buys. |
| Pallet Display | High-volume, fast-moving goods | Very High | Minimal setup time for retailers. |
What are floor fixtures?
The term "floor fixtures" sounds very technical, maybe even permanent. Does it mean the same thing as a floor display6? Let's clear up any confusion with a straightforward explanation.
Floor fixtures are a wide category of retail equipment that sits on the floor to hold and present merchandise. This includes permanent structures like metal gondola shelving and wooden tables, as well as temporary units like the cardboard floor displays13](https://gifts-pack.com/how-to-make-a-corrugated-cardboard-box-stronger/)[^6]s we specialize in.

When you walk into a store, almost everything that isn't part of the building itself is a fixture. The key is understanding the difference between permanent and temporary options, as this choice has a big impact on budget, strategy, and logistics. As a product designer, knowing this difference helps you guide your clients to the right solution for their specific campaign goals.
Permanent vs. Temporary Fixtures
The main distinction comes down to material and intended lifespan.
- Permanent Fixtures: These are the workhorses of the retail world. Think of the metal gondola shelving that makes up the aisles, heavy-duty clothing racks, or wooden display tables. They are made from durable materials like steel, wood, or heavy plastic and are designed to last for years. They are a long-term investment for the retailer.
- Temporary Fixtures: This is where cardboard floor displays13](https://gifts-pack.com/how-to-make-a-corrugated-cardboard-box-stronger/)[^6]s shine. Made from corrugated paperboard, they are designed for short-term use, typically from a few weeks to a few months. They are perfect for seasonal promotions, new product launches, or any marketing campaign with a limited timeframe.
I have helped many clients save thousands of dollars by choosing a temporary cardboard display for a three-month promotion instead of a more expensive semi-permanent unit.
Here’s how they compare:
| Feature | Permanent Fixtures | Temporary Fixtures (e.g., Cardboard) |
|---|---|---|
| Material | Metal, Wood, Hard Plastic | Corrugated Cardboard, Paperboard |
| Lifespan | Years | Weeks to Months |
| Cost | High initial investment | Low cost per unit |
| Customization | Limited and expensive | Highly customizable with printing |
| Best Use | Core store layout, long-term products | Short-term promotions, new launches |
Conclusion
Ordering custom displays14 is a clear process when you follow the steps. Start with defined goals, understand the fixture types, and you will achieve great results for your brand.
-
Explore strategies for setting clear objectives that guide your display design. ↩
-
Discover creative brainstorming techniques to generate innovative display ideas. ↩
-
Understand how structural design ensures your display is functional and safe. ↩ ↩
-
Learn best practices for graphic application to enhance the visual appeal of your display. ↩
-
Find out how prototypes can help you test and refine your display design. ↩
-
Get a clear definition and understanding of the purpose of floor displays in retail. ↩ ↩ ↩
-
Discover how prototyping can help validate your design before mass production. ↩
-
Learn how understanding your target audience can shape effective display strategies. ↩ ↩
-
Explore how different retail settings influence the design and functionality of displays. ↩
-
Find out how to ensure your display design supports your overall marketing strategy. ↩
-
Learn techniques for assessing retail space to optimize display effectiveness. ↩
-
Understand the key distinctions to make informed decisions about display options. ↩
-
Explore how cardboard displays can be cost-effective and visually appealing for promotions. ↩ ↩
-
Explore how custom displays can enhance product visibility and boost sales in retail environments. ↩

One Response